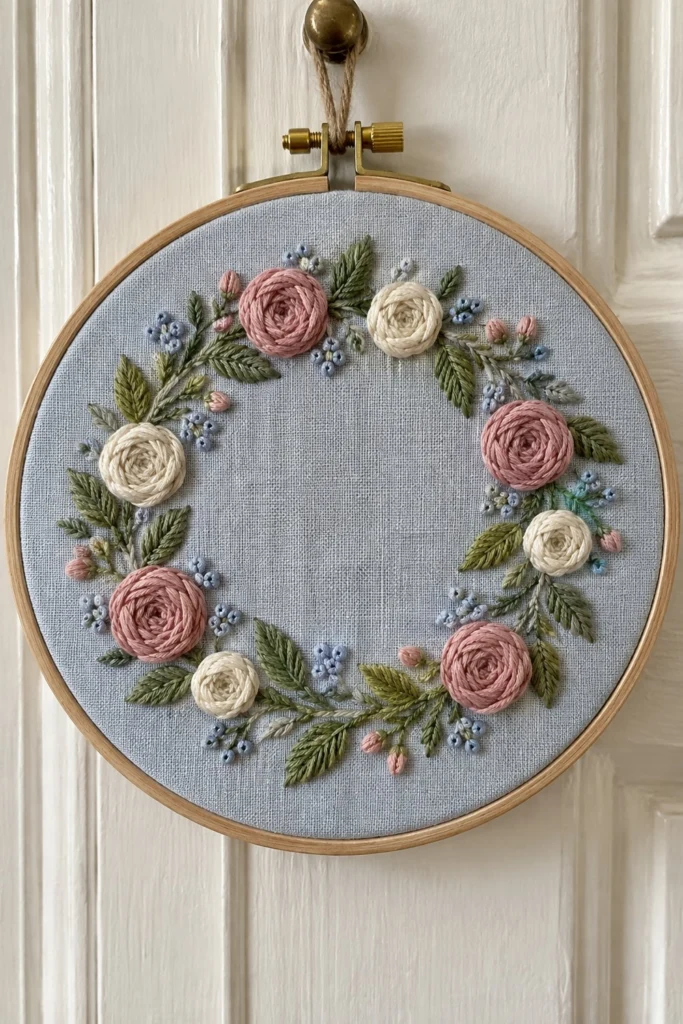
Woven wheel roses look clever, but they are really just simple weaving over five straight spokes. Nine of these roses make up this sweet floral wreath, surrounded by neat little leaves and French knots. It is a lovely project for an evening on the couch.
Quick Facts
- Skill level: Intermediate
- Finished size: 5 in (13 cm) across
- Hoop: 7 in (18 cm) wooden embroidery hoop
- Fabric: Light blue linen-cotton blend, 9 in x 9 in (23 cm x 23 cm)
- Stitches used: Stem stitch, fishbone stitch, woven wheel, French knot
- Time to make: 5 to 6 hours
What Makes This Hoop Art Special
The wreath brings together two main flower textures: dense woven wheel roses and tiny French knot buds. The leaves fan out in pairs using a neat fishbone stitch that gives them a raised center spine. The light blue background makes the pink and cream threads pop without needing a complex color scheme.
Finished Size
The embroidered wreath measures 5 in (13 cm) across inside a 7 in (18 cm) wooden hoop.
Materials You Will Need
- Light blue linen-cotton blend fabric: 1 piece cut to 9 in x 9 in (23 cm x 23 cm)
- 7 in (18 cm) wooden embroidery hoop
- Embroidery needles: Size 5 sharp embroidery needle
- Small embroidery scissors
- Water-soluble marking pen
- 5 in (13 cm) bowl or round template for tracing
| Colour Name |
DMC Number |
Strands |
Used For |
Skeins |
| Dusty Rose |
3727 |
6 |
Rose petals |
1 |
| Soft Cream |
712 |
6 |
Cream rose petals |
1 |
| Muted Green |
3011 |
3 |
Stems and leaves |
1 |
| Pale Blue |
3753 |
3 |
Filler knots and buds |
1 |
| Dusty Pink |
3761 |
3 |
Small flower buds |
1 |
Stitches Used
Stem Stitch
- Bring the needle up on the line, take a small stitch forward, and bring the needle back up just slightly to the side of your first stitch, keeping the working thread below the needle.
- Repeat, overlapping each stitch slightly to form a smooth, rope-like line.
Fishbone Stitch
- Bring the needle up at the top tip of the leaf, go down a short straight stitch straight down the center to form the spine.
- Bring the needle up at the top left edge, cross over the center spine to the right side, and go down into the fabric.
- Bring the needle up at the top right edge, cross over the center spine to the left, and go down.
- Alternate sides, working downward until the leaf shape is filled.
Woven Wheel
- Stitch 5 single straight stitches from a central point outward like the spokes of a bicycle wheel, making sure you use an odd number of spokes.
- Bring your needle up near the center point behind one spoke, then weave the needle alternately over and under the spokes without piercing the fabric.
- Continue weaving round and round until the spokes are completely covered and you have a solid rose circle, then take the needle down through the edge.
French Knot
- Bring the needle up through the fabric where you want the knot.
- Wrap the thread around the needle 2 times close to the fabric surface.
- Insert the needle back down very close to where it came up, holding the working thread taut with your non-dominant hand while you pull the stitch through to the back.
Transferring the Design
Place your 5 in (13 cm) bowl upside down in the exact center of your 9 in x 9 in (23 cm x 23 cm) light blue fabric. Trace around the rim with your water-soluble marking pen to create a 5 in (13 cm) circle guide for your wreath.
To map out the wreath details by eye, divide your circle into quarters with light pencil ticks. Place 9 rose heads evenly around the circle line: 4 dusty rose roses and 5 soft cream roses, spaced alternately. Sketch short stems connecting them and small teardrop shapes for the fishbone leaves between the roses. Add small clusters of dots for the French knot filler flowers around the outer and inner edges of the wreath. Tape your fabric to a bright window or use a light box to trace these guidelines directly onto the cloth.
💡 Designer Tip: Always draw your circle using a bowl that is 2 inches smaller than your hoop so you leave a comfortable 1 in (2.5 cm) margin of bare fabric around the entire design.
Stitching Instructions
Stems and Foliage
- Using Muted Green (DMC 3011) with 3 strands, work the curved wreath stems using the stem stitch. Follow the guidelines running in a circle beneath where the flowers will sit.
- Fill in all the leaf shapes using the fishbone stitch with 3 strands of Muted Green (DMC 3011). Stitch them in pairs pointing outward along the wreath circle.
✅ Checkpoint: You should have a complete leafy green ring with stems before you touch any of the flower threads.
Woven Wheel Roses
- Make the 9 rose centers using Dusty Rose (DMC 3727) for 5 roses and Soft Cream (DMC 712) for the remaining 4 roses.
- Use all 6 strands of floss threaded together to give the roses a thick, raised, dimensional look.
- Stitch 5 straight spokes for each rose, then weave over and under until the spokes disappear. Work your way clockwise around the wreath until all 9 roses are finished.
Flower Buds and Filler Knots
- Stitch the small rosebuds at the base of certain leaves using Dusty Pink (DMC 3761) with 3 strands in a tight satin stitch or French knot cluster.
- Add clusters of small dots around the wreath using Pale Blue (DMC 3753) with 3 strands worked as French knots. Place groups of 3 to 5 knots near the outer edges of the roses and leaves.
✅ Checkpoint: Check that every rose is tightly woven so no base fabric shows through the center of the petals.
Finishing the Hoop
- Dab your fabric with a damp cloth or rinse it gently in cool water to dissolve the blue transfer ink completely. Let the fabric dry flat on a clean towel.
- Press the embroidered piece face down on a soft towel with your iron set to a warm cotton setting to keep the stitches plump and unflattened.
- Center your finished embroidery inside the 7 in (18 cm) wooden hoop, tighten the screw at the top, and trim the excess fabric at the back to a 1 in (2.5 cm) margin. Run a gathering stitch around the raw edge of the fabric inside the back and pull it tight, or secure it with a circle of felt glued to the inside rim.
Tips and Variations
If you want a different seasonal mood, try swapping the dusty rose and soft cream for bright autumn golds and rusts, or icy blues and whites for a winter wreath. You can also center this exact same wreath design onto the corner of a linen tea towel or the front pocket of a canvas tote bag by omitting the hoop and stretching your fabric in a square slate frame instead.
FAQ
Can I use embroidery floss straight from the skein without separating it?
Yes and no. For the woven wheel roses, you need all 6 strands together to get that nice, chunky raised flower effect. For the stems, leaves, and French knots, always split your floss down to 3 strands so your stitches stay neat and delicate.
Why do my woven wheel roses look lumpy or uneven?
You probably pulled your weaving thread a little too tight, which pinches the center spokes inward. Keep your weaving tension loose and let the thread rest gently over the spokes as you go round and round.
How do I keep my linen fabric from fraying while I stitch?
Linen frays easily at the raw edges. Run a quick line of machine zigzag stitches around the 9 in square edge before you start, or dab a little liquid fray stop along the cut borders.
Happy Stitching!
I hope you enjoy stitching this sweet floral wreath as much as I did. Save this pin on Pinterest so you can find it easily when you are ready to stitch. If you make one, I would love to see it: send me a photo through the contact page.