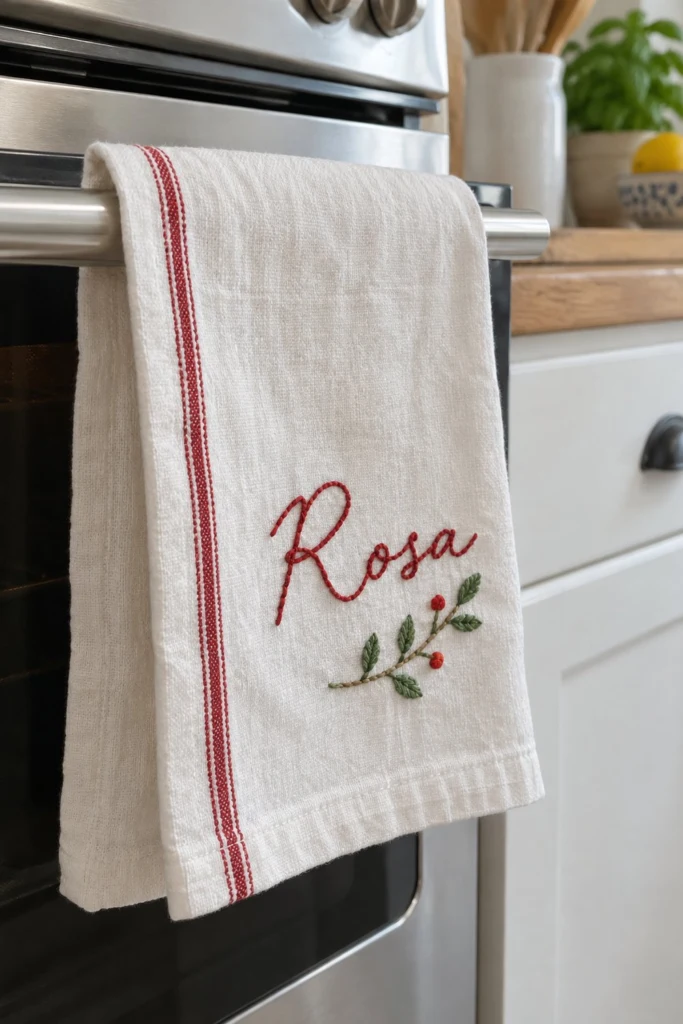
An embroidered name tea towel makes a practical kitchen accessory feel personal, and it is one of my favorite things to stitch when I need a quick gift. The bold red monogram paired with delicate green leaves and berries gives it a classic, timeless look that works in any kitchen.
Quick Facts
- Skill level: Beginner
- Finished size: 20 in x 28 in (51 cm x 71 cm) tea towel
- Hoop: 6 in (15 cm) embroidery hoop
- Fabric: Linen-cotton blend tea towel with woven red stripes
- Stitches used: Back stitch, split stitch, French knot
- Time to make: 4 to 6 hours
What Makes This Embroidered Name Tea Towel Special
- Woven red stripes: The towel already features bold red woven stripes on the left edge, which ties right into the red lettering.
- Classic script lettering: Simple back stitch and split stitch give the name a clean, hand-drawn look.
- Delicate botanical accent: A small leafy branch with French knot berries sits right beneath the name to balance the composition.
Finished Size
The embroidered design measures 5 in (13 cm) wide by 2 1/2 in (6 cm) high and is stitched onto a tea towel measuring 20 in x 28 in (51 cm x 71 cm).
Materials You Will Need
- Linen-cotton blend tea towel with red stripes, cut size 20 in x 28 in (51 cm x 71 cm)
- 6 in (15 cm) wooden embroidery hoop
- Embroidery needle, size 5 or 7 sharps
- Small embroidery scissors
- Water-soluble transfer pen
- Ruler
| Colour Name |
DMC Number |
Strands |
Used For |
Skeins |
| Christmas Red |
321 |
3 |
Lettering and berries |
1 |
| Pine Green |
989 |
3 |
Leaves and stems |
1 |
Stitches Used
Back Stitch
- Bring your needle up from the back at the start of the line.
- Take a small stitch backward and push the needle down through the fabric.
- Bring the needle up a stitch length ahead of your last stitch.
- Go back down into the exact hole where the previous stitch ended to keep the line solid.
Split Stitch
- Bring the needle up at the start of the line and take a single stitch forward.
- Bring the needle back up through the middle of that exact stitch, splitting the two strands of floss in half.
- Take the next stitch forward and split it again as you go. This creates a neat, braided line that is wonderful for curves.
French Knot
- Bring the needle up through the fabric where you want the knot.
- Wrap the floss around the needle two times, holding the tail taut with your non-working hand.
- Insert the needle back down very close to the entry hole—not the exact same hole, or the knot will slip through.
- Pull the thread gently from the back until the knot sits flat against the fabric.
Transferring the Design
Draw a straight baseline across your tea towel about 6 in (15 cm) down from the top edge and 4 in (10 cm) in from the right edge, using a ruler and a water-soluble transfer pen. Sketch the name “Rosa” in a flowing script above this baseline, making the capital letter R about 1 in (2.5 cm) tall and the lowercase letters 1/2 in (1.3 cm) tall. Below the name, draw a small horizontal stem about 3 in (8 cm) long with five paired leaves and two small round berry dots.
✅ Checkpoint: Measure your sketched name to make sure it fits comfortably within a 6 in (15 cm) circle so you can hoop your fabric easily.
Stitching Instructions
Lettering
- Thread your needle with 3 strands of Christmas Red (DMC 321).
- Work all the letters of the name using split stitch on the curves to keep the script smooth, and back stitch on any straight vertical sections.
- Keep your stitch length short, about 1/8 in (0.3 cm), so the letters turn the corners cleanly without jagged edges.
✅ Checkpoint: Check the back of your work to make sure your red thread is not carrying across large open spaces where it might show through the front of the towel.
Stems and Leaves
- Thread your needle with 3 strands of Pine Green (DMC 989).
- Stitch the central horizontal stem using a stem stitch, working from left to right.
- Fill in the paired leaves branching off the stem using a simple satin stitch or slanted straight stitches in the same green floss.
Berries
- Thread your needle with 3 strands of Christmas Red (DMC 321).
- Stitch two French knots directly onto the stem where indicated in the design, wrapping the thread twice around the needle for a nice, round berry shape.
Finishing the Hoop
- Dab the tea towel with a damp cloth to dissolve any leftover blue lines from your transfer pen, then let it dry completely.
- Lay the tea towel face down on a clean towel on your ironing board.
- Press the embroidered area gently from the back using a medium-hot iron to flatten the stitches and smooth the fabric.
Tips and Variations
- If you want to make this for someone else, you can trace any script font printed from your computer onto water-soluble paper.
- You can adapt this exact layout to fit flour sack towels, linen dinner napkins, or even canvas tote bags.
FAQ
Can I use a regular sewing thread instead of embroidery floss?
Stick with six-strand embroidery floss. Regular sewing thread is too thin and will sink into the weave of the tea towel without showing the letters clearly.
How do I stop the back of my embroidery from showing through a thin towel?
Keep your floats short on the back and trim your thread tails neatly as you go. Avoid carrying dark red thread across white spaces where shadows might peek through.
Do I have to leave the tea towel in a hoop while I stitch?
Using a 6 in (15 cm) hoop keeps the fabric taut so your letters do not pucker, but you can move the hoop as you stitch if your design sits near the edges.
Happy Stitching!
I hope you enjoy stitching this personalised tea towel as much as I did. Save this pin on Pinterest so you can find the instructions later. If you make one, I would love to see it: send me a photo through the contact page.