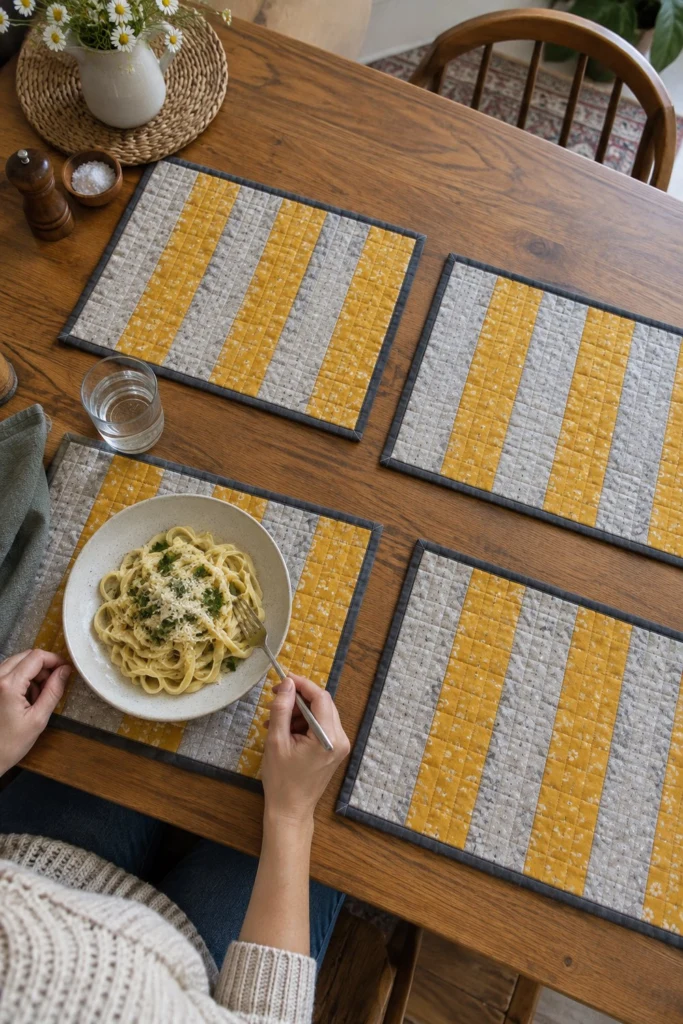
Making a set of four quilted placemats is one of the best ways to get comfortable with binding corners. By the time you finish the last one, those mitres look sharp, and you have a matching set for your dining table.
Quick Facts
Skill level: Confident Beginner
Finished size: 18 x 13 in (46 x 33 cm) per placemat
Block size: Six vertical alternating stripes
Fabric: Cotton quilting fabrics
Seam allowance: 1/4 in
Time to make: 1 weekend afternoon
What Makes This Quilted Placemats Free Pattern Special
- Alternating grey and mustard vertical stripes give a modern, clean look to the table.
- Simple grid quilting secures the layers without competing with the bold stripes.
- Four separate placemats give you plenty of practice with machine or hand-finished binding.
Finished Size
| Item |
Width |
Height |
Number of placemats |
| Placemat |
18 in (46 cm) |
13 in (33 cm) |
4 |
Fabric Requirements
| Fabric |
Used for |
Yards |
Metres |
| Grey patterned |
Stripes (3 per placemat) |
1/2 yd |
0.5 m |
| Mustard patterned |
Stripes (3 per placemat) |
1/2 yd |
0.5 m |
| Charcoal solid |
Binding |
5/8 yd |
0.6 m |
| Backing fabric |
Backing |
1 1/4 yd |
1.2 m |
| Batting |
Inner layer |
Four 17 x 22 in pieces |
Four 43 x 56 cm pieces |
Cutting Instructions
- Grey patterned fabric: Cut 1 strip 13 1/2 in x WOF; subcut into 12 pieces 3 1/2 x 13 1/2 in (9 x 34 cm).
- Mustard patterned fabric: Cut 1 strip 13 1/2 in x WOF; subcut into 12 pieces 3 1/2 x 13 1/2 in (9 x 34 cm).
- Charcoal fabric: Cut 8 strips 2 1/2 in x WOF (2 strips per placemat).
- Backing fabric: Cut four pieces 17 x 22 in (43 x 56 cm).
- Batting: Cut four pieces 17 x 22 in (43 x 56 cm).
Assembly
Placemat Top Assembly
- Lay out six vertical strips for one placemat, alternating grey and mustard: Grey, Mustard, Grey, Mustard, Grey, Mustard.
- Place adjacent strips right sides together and sew down the long edge using a 1/4 in seam allowance. Press seams open or to one side. Repeat for all six strips.
- Make four identical placemat tops.
✅ Checkpoint: Each sewn placemat top measures 18 1/2 x 13 1/2 in (47 x 34 cm) unfinished. Trim any uneven edges square.
Quilting and Binding
- Layer each backing piece wrong side up, add the batting in the middle, and place the quilted placemat top right side up on top. Pin or baste the layers together.
- Quilt straight lines through all three layers, spacing your quilting lines about 1 in apart across the entire surface of the placemat.
- Trim the backing and batting flush with the placemat top edges.
- Join your charcoal 2 1/2 in binding strips end-to-end on the diagonal to make one long continuous strip. Press the strip in half lengthwise, wrong sides together.
- Sew the binding to the front of the placemat using a 1/4 in seam allowance, mitring each corner as you turn the mitered fold at the corners.
- Fold the binding over to the back of the placemat and hand-stitch or machine-stitch it down securely. Repeat for all four placemats.
Size Variations
To make a larger table runner using the same strip dimensions, simply sew additional alternating grey and mustard strips together in a longer row.
Care Instructions
Machine wash in cold water on a gentle cycle. Tumble dry on low heat or lay flat to dry. Warm iron if needed.
FAQ
Can I use fat quarters instead of yardage?
Yes, a fat quarter measures 18 x 21 in, which is tall enough to cut your 13 1/2 in strip requirements.
Do I have to hand-sew the binding?
Not at all. You can machine-stitch the binding down to the back for durability, which is especially helpful for items that need frequent washing like placemats.
How do I get sharp mitred corners on my binding?
Stop sewing 1/4 in from the corner, backstitch, take the placemat out of the machine, fold the strip up at a 45-degree angle, and fold it back down even with the next edge before continuing.
Happy Quilting!
I hope you enjoy sewing these placemats and watching your binding corners get crisper with every single one. If you make a set for your table, please save the pin on Pinterest and send me a photo of your finished work through my contact page. I always love seeing what you create.