A strip of fabric, a length of elastic and ten minutes. A good way to learn to sew a tube and close it invisibly.
Quick Facts
- Skill level: Beginner
- Finished size: Approx. 4 in (10 cm) across when gathered
- Fabric: Velvet, cotton gingham, or satin
- Seam allowance: 1/4 in (6 mm)
- Time to make: 10 minutes
- Machine needed: Sewing machine (hand sewing works too for the final gap)
What Makes This Scrunchie Special
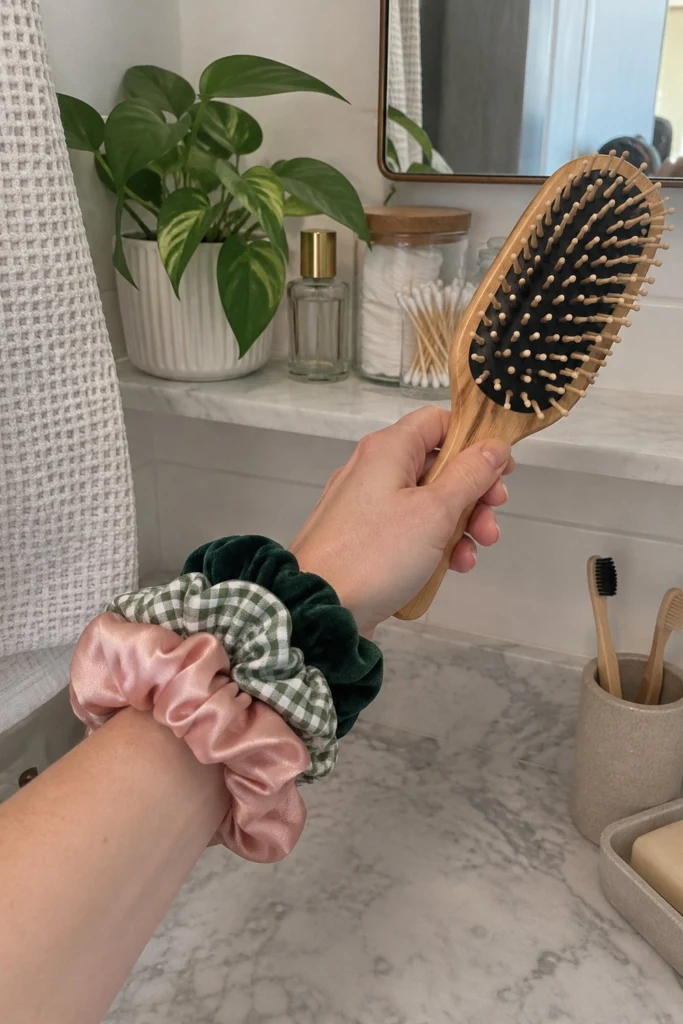
This simple scrap buster gives you a soft, hair-friendly elastic that holds its shape without pulling or snagging. You can see the plush velvet, the crisp green gingham, and the smooth satin versions stacked on the wrist in the photo, all made using the exact same dimensions. It is the fastest way to use up leftover fabric strips from your stash.
Finished Size
| Dimension |
Inches |
Centimetres |
| Finished tube width |
1 3/4 in |
4.5 cm |
| Elastic loop length |
7 in |
18 cm |
Materials You Will Need
| Material / Notion |
Amount |
Notes |
| Fabric strip |
1/8 yd (12 cm x 107 cm) |
Velvet, cotton gingham, or satin |
| Elastic (1/4 in or 6 mm wide) |
8 in (20 cm) |
Standard braided or knitted elastic |
| Matching sewing thread |
1 spool |
All-purpose polyester |
Tools:
– Sewing machine
– Fabric shears or rotary cutter and mat
– Safety pin or bodkin (for threading elastic)
– Hand sewing needle
– Iron and ironing board
Cutting List
Seam allowance is 1/4 in (6 mm) unless noted otherwise.
| Piece |
Fabric |
Cut Size W x H |
How Many |
| Fabric strip |
Velvet, gingham, or satin |
22 in x 4 in (56 cm x 10 cm) |
1 |
| Elastic |
Elastic |
8 in (20 cm) |
1 |
Before You Start
Press your fabric strip flat with an iron before cutting. If you are using a directional print or directional velvet pile, make sure the nap runs along the length of the strip so your finished scrunchie looks even all the way around.
Step-by-Step Instructions
Step 1: Fold and press the strip
Place your fabric strip on the ironing board with the wrong side facing up. Fold the long raw edges in toward the center by 1/4 in (6 mm) and press the folds flat. This step is optional, but it makes turning the tube much easier later.
Step 2: Sew the tube
Fold the fabric strip in half lengthwise with the right sides together, matching the long raw edges. Pin in place. Sew along the long raw edge using a 1/4 in (6 mm) seam allowance, starting and stopping 1 in (2.5 cm) away from each short end to leave a turning opening if you prefer, or stitch all the way down the long side and turn the tube right side out.
✅ Checkpoint: You now have a long fabric tube measuring approximately 21 1/2 in (55 cm) long by 1 3/4 in (4.5 cm) wide.
Step 3: Turn the tube right side out
Turn your fabric tube right side out. A safety pin fastened to one end and pushed through the inside channel makes this quick. Press the tube flat with the seam running down one side.
Step 4: Thread the elastic
Attach a safety pin to one end of your 8 in (20 cm) piece of elastic. Feed the safety pin through the center of the fabric tube until it comes out the other end. Keep a firm hold on the tail end of the elastic so it does not slip inside the tube.
Step 5: Join the elastic
Overlap the two ends of the elastic by 1 in (2.5 cm) to form a secure loop. Stitch across the overlap using a zigzag stitch on your sewing machine, going back and forth a few times so it holds firmly.
✅ Checkpoint: The elastic loop now measures 7 in (18 cm) around.
Step 6: Close the opening
Tuck the raw short edges of the fabric tube inside by 1/4 in (6 mm) so they meet neatly. Slip one end inside the other slightly if needed to enclose all raw edges. Close the opening using a neat ladder stitch by hand, catching both folded edges securely.
Finishing
Give your finished scrunchie a gentle pull to distribute the gathers evenly around the elastic. Press lightly with an iron on a low setting if your fabric needs a crisp finish, though most scrap fabrics look great naturally ruffled.
Size and Fabric Variations
- Oversized scrunchie: Cut your fabric strip 26 in x 6 in (66 cm x 15 cm) and use 9 in (23 cm) of elastic for a fuller, 90s-style volume.
- Skinny scrunchie: Cut your fabric strip 18 in x 2 1/2 in (46 cm x 6 cm) and use 7 in (18 cm) of 1/4 in (6 mm) elastic for a delicate, minimal look.
Care Instructions
Wash your scrunchies by hand in cool water with mild soap, or place them inside a mesh laundry bag and machine wash on a gentle cycle. Lay flat to dry.
FAQ
Can I make this without a sewing machine?
Yes. You can sew the long tube seam and close the final opening entirely by hand using a running stitch or whipstitch. It takes just a few minutes longer.
What is the best fabric for beginners?
Cotton gingham or quilting cotton is the easiest to work with because it does not stretch or slip while you sew. Velvet and satin are lovely, but pin them securely before stitching so the layers do not shift.
How much elastic overlap do I need?
Always overlap your elastic by 1 in (2.5 cm) and secure it with a wide zigzag stitch. If you only knot the elastic, it can slip loose inside the scrunchie over time.
Happy Sewing!
I hope you enjoy stitching up a whole handful of these quick scrap busters. Save this pin on Pinterest to find it easily later, and send a photo of your finished scrunchies through my contact page so I can see what you made!