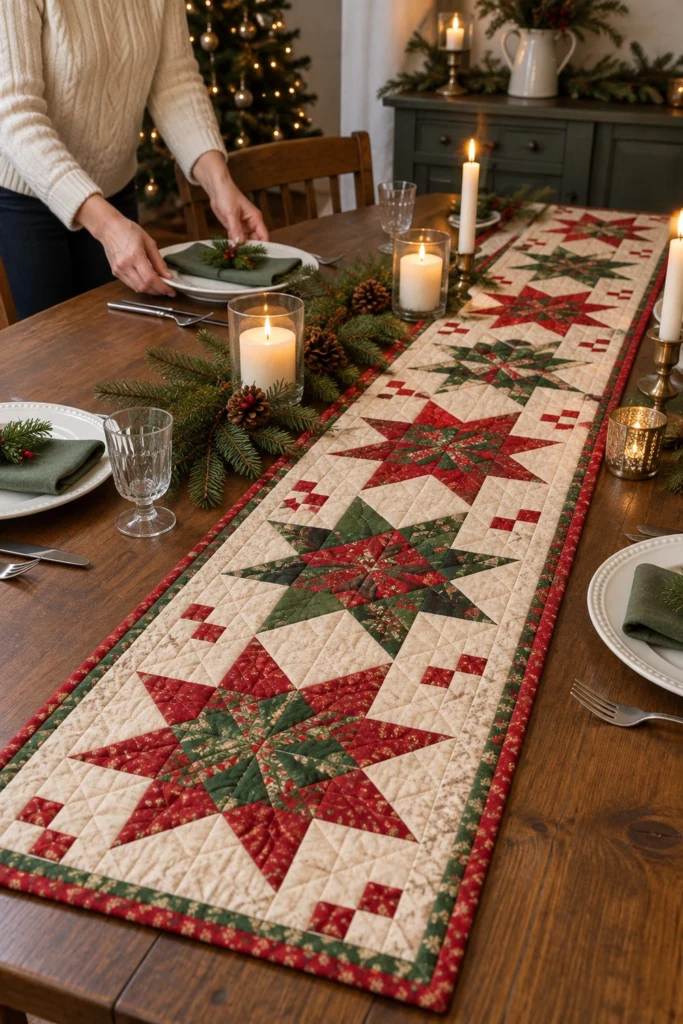
This christmas table runner brings traditional star blocks straight to the holiday dining table with a rich palette of crimson red, hunter green, and cream muslin prints. It comes together quickly in a single row of blocks framed by a narrow border, making it a satisfying project to finish before guests arrive.
Quick Facts
- Skill level: Confident Beginner
- Finished size: 14 in x 50 in (35.5 cm x 127 cm)
- Block size: 12 in x 12 in (30.5 cm x 30.5 cm) finished
- Fabric: Cotton quilting fabrics in red, green, and cream prints
- Seam allowance: 1/4 in (0.6 cm) throughout
- Time to make: A weekend afternoon
What Makes This Table Runner Special
The classic Ohio Star design shines when you alternate the star centers between red and green prints against a soft cream background. Pieced star points create crisp geometric edges without tricky inset seams. The skinny outer border in matching green print frames the runner neatly and gives you the exact fabric needed to cut your continuous binding strips from the perimeter.
Finished Size
| Item |
Block Size |
Number of Blocks (Across x Down) |
Finished Size |
| Table Runner |
12 in x 12 in (30.5 cm x 30.5 cm) |
3 x 1 |
14 in x 50 in (35.5 cm x 127 cm) |
Fabric Requirements
| Fabric |
Used For |
Yards |
Metres |
| Cream Print |
Background squares and star background units |
1 3/8 yd |
1.3 m |
| Red Print |
Star points and alternating block centers |
7/8 yd |
0.8 m |
| Green Print |
Star points, alternating block centers, and border |
1 3/8 yd |
1.3 m |
| Backing Fabric |
Quilt back |
1 3/4 yd |
1.6 m |
| Batting |
Center wadding |
1 3/4 yd |
1.6 m |
Cutting Instructions
From the Cream Print, cut:
– 1 strip 12 1/2 in x WOF (31.8 cm x WOF); subcut into 3 squares 12 1/2 in x 12 1/2 in (31.8 cm x 31.8 cm) for block backgrounds.
– 4 strips 4 1/2 in x WOF (11.4 cm x WOF); subcut into 24 squares 4 1/2 in x 4 1/2 in (11.4 cm x 11.4 cm) for half-square triangle units.
– 6 strips 2 1/2 in x WOF (6.4 cm x WOF); subcut into 36 squares 2 1/2 in x 2 1/2 in (6.4 cm x 6.4 cm) for flying geese corners.
From the Red Print, cut:
– 4 strips 4 1/2 in x WOF (11.4 cm x WOF); subcut into 24 squares 4 1/2 in x 4 1/2 in (11.4 cm x 11.4 cm) for half-square triangle units.
– 1 strip 4 1/2 in x WOF (11.4 cm x WOF); subcut into 2 squares 4 1/2 in x 4 1/2 in (11.4 cm x 11.4 cm) for star centers.
– 2 strips 2 1/2 in x WOF (6.4 cm x WOF); subcut into 12 squares 2 1/2 in x 2 1/2 in (6.4 cm x 6.4 cm) for flying geese corners.
From the Green Print, cut:
– 4 strips 4 1/2 in x WOF (11.4 cm x WOF); subcut into 24 squares 4 1/2 in x 4 1/2 in (11.4 cm x 11.4 cm) for half-square triangle units.
– 1 strip 4 1/2 in x WOF (11.4 cm x WOF); subcut into 1 square 4 1/2 in x 4 1/2 in (11.4 cm x 11.4 cm) for the center star.
– 2 strips 2 1/2 in x WOF (6.4 cm x WOF); subcut into 12 squares 2 1/2 in x 2 1/2 in (6.4 cm x 6.4 cm) for flying geese corners.
– 6 strips 2 1/2 in x WOF (6.4 cm x WOF) for the border and binding.
Assembly
Block Assembly
- Pair 12 cream 4 1/2 in (11.4 cm) squares with 12 red 4 1/2 in (11.4 cm) squares. Draw a diagonal line on the wrong side of the cream squares. Stitch 1/4 in (0.6 cm) away from both sides of the drawn line, then cut apart on the line. Press seams open and trim each half-square triangle unit to measure 4 1/2 in x 4 1/2 in (11.4 cm x 11.4 cm). Repeat with the remaining cream and green squares to make 24 green half-square triangle units.
- Construct flying geese units using the stitch-and-flip method. Place a 2 1/2 in (6.4 cm) cream square on the top left corner of a 4 1/2 in x 8 1/2 in (11.4 cm x 21.6 cm) rectangle. Stitch diagonally across the square, trim the excess seam allowance to 1/4 in (0.6 cm), and press open. Repeat on the opposite corner to finish the flying geese unit. Make 12 red-pointed geese and 12 green-pointed geese.
- Lay out each block in a 3×3 grid. Place the 4 1/2 in (11.4 cm) star center square in the middle. Arrange the half-square triangles and flying geese units around the center to form the star pattern.
- Sew the units into three horizontal rows, pressing seams toward the darker fabrics. Join the rows together, matching all seams carefully. Make three blocks total (two with red centers and star points, one with a green center and green star points, alternating them along the runner).
✅ Checkpoint: Each finished star block measures 12 1/2 in x 12 1/2 in (31.8 cm x 31.8 cm) raw edge to raw edge.
Quilt Top Assembly
- Arrange the three star blocks in a single horizontal row, alternating red and green centers. Sew the blocks together side by side using a 1/4 in (0.6 cm) seam allowance. Press seams open.
- Measure the length of the runner top. Cut two green print border strips to this length, sew them to the long sides of the runner, and press seams toward the border.
- Measure the new width of the runner including the side borders. Cut two green print border strips to this length, sew them to the top and bottom ends, and press open.
💡 Designer Tip: Pin your borders through the center as well as the ends to keep the long runner straight and prevent wavy edges.
Quilting and Binding
- Layer the backing fabric face down, place the batting on top, and center the pieced table runner top face up. Pin or baste the three layers together securely.
- Quilt along the ditch of the block seams and add simple straight-line quilting through the background squares to secure all layers. Trim the excess batting and backing flush with the quilt top.
- Take your remaining 2 1/2 in (6.4 cm) green print strips, join them end-to-end on the diagonal to create one continuous binding strip, and fold it in half lengthwise with wrong sides together.
- Sew the binding to the front of the table runner with a 1/4 in (0.6 cm) seam, miter the corners neatly, fold the binding to the back, and hand-stitch or machine-stitch it down securely.
Size Variations
- Longer Runner: Add one extra 12 in (30.5 cm) block to the row for every 12 in (30.5 cm) of added length you need for an extended dining table.
- Placemats: Make a single star block on its own with matching borders to create matching 16 in x 16 in (40.5 cm x 40.5 cm) holiday table placemats.
Care Instructions
Machine wash cold on a gentle cycle with mild detergent. Tumble dry on low heat or lay flat to dry. Touch up with a warm iron if needed to keep the points looking crisp.
FAQ
Can I use fat quarters instead of yardage for this runner?
Yes, fat quarters work wonderfully for the red and green star prints since you only need small pieces for the half-square triangles and flying geese units.
How do I keep my points from getting cut off during piecing?
Always double-check your 1/4 in seam allowance with a test scrap before sewing your star points, and stop stitching right at the intersection where the diagonal seams cross.
What is the best batting to use for a table runner?
A low-loft cotton or 80/20 cotton-poly blend batting lies flat on the table without adding too much bulk under your serving dishes.
Happy Quilting!
I hope this star table runner brings a cozy handmade touch to your holiday table this season. Save this pin on Pinterest so you can find it easily when you pull out your Christmas fabrics. If you make one, I would love to see it: send me a photo through the contact page.