Reader Favorites












Strawberry Cross Stitch Pattern (Free Mini Chart)
A mini strawberry, 15 by 17 stitches, that fits a 3 inch hoop. A good first chart: five colours and only full stitches.

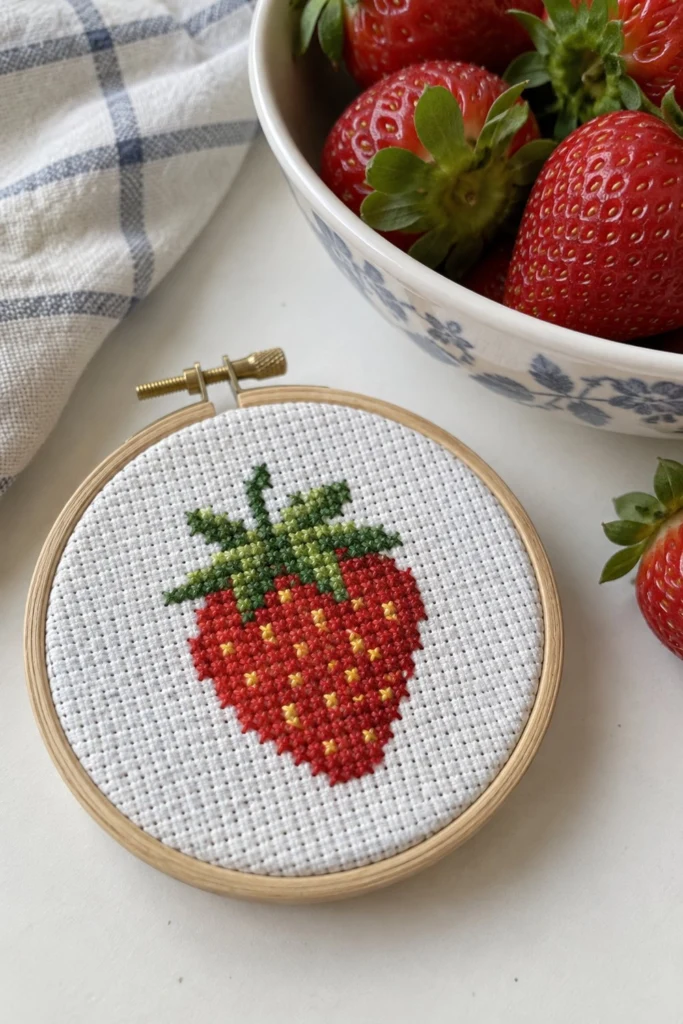
This sweet little strawberry cross stitch pattern is a quick, satisfying project that works up in just one evening. When you frame it in a small wooden hoop, it looks just right hanging in a kitchen or resting on a sunny shelf. It is a good first chart because it uses only full stitches and a small handful of colours.
Quick Facts
Skill level: Beginner
Finished size: 1 1/14 x 1 3/14 in (2.7 x 3.1 cm) on 14-count aida
Hoop: 3 in (7.5 cm) round wooden embroidery hoop
Fabric: White 14-count aida cloth
Stitches used: Full cross stitch
Time to make: 2 to 3 hours
What Makes This Strawberry Cross Stitch Pattern Special
The design features a plump red strawberry topped with leafy green calyx leaves and dotted with bright yellow seeds. Every stitch is a simple full cross stitch, which makes it easy to keep your tension even. The small 15 by 17 stitch count means you do not need to spend weeks finishing it, and it fits neatly inside a 3 in (7.5 cm) hoop with plenty of margin to spare.
Finished Size
The finished design measures 1 1/14 in wide by 1 3/14 in high (2.7 cm x 3.1 cm) when worked on 14-count aida cloth. It centers comfortably inside the 3 in (7.5 cm) wooden embroidery hoop, leaving a clean white border all the way around.
Materials You Will Need
- White 14-count aida cloth: cut to 7 in x 7 in (17.5 cm x 17.5 cm)
- 3 in (7.5 cm) round wooden embroidery hoop
- Size 24 cross stitch needle
- Embroidery scissors
- Water-soluble marking pen or pencil
| Colour name | DMC number | Strands | Used for | Skeins |
|---|---|---|---|---|
| Red | 321 | 2 | Main strawberry body | 1 |
| Christmas green | 699 | 2 | Dark leaves and stem | 1 |
| Dark garnet | 815 | 2 | Strawberry shading | 1 |
| Topaz yellow | 726 | 2 | Seeds | 1 |
| Bright chartreuse | 704 | 2 | Light leaves | 1 |
Stitches Used
Full Cross Stitch
- Bring your needle up from the back through the bottom-left hole of a grid square to the front.
- Push the needle down through the top-right hole to make a diagonal slash.
- Bring the needle up through the bottom-right hole and push it down through the top-left hole to cross over the first stitch.
- Keep the top leg of every cross stitch sloping in the exact same direction for a neat finish.
Transferring the Design
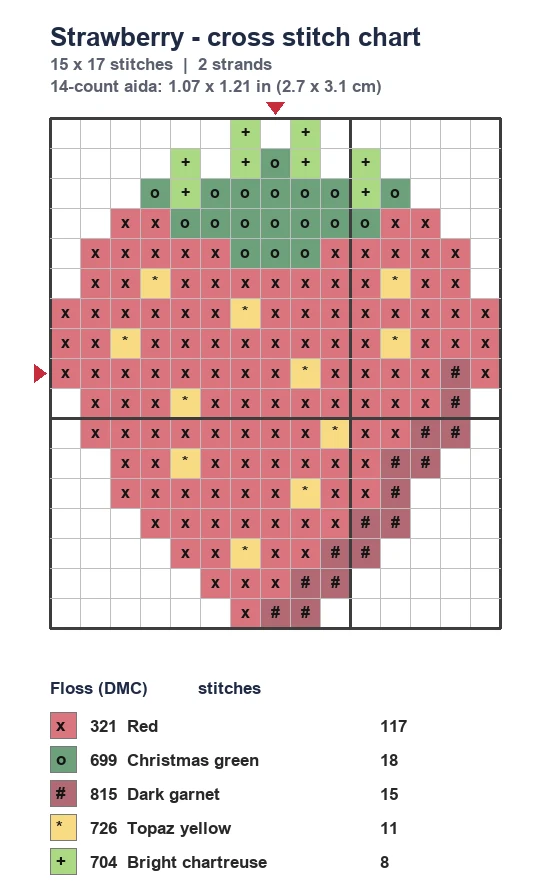
The design is 15 stitches wide by 17 stitches high. Because aida cloth has a visible grid of woven squares, you do not need a transfer pen. Find the center of your 7 in x 7 in (17.5 cm x 17.5 cm) aida square by folding it gently in half horizontally and vertically, then finger-pressing a small crease. Match that exact center point on your fabric to the center of the chart above (which is row 9 vertically and column 8 horizontally). Count your aida squares outward from that center hole to place your very first stitch.
Stitching Instructions
1. The Strawberry Body and Shading
Start with DMC 321 Red using 2 strands. Work the central body of the strawberry using full cross stitches following the chart above. Next, fill in the darker shading areas near the base and sides using DMC 815 Dark garnet with 2 strands.
✅ Checkpoint: Make sure all 117 red stitches and 15 dark garnet stitches sit snugly in the lower portion of the design before moving on to the seeds.
2. The Seeds
Switch to DMC 726 Topaz yellow using 2 strands. Stitch the 11 scattered seed crosses directly onto the red body of the strawberry, following the placements shown in the chart above.
✅ Checkpoint: Check that your yellow seeds are distributed evenly across the red body and do not bunch up in one corner.
3. The Leaves and Stem
Thread your needle with DMC 699 Christmas green using 2 strands for the darker leaves, then switch to DMC 704 Bright chartreuse using 2 strands for the lighter leaf highlights at the top of the strawberry. Complete the 18 green stitches and 8 chartreuse stitches that form the stem and calyx.
✅ Checkpoint: Verify that all 169 total stitches are complete and that no stray threads show on the back.
Finishing the Hoop
Once your stitching is complete, press the aida cloth face down on a clean towel using a warm iron to flatten any creases. Place the inner ring of your 3 in (7.5 cm) wooden hoop on a flat surface, center your stitched strawberry face up over the ring, and press the outer ring down over it. Tighten the brass screw at the top while gently pulling the edges of the aida cloth so the fabric stays taut and drum-tight. Trim the excess aida cloth around the back, leaving a 1/2 in (1.3 cm) margin. Whipstitch a circle of matching thread through the raw edges on the back and pull it tight to enclose them neatly.
Tips and Variations
If you want to use this pattern on something other than hoop art, try stitching it directly onto the pocket of a plain canvas tote bag or in the corner of a linen tea towel. Just remember to use waste canvas if your fabric does not have a natural woven grid.
FAQ
Can I use 18-count aida instead of 14-count?
Yes, but your finished strawberry will turn out slightly smaller, measuring about 5/6 in x 17/18 in (2.1 cm x 2.4 cm).
Do I need an embroidery hoop while stitching?
A hoop helps keep your aida cloth drum-tight, which makes your cross stitches much more even and prevents the fabric from puckering.
How many strands of embroidery floss should I use?
Always use 2 strands of DMC floss separated from the 6-strand skein for 14-count aida.
Happy Stitching!
I hope you enjoy stitching this sweet little strawberry as much as I did. Save this pin on Pinterest so you can find it easily later. If you make one, I would love to see it: send me a photo through the contact page.
- Vera
📄 Your free PDF pattern
⏳ Preparing your free PDF… 30s
Like this one? Save it for later.