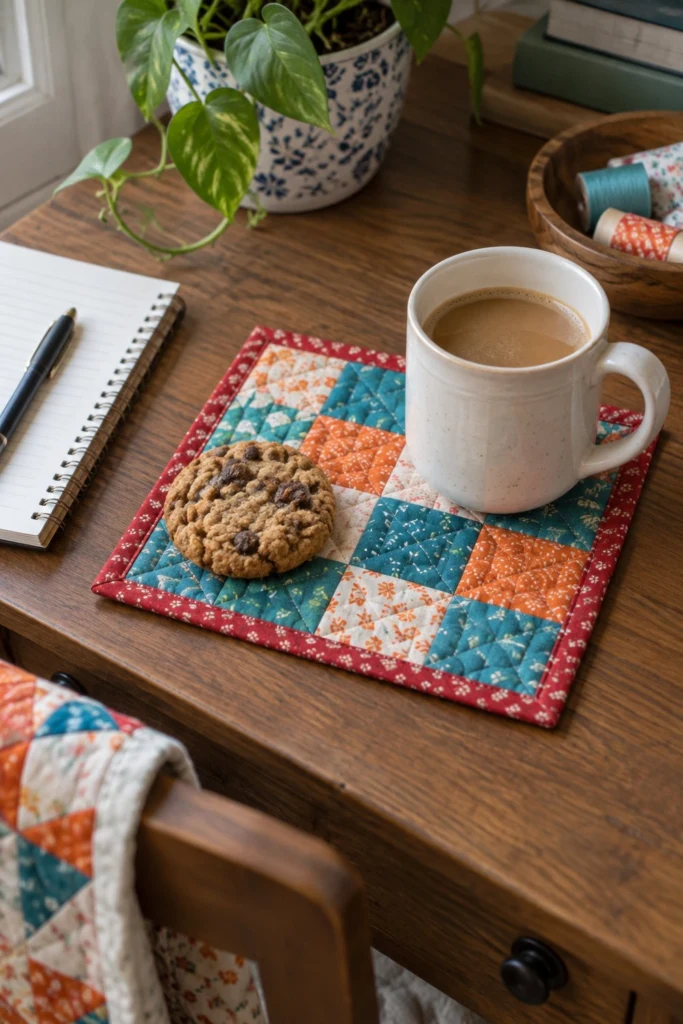
This little patchwork mug rug is a wonderful project when you want the joy of quilting without clearing off a big table or committing to weeks of stitching. Made with scraps of teal and orange prints, it gives you a cozy spot for your coffee and a cookie while you work on your notes, and it is a straightforward way to practice your binding on a small scale.
Quick Facts
- Skill level: Beginner
- Finished size: 9 x 9 in (23 x 23 cm)
- Block size: 3 in finished (3 1/2 in unfinished)
- Fabric: Teal and orange cotton prints, red print for binding
- Seam allowance: 1/4 in
- Time to make: 2 to 3 hours
What Makes This Mug Rug Special
- Scrap Friendly: The nine small squares use up bits and pieces from your scrap bin, letting you mix and match your favorite teal and orange prints.
- Quilted Texture: Straight-line quilting through the squares gives it a neat, traditional look and keeps the batting flat.
- Simple Binding: Because the piece is so small, sewing on the double-fold binding by hand or machine is quick and manageable.
Finished Size
| Item |
Size (inches) |
Size (centimetres) |
| Finished Mug Rug |
9 x 9 in |
23 x 23 cm |
| Block Size |
3 x 3 in |
7.5 x 7.5 cm |
| Block Layout |
3 blocks across x 3 blocks down |
3 blocks across x 3 blocks down |
Fabric Requirements
| Fabric |
Used For |
Yards |
Metres |
| Teal Prints (5) |
Quilt Center Squares |
1/8 yd |
0.15 m |
| Orange Prints (4) |
Quilt Center Squares |
1/8 yd |
0.15 m |
| Red Print |
Binding |
1/4 yd |
0.25 m |
| Neutral Solid |
Backing |
Fat Quarter (18 x 21 in) |
0.45 x 0.55 m |
| Cotton Batting |
Inner Layer |
11 x 11 in |
28 x 28 cm |
Cutting Instructions
- Teal Prints: Cut 5 squares 3 1/2 x 3 1/2 in (9 x 9 cm).
- Orange Prints: Cut 4 squares 3 1/2 x 3 1/2 in (9 x 9 cm).
- Red Print: Cut 2 strips 2 1/2 in x WOF (6.5 cm x WOF) for the binding.
- Backing: Cut 1 square 11 x 11 in (28 x 28 cm).
- Batting: Cut 1 square 11 x 11 in (28 x 28 cm).
Assembly
Block Assembly
- Arrange your nine 3 1/2 x 3 1/2 in (9 x 9 cm) squares in a three-by-three grid on your table, alternating teal and orange prints so that the center square is teal and the four corners are also teal, with orange squares in the remaining four spots.
- Pick up the top row and place the second square right sides together onto the first square. Sew along the right edge using a 1/4 in seam allowance. Attach the third square to the other side of the second square in the same way. Press the seams open or to one side.
- Repeat this process for the middle row and the bottom row, pressing the seams in alternating directions so they nest neatly when you join the rows.
✅ Checkpoint: Each sewn row measures 3 1/2 x 9 1/2 in (9 x 24 cm) unfinished.
Quilt Top Assembly
- Place row one and row two right sides together, nesting the vertical seams. Pin in place and sew across the long edge using a 1/4 in seam allowance.
- Attach row three to the bottom of row two in the same manner. Press all horizontal seams flat.
✅ Checkpoint: The sewn quilt top measures 9 1/2 x 9 1/2 in (24 x 24 cm) unfinished.
Quilting and Binding
- Lay the backing square face down on a flat surface, place the 11 x 11 in (28 x 28 cm) batting on top, and center your quilted top face up over the batting to make a little quilt sandwich. Pin the layers together or use curved basting safety pins.
- Quilt straight lines through the center of each square diagonally or parallel to the seams.
- Trim the backing and batting square so they match the edges of your quilted top.
- Join your two red binding strips end-to-end to create one continuous strip, press it in half lengthwise with wrong sides together, and sew it to the front of your mug rug with a 1/4 in seam. Fold the binding over to the back and hand-stitch it down securely.
Size Variations
- Slightly Larger Mug Rug: Add a fourth row and column of blocks to make a 12 x 12 in (30.5 x 30.5 cm) snack mat, cutting a total of 16 squares (3 1/2 in each).
Care Instructions
Wash your mug rug by hand or on a gentle machine cycle in cool water with mild soap. Lay flat to dry and press with a warm iron if needed.
FAQ
Can I use fabric scraps instead of cutting new pieces?
Yes, this project is designed for scraps as long as your bits are large enough to yield a 3 1/2 x 3 1/2 in square.
Do I need to use quilting cotton?
Quilting cotton works best because it presses crisply and has a stable weave, but lightweight linen or cotton-blends will also work well.
How do I join the binding strips cleanly?
Overlap the two strip ends at a 90-degree angle, sew diagonally from corner to corner, and trim the excess seam allowance before pressing it flat.
Happy Quilting!
I hope you enjoy stitching this little project for your tea table or desk. Save the pin for this free quilt pattern on Pinterest so you can find it whenever you need a quick afternoon project, and send a photo of your finished piece through my contact page so I can see the fabrics you chose.