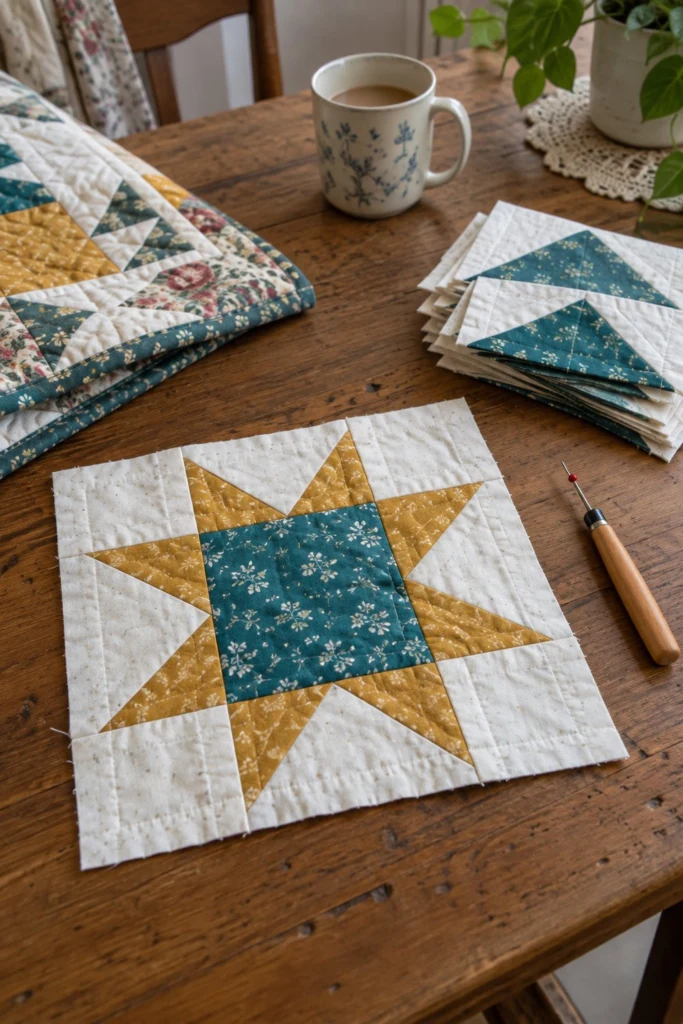
This sawtooth star quilt block is one of my absolute favourites to sew when I want a project that comes together quickly but still has plenty of traditional charm. The block pairs a rich teal print in the centre with warm mustard flying geese and crisp cream background squares, creating a bold star that pops right off the table. Adding this to a larger sampler quilt or sewing it up on its own to display is a lovely way to practice your points.
Quick Facts
- Skill level: Confident beginner
- Finished size: 12 in x 12 in (30.5 cm x 30.5 cm)
- Block size: 12 in (30.5 cm) finished, 12 1/2 in (31.8 cm) unfinished
- Fabric: 100% quilting cotton
- Seam allowance: 1/4 in (0.6 cm) throughout
- Time to make: 1 hour
What Makes This Quilt Block Special
- Uses the four-at-a-time flying geese method so you save time and skip the paper piecing.
- Features generous scrap-friendly cuts that work wonderfully with fat quarters or yardage from your stash.
- The high-contrast teal and mustard combination gives a modern nod to antique star quilts.
Finished Size
| Item |
Inches |
Centimetres |
| Finished Block |
12 in x 12 in |
30.5 cm x 30.5 cm |
| Unfinished Block |
12 1/2 in x 12 1/2 in |
31.8 cm x 31.8 cm |
Fabric Requirements
| Fabric |
Used For |
Yards |
Metres (42 in WOF) |
| Cream Background |
Corners and flying geese base |
1/4 yd |
0.25 m |
| Mustard Print |
Flying geese points |
1/8 yd |
0.15 m |
| Teal Print |
Centre square |
1/4 yd (or 6 1/2 in scrap) |
0.25 m |
Cutting Instructions
- Cream Background:
- Cut one strip 7 1/4 in x WOF (18.4 cm x WOF); subcut into one 7 1/4 in x 7 1/4 in square (18.4 cm x 18.4 cm) for the flying geese.
- Cut one strip 3 1/2 in x WOF (8.9 cm x WOF); subcut into four 3 1/2 in x 3 1/2 in squares (8.9 cm x 8.9 cm) for the corners.
- Mustard Print:
- Cut one strip 3 7/8 in x WOF (9.8 cm x WOF); subcut into four 3 7/8 in x 3 7/8 in squares (9.8 cm x 9.8 cm) for the flying geese.
- Teal Print:
- Cut one square 6 1/2 in x 6 1/2 in (16.5 cm x 16.5 cm) for the block centre.
Assembly
Block Assembly
- Make the Flying Geese (Four-at-a-Time Method): Take your 7 1/4 in (18.4 cm) cream square and place it right sides up on your cutting mat. Place two 3 7/8 in (9.8 cm) mustard squares diagonally across the cream square, touching in the middle with opposite corners overlapping slightly.
- Draw a faint diagonal line from corner to corner right across the mustard squares. Sew a seam 1/4 in (0.6 cm) away from the drawn line on both sides.
- Cut along the drawn line right down the middle to create two heart-shaped units. Press the seams toward the dark fabric.
-
Take one of those units, place a remaining 3 7/8 in (9.8 cm) mustard square in the bottom acute corner, and draw a new diagonal line. Sew 1/4 in (0.6 cm) away on both sides of the line, then cut down the middle. Press seams open or toward the dark fabric. You now have four perfect flying geese units measuring 3 1/2 in x 6 1/2 in (8.9 cm x 16.5 cm) unfinished.
✅ Checkpoint: Each flying geese unit measures 3 1/2 in x 6 1/2 in (8.9 cm x 16.5 cm) unfinished.
-
Arrange the Block Rows: Lay out your pieces on a flat surface in three rows.
- Row 1: One 3 1/2 in (8.9 cm) cream corner square, one flying geese unit (pointed up), and one 3 1/2 in (8.9 cm) cream corner square.
- Row 2: One flying geese unit (pointed left), the 6 1/2 in (16.5 cm) teal centre square, and one flying geese unit (pointed right).
- Row 3: One 3 1/2 in (8.9 cm) cream corner square, one flying geese unit (pointed down), and one 3 1/2 in (8.9 cm) cream corner square.
- Sew the pieces of each row together using a 1/4 in (0.6 cm) seam allowance. Press the seams in Rows 1 and 3 toward the corner squares, and press the seams in Row 2 away from the centre square so they nest nicely.
- Sew the three rows together, nesting the seams carefully at the intersections. Press the final seams open to reduce bulk.
✅ Checkpoint: Your finished sawtooth star block measures 12 1/2 in x 12 1/2 in (31.8 cm x 31.8 cm) unfinished.
Quilting and Binding
If you are turning this single block into a mini quilt or mug rug, cut a piece of backing fabric and batting to 14 in x 14 in (35.6 cm x 35.6 cm). Layer your backing, batting, and block, then baste them together. Quilt along the ditch of the star points or add simple diagonal grid lines across the background. Trim the excess batting and backing flush with the block edges, and bind with 2 1/2 in (6.4 cm) binding strips cut from your leftover fabric.
Size Variations
- Nine-Patch Star Quilt: Make twelve identical 12 in (30.5 cm) blocks and sew them in a 3 x 4 grid with sashing to create a generous lap quilt measuring about 42 in x 54 in (106.7 cm x 137.2 cm).
- Pillow Cover: Add two 2 in (5.1 cm) wide borders all the way around the block to bring it to a 16 in (40.6 cm) square, perfect for a standard throw pillow form.
Care Instructions
Wash your finished block or small quilt in cool water on a gentle cycle with mild detergent. Tumble dry on low heat or lay flat to dry to keep the crisp points looking sharp.
FAQ
Can I use pre-cut 5-inch charm squares for this block?
The centre square needs to be 6 1/2 in (16.5 cm), so standard 5 in charm squares are a bit too small for the centre. However, you can use charm squares for the four 3 1/2 in corner squares if you trim them down.
Why do we cut a 7 1/4 inch square for the flying geese?
Cutting a 7 1/4 in (18.4 cm) square paired with 3 7/8 in (9.8 cm) squares is the magic formula for the four-at-a-time no-waste flying geese method, ensuring you get four exact units without any awkward trimming of bias edges.
How do I keep my star points from getting cut off?
Always double-check that your 1/4 in (0.6 cm) seam allowance is accurate before sewing the rows together. When joining rows, drop your needle down right in the “intersection” where the diagonal star points cross to keep those sharp tips intact.
Happy Quilting!
I hope you enjoy stitching up this classic block as much as I do. If you make one, I would love to see your fabric choices—feel free to send a photo of your finished piece through my contact page, and be sure to save this pin on Pinterest so you can find it later!