Reader Favorites












Red Mushroom Cross Stitch Pattern (Free Chart)
A spotty toadstool in 184 stitches. Stitch the red cap first and the spots fall into place.

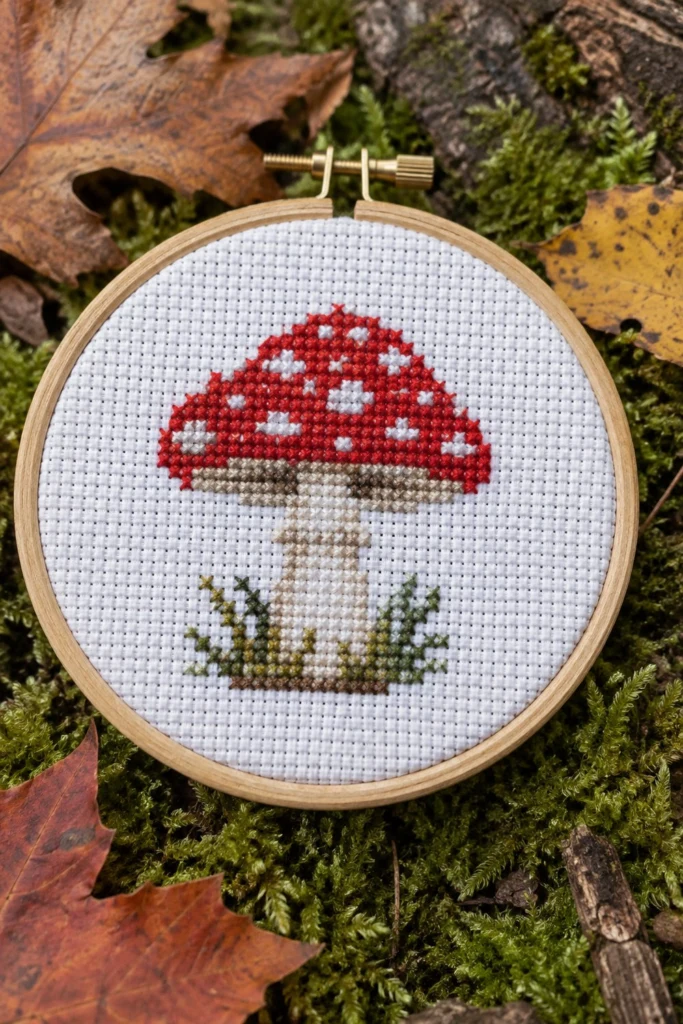
This little toadstool brings a bit of woodland colour straight to your sewing table. It is stitched on white aida with a bright red cap, white spots, and green grass at the base, all framed neatly in a wooden hoop. It is a quick and satisfying project if you want a cheerful piece of nature to hang on your wall or prop on a shelf.
Quick Facts
- Skill level: Beginner
- Finished size: 1.14 x 1.14 in (2.9 x 2.9 cm)
- Hoop: 4 in (10 cm) wooden embroidery hoop
- Fabric: 14-count white aida cloth, cut to 8 x 8 in (20.5 x 20.5 cm)
- Stitches used: Full cross stitch
- Time to make: 2 to 3 hours
What Makes This Cross Stitch Special
- Simple grid: The entire design uses just 184 full cross stitches, making it easy to count and keep your place.
- Classic toadstool colours: The bright red cap and crisp white spots stand out sharply against the neutral stem and green grass.
- Compact size: At just 16 by 16 stitches, it fits comfortably inside a small hoop without taking days to finish.
Finished Size
The stitched mushroom measures 1.14 x 1.14 in (2.9 x 2.9 cm), which is 16 stitches wide by 16 stitches high on 14-count aida. It is centered inside a 4 in (10 cm) wooden embroidery hoop.
Materials You Will Need
- Fabric: 14-count white aida cloth, cut to 8 x 8 in (20.5 x 20.5 cm)
- Hoop: 4 in (10 cm) wooden embroidery hoop
- Needle: Size 24 embroidery needle
- Scissors: Small embroidery scissors
- Transfer tool: Water-soluble marking pen (optional, for centering)
| Colour Name | DMC Number | Strands | Used For | Skeins |
|---|---|---|---|---|
| Red | 321 | 2 | Cap body | 1 |
| Snow white | B5200 | 2 | Cap spots | 1 |
| Cream | 712 | 2 | Stem | 1 |
| Dark garnet | 815 | 2 | Cap shading | 1 |
| Bright chartreuse | 704 | 2 | Grass | 1 |
| Beige grey | 644 | 2 | Stem shading | 1 |
| Christmas green | 699 | 2 | Grass shading | 1 |
Stitches Used
Full Cross Stitch
- Bring your needle up from the back at the bottom-left corner of a square (hole 1).
- Go down through the top-right corner (hole 2) to form a diagonal stitch sloping upward to the right.
- Bring your needle up at the bottom-right corner (hole 3).
- Go down through the top-left corner (hole 4) to cross over the first diagonal and complete the “X”.
Transferring the Design
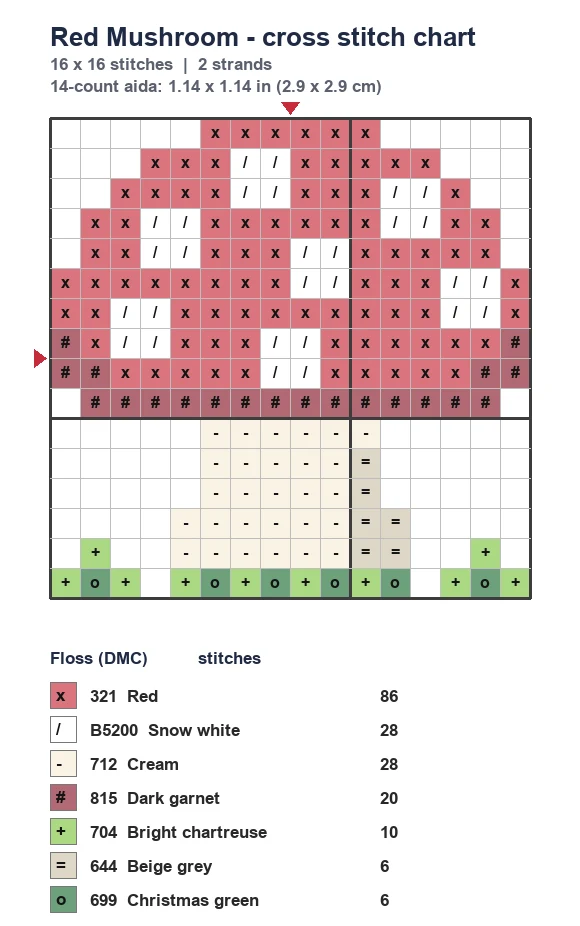
Because this is a counted cross stitch project, you do not need to trace lines onto the fabric. Instead, find the exact center of your 8 x 8 in (20.5 x 20.5 cm) aida square by folding it gently in half horizontally and vertically, then pinching the center point. Use the chart above as your guide, counting outward from that center square. The mushroom spans 16 grid squares horizontally and 16 grid squares vertically.
Stitching Instructions
Stitches and Floss
Use 2 strands of embroidery floss for all stitches on 14-count aida. Separate your embroidery floss from the 6-strand skein and take 2 individual strands at a time.
Stitching Order
- Stem: Stitch the stem and gill area using DMC 712 Cream and DMC 644 Beige grey, working from the top gills down to the base of the stalk.
- Cap: Stitch the main cap body using DMC 321 Red, leaving open spaces for the spots according to the chart above. Add the darker shading at the bottom edge and under the cap using DMC 815 Dark garnet.
- Spots: Fill in the cap spots using DMC B5200 Snow white where indicated on the chart.
- Grass: Stitch the grass blades at the base of the mushroom using DMC 704 Bright chartreuse and DMC 699 Christmas green.
✅ Checkpoint: Check your count against the chart above to make sure the cap spots line up properly before you finish stitching the red background.
Finishing the Hoop
Once all 184 stitches are complete, thread your needle and weave in any loose ends on the back of the work. If you used a marking pen, rinse the fabric gently in cool water and lay it flat on a clean towel to dry. Press the aida face down on a soft towel with a warm iron to smooth out any creases. Place the stitched fabric inside the 4 in (10 cm) wooden hoop, pull the edges taut, and tighten the screw at the top. Trim the excess aida fabric around the back, leaving a 1/2 in (1.3 cm) margin, and gather the raw edges with a running stitch pulled tight.
Tips and Variations
- Change the background: If you prefer a darker look, try stitching this same design on a scrap of black or navy 14-count aida.
- Make an ornament: Instead of a wall hanging, finish the piece in a 3 in mini embroidery hoop and add a loop of ribbon at the top for a holiday tree ornament.
FAQ
Can I use 11-count aida instead of 14-count?
Yes, but your finished mushroom will be slightly larger (about 1.45 inches square) and you will need to use 3 strands of floss instead of 2 for good coverage.
Do I need an embroidery hoop while I stitch?
Using a hoop keeps your aida fabric drum-tight, which makes your cross stitches even and prevents the fabric from puckering as you pull the thread.
How do I start without a knot on the back?
Leave a short tail of thread on the back of your fabric and stitch over the tail with your first few stitches to anchor it securely.
Happy Stitching!
I hope you enjoy stitching this little woodland toadstool as much as I did. Save this pin on Pinterest so you can find the free chart later. If you make one, I would love to see it: send me a photo through the contact page.
- Vera
📄 Your free PDF pattern
⏳ Preparing your free PDF… 30s
Like this one? Save it for later.