Reader Favorites












Christmas Tree Cross Stitch Ornament Pattern (Free Chart)
A tiny tree that becomes an ornament in an evening. Make one for every friend who stitches.

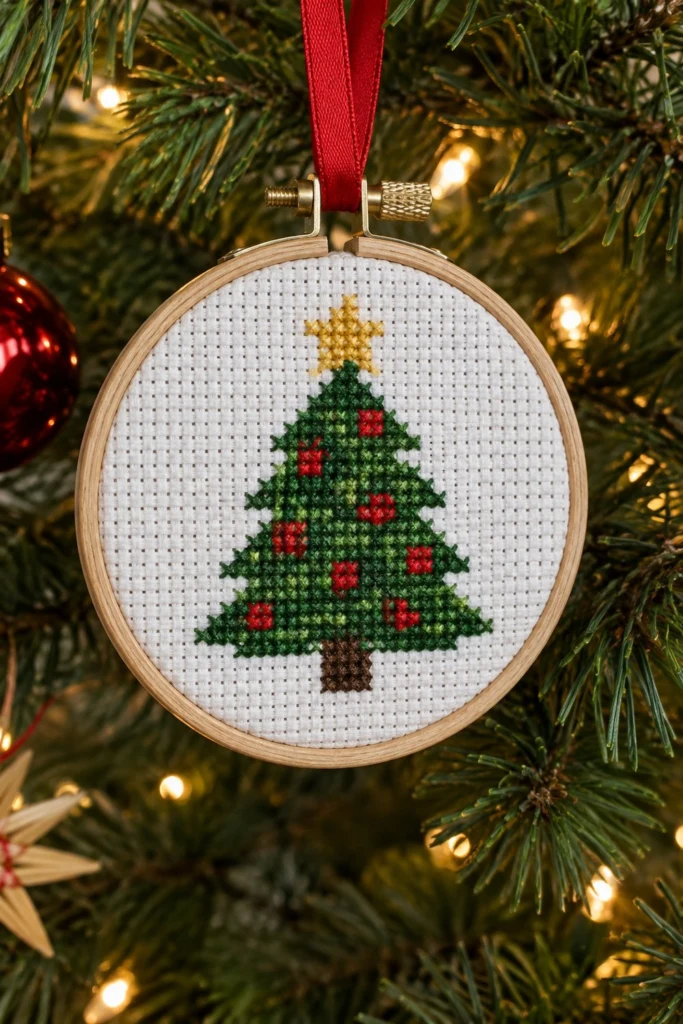
A tiny tree that becomes an ornament in an evening. Make one for every friend who stitches.
Quick Facts
- Skill level: Beginner
- Finished size: 1.07 x 1.29 in (2.7 x 3.3 cm) on 14-count aida
- Hoop: 4 in (10 cm) round wooden embroidery hoop
- Fabric: White 14-count aida, cut to 8 x 8 in (20 x 20 cm)
- Stitches used: Full cross stitch
- Time to make: 2 to 3 hours
What Makes This Cross Stitch Ornament Special
This little project turns a handful of leftover floss into a festive decoration that hangs right on your Christmas tree. The design features a classic pine tree with a bright star on top and red ornaments scattered across the green branches, all neatly framed in a small wooden hoop with a red satin ribbon hanger. It makes a wonderful gift for fellow stitchers, and because it is small, you can easily finish it in a single evening while watching a holiday movie.
Finished Size
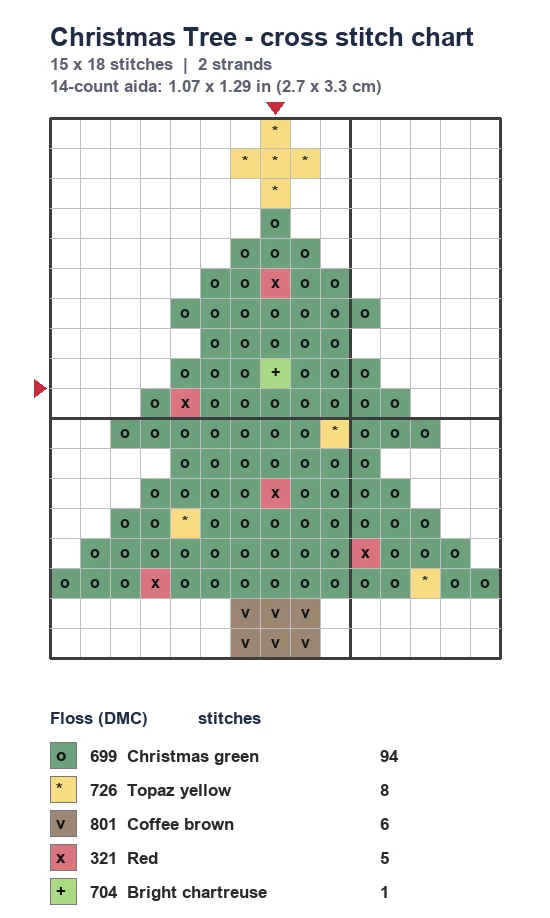
The stitched Christmas tree design measures 1.07 in (2.7 cm) wide by 1.29 in (3.3 cm) high, which is 15 stitches wide by 18 stitches high on 14-count aida. The wooden embroidery hoop measures 4 in (10 cm) across, leaving a nice wide white margin of aida cloth all the way around the motif.
Materials You Will Need
- White 14-count aida fabric: cut to 8 x 8 in (20 x 20 cm)
- 4 in (10 cm) round wooden embroidery hoop
- Size 24 cross stitch needle
- Embroidery scissors
- Red satin ribbon: 10 in (25.5 cm) long and 3/8 in (1 cm) wide for hanging
- Cardboard circle and felt scrap for finishing the back (optional)
| Colour Name | DMC Number | Strands | Used For | Skeins |
|---|---|---|---|---|
| Christmas Green | DMC 699 | 2 | Tree branches and foliage | 1 |
| Topaz Yellow | DMC 726 | 2 | Star on top of the tree | 1 |
| Coffee Brown | DMC 801 | 2 | Tree trunk | 1 |
| Red | DMC 321 | 2 | Ornaments on the tree | 1 |
| Bright Chartreuse | DMC 704 | 2 | Tree highlight stitch | 1 |
Stitches Used
Cross Stitch
- Bring your needle up from the back through the bottom-left corner of an aida square, then down through the top-right corner to form a diagonal stitch sloping one way.
- Bring your needle up through the bottom-right corner and down through the top-left corner to cross over the first stitch and complete the “X”.
- Keep all your top stitches leaning in the exact same direction so the finished tree looks neat and uniform.
Transferring the Design
Because aida fabric has a rigid grid of holes, you do not need a transfer pen. Instead, find the center of your 8 x 8 in (20 x 20 cm) aida square by folding it in half vertically and horizontally, then finger-pressing a small crease. The very center stitch of the chart sits right at this intersection. Count 7 stitches to the left and 9 stitches up from the center to locate the bottom-left corner of the tree trunk, and begin stitching from there using the chart above as your guide.
Stitching Instructions
Tree Trunk
- Thread your needle with 2 strands of Coffee Brown (DMC 801).
- Stitch the 6 full cross stitches that form the small rectangular trunk at the base of the tree.
✅ Checkpoint: You should have a solid brown block of 6 stitches, 2 stitches wide by 3 stitches high, centered at the bottom of the tree.
Tree Foliage and Ornaments
- Thread your needle with 2 strands of Christmas Green (DMC 699) and fill in the 94 full cross stitches that make up the layered triangle shape of the pine tree, leaving empty spaces where the ornaments go.
- Switch to 2 strands of Red (DMC 321) to stitch the 5 scattered red ornament crosses nestled among the green branches.
- Switch to 2 strands of Bright Chartreuse (DMC 704) and place 1 single highlight cross stitch inside the green foliage area as shown on the chart above.
✅ Checkpoint: Your tree body is now completely filled in with green, punctuated by 5 red ornaments and 1 bright chartreuse stitch.
Tree Star
- Thread your needle with 2 strands of Topaz Yellow (DMC 726).
- Stitch the 8 yellow cross stitches that form the star perched right on the very top point of the tree.
✅ Checkpoint: A bright yellow star sits directly above the topmost green tip of the tree, completing all 114 stitches of the design.
Finishing the Hoop
Loosen the screw on your 4 in (10 cm) wooden hoop and separate the inner and outer rings. Center your stitched aida cloth over the inner ring, making sure the tree is straight, then press the outer ring down over the fabric and tighten the metal screw at the top. Pull the edges of the aida gently in all directions so the fabric is drum-tight in the hoop. Trim the excess aida cloth around the back, leaving a 1/2 in (1.3 cm) margin. Run a gathering stitch all the way around the raw edge of the fabric, pull it tight to gather the excess behind the hoop, and knot the thread securely. Tie your 10 in (25.5 cm) red satin ribbon securely around the brass adjustment screw at the top, leaving a loop for hanging on your Christmas tree.
Tips and Variations
- If you want to make a matching set, stitch another ornament on cream-coloured aida using the exact same DMC floss numbers.
- You can also omit the wooden hoop entirely, cut the finished aida down to a 3 x 3 in (7.5 x 7.5 cm) square, and sew it onto the front of a holiday linen gift bag.
FAQ
Can I use 3 or 4 strands of embroidery floss on 14-count aida?
Stick to 2 strands for cross stitch on 14-count aida. Two strands give you good coverage while still letting the individual “X” shapes look crisp and defined.
How do I wash the aida if I get a mark on it?
If you get a smudge on your fabric, take the aida out of the hoop, dip it in lukewarm water with a tiny drop of mild dish soap, rinse gently without wringing, and press it face down on a clean towel while still damp.
Do I need a backing on the back of my hoop ornament?
It is optional, but tracing a 4 in (10 cm) circle onto a piece of thin white felt and whipstitching it to the gathered fabric in the back gives your ornament a clean, professional finish.
Happy Stitching!
I hope this little Christmas tree ornament brings a bit of handmade cheer to your holiday season. Save this pin on Pinterest so you can find the pattern again easily. If you make one, I would love to see it: send me a photo through the contact page.
- Vera
📄 Your free PDF pattern
⏳ Preparing your free PDF… 30s
Like this one? Save it for later.