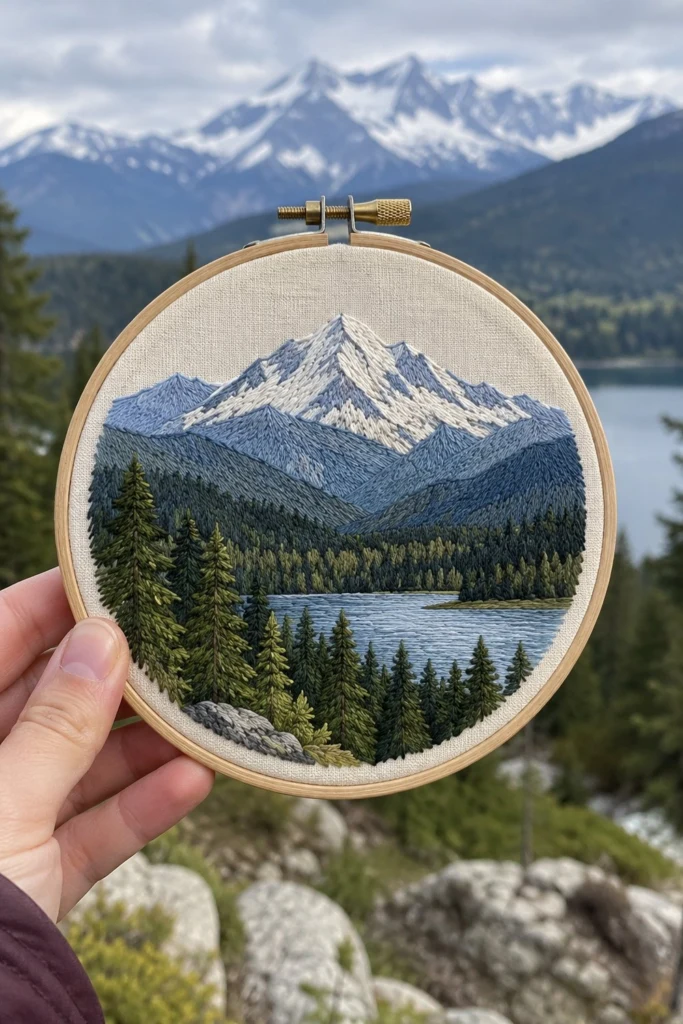
Layered mountains in long-and-short stitch with a stand of pines at the front. The colour changes do the work.
Quick Facts
- Skill level: Intermediate
- Finished size: 5 in (13 cm) diameter
- Hoop: 6 in (15 cm) wood embroidery hoop
- Fabric: Off-white linen, cut 10 in x 10 in (25.5 cm x 25.5 cm)
- Stitches used: Long and short stitch, satin stitch, straight stitch
- Time to make: 12 to 15 hours
What Makes This Hoop Art Special
I love how the depth in this design comes entirely from the floss colours rather than heavy marking. By stacking muted blues for the distant peaks and deep, forest greens for the tall pines at the edge of the lake, the piece builds real distance on a flat piece of fabric. The dense stitching fills every gap, giving the mountains a rich, solid texture that looks just like a misty morning view.
Finished Size
The embroidered mountain scene measures 5 in (13 cm) across, perfectly framed inside a 6 in (15 cm) round wood embroidery hoop with a 1/2 in (1.3 cm) margin of plain linen showing all the way around the edge.
Materials You Will Need
- Off-white linen fabric: cut 1 oz, 10 in x 10 in (25.5 cm x 25.5 cm)
- 6 in (15 cm) wood embroidery hoop
- Embroidery needles: Crewel needles size 5 and 7
- Sharp embroidery scissors
- Water-soluble transfer pen
- DMC embroidery floss:
| Colour name |
DMC number |
Strands |
Used for |
Skeins |
| Snow White |
Blanc |
2 |
Mountain highlights |
1 |
| Pale Ice Blue |
3753 |
2 |
Distant sky and high ridges |
1 |
| Slate Blue |
931 |
2 |
Mid-distance peaks |
1 |
| Deep Navy Blue |
930 |
2 |
Dark mountain shadows |
1 |
| Light Olive Green |
3052 |
2 |
Background pine canopy |
1 |
| Forest Green |
3818 |
2 |
Foreground pine trees |
1 |
| Dark Green |
936 |
2 |
Pine tree shadows |
1 |
| Soft Blue |
3761 |
2 |
Lake water |
1 |
| Grey |
647 |
2 |
Foreground rocks |
1 |
Stitches Used
Long and Short Stitch
- Work a row of alternating long and short straight stitches along the top edge of your shape.
- Stitch the next row right up through the spaces left by the first row, blending the threads.
- Continue down the shape, switching to your next colour shade halfway through to create a smooth gradient.
Satin Stitch
- Bring your needle up on one edge of the shape and take it down straight across to the opposite edge.
- Bring the needle back up right next to your first starting point, keeping the threads parallel and close together.
- Pull gently so the thread sits flat without puckering the linen fabric.
Straight Stitch
- Bring the needle up from the back of the linen at your starting point.
- Insert the needle back down at your ending point to make a single, clean line of the exact length you need.
Transferring the Design
Draw the design directly onto the center of your 10 in x 10 in (25.5 cm x 25.5 cm) off-white linen using a water-soluble transfer pen. Place your fabric over the pattern source on a bright window or light pad.
Center a 5 in (13 cm) circle lightly in the middle of your fabric. The base of the lake sits 1 1/2 in (3.8 cm) up from the bottom edge of the circle, and the tallest mountain peak reaches up to 1/2 in (1.3 cm) below the top edge of the circle. Draw the horizon line for the lake, the triangular shapes for the foreground pines, and the jagged ridge lines for the mountains.
Stitching Instructions
1. The Sky and Distant Peaks
Stitch the sky and the highest mountain ridges first. Use 2 strands of Pale Ice Blue (3753) for the upper sky area around the peaks using long and short stitch. Fill the highest snowy mountain caps using 2 strands of Snow White (Blanc) in satin stitch, following the sharp angles of the stone. Add shading to the upper ridges using 2 strands of Slate Blue (931).
✅ Checkpoint: Your upper peaks should look sharp and bright against the pale blue sky before you start working downward.
2. The Mid-Distance Mountains
Work down the mountain layers one by one. Use 2 strands of Slate Blue (931) for the middle ranges, then transition to 2 strands of Deep Navy Blue (930) as the mountains get closer to the tree line. Blend the long and short stitches where the blue shades meet so the ridges look natural and misty.
3. The Background Forest and Lake
Stitch the dense band of background trees behind the lake using 2 strands of Light Olive Green (3052) with short straight stitches. Below the trees, fill the lake area using 2 strands of Soft Blue (3761) in horizontal satin stitches that run side to side across the water.
💡 Designer Tip: Keep your lake stitches loose and even so the water looks flat and calm against the dark tree line.
4. Foreground Pine Trees and Rocks
Stitch the large foreground pine trees on the left and right sides using 2 strands of Forest Green (3818) and Dark Green (936). Layer the straight stitches closely to build thick, textured branches that overlap the lake edge. Finally, stitch the grey rocks at the bottom left corner using 2 strands of Grey (647) in short, overlapping satin stitches.
Finishing the Hoop
When all your stitching is complete, submerge the linen in lukewarm water for 10 minutes to dissolve the blue transfer pen lines completely. Lay the fabric flat on a clean towel until it is damp-dry, then press it face down on a padded surface with a warm iron. Place your finished embroidery back into the 6 in (15 cm) wood hoop, pull the linen taut so the fabric grain stays straight, and trim the excess fabric at the back leaving a 1/2 in (1.3 cm) margin to glue or gather down.
Tips and Variations
If you want to stitch this design onto something other than a wall hanging, you can skip the wooden hoop entirely and stitch the mountain scene directly onto the pocket of a canvas tote bag or the corner of a linen tea towel using a stabilizer on the back.
FAQ
Can I use 3 strands of floss instead of 2?
Stick to 2 strands throughout this piece. Because the mountains and trees overlap in many layers, 2 strands keep the shading smooth and prevent the fabric from getting too bulky.
How do I keep my long and short stitches from looking choppy?
Make sure your alternating stitches vary slightly in length, and let your second row of thread pierce directly between the stitches of the first row to blur the color lines.
What is the best way to frame the piece in the hoop?
Center your stitched design carefully in the inner hoop ring before tightening the metal screw at the top, and tug the fabric edges evenly so the grain lines stay squared up.
Happy Stitching!
I hope you enjoy stitching these layered mountain peaks and bringing this quiet landscape to life in your hoop. Save this pattern pin on Pinterest to find it easily later. If you make one, I would love to see it: send me a photo through the contact page.