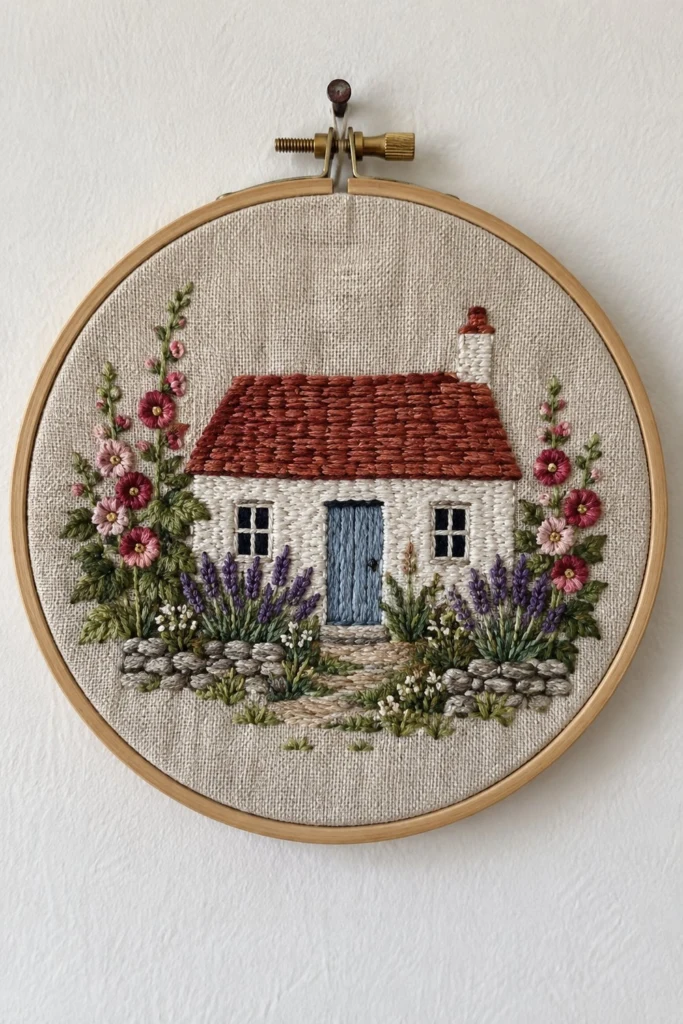
This little cottage embroidery brings back memories of walks past quiet stone-walled gardens in the countryside. The scene features a cozy white house with a terracotta roof, a blue door, and bright hollyhocks reaching up the sides. It uses basic stitches like back stitch and French knots, so you can build up the details without any fuss.
Quick Facts
- Skill level: Beginner to intermediate
- Finished size: 5 in (13 cm) wide by 4 in (10 cm) high
- Hoop: 6 in (15 cm) round wooden embroidery hoop
- Fabric: Natural linen, cut to 10 in x 10 in (25 cm x 25 cm)
- Stitches used: Back stitch, satin stitch, French knot, lazy daisy, straight stitch
- Time to make: 6 to 8 hours
What Makes This Hoop Art Special
Every part of the design has a purpose. The stone wall uses textured straight stitches in shades of grey, while the roof has rows of overlapping satin stitches that give it a tiled look. The hollyhocks frame the house with clusters of French knots and lazy daisy petals in rich pink and burgundy tones.
Finished Size
The embroidered cottage design measures 5 in (13 cm) wide by 4 in (10 cm) high and fits comfortably inside a 6 in (15 cm) round wooden embroidery hoop with a 1/2 in (1.3 cm) margin all around.
Materials You Will Need
- Natural linen fabric: 1 piece cut to 10 in x 10 in (25 cm x 25 cm)
- 6 in (15 cm) round wooden embroidery hoop
- Embroidery needles: Size 5 embroidery needles with a sharp point and long eye
- Embroidery scissors with fine tips
- Water-soluble transfer pen
- DMC stranded cotton embroidery floss:
- White | DMC Blanc | 2 strands | House walls, window frames, small flowers | 1 skein
- Terracotta Red | DMC 3830 | 3 strands | Roof tiles, chimney | 1 skein
- Dusty Blue | DMC 931 | 2 strands | Front door | 1 skein
- Charcoal Black | DMC 3799 | 2 strands | Window panes, door handle, stonework outlines | 1 skein
- Slate Grey | DMC 642 | 2 strands | Stone wall | 1 skein
- Light Grey | DMC 644 | 2 strands | Stone wall highlights | 1 skein
- Deep Burgundy | DMC 814 | 2 strands | Hollyhock flower centers | 1 skein
- Rose Pink | DMC 3350 | 2 strands | Hollyhock petals | 1 skein
- Soft Pink | DMC 3354 | 2 strands | Hollyhock bud highlights | 1 skein
- Olive Green | DMC 3011 | 2 strands | Stems, leaves, foliage | 2 skeins
- Light Sage | DMC 3012 | 2 strands | Leaf highlights | 1 skein
- Lavender Purple | DMC 3743 | 2 strands | Lavender bushes | 1 skein
Stitches Used
Back Stitch
- Bring your needle up from the back at point 1, go down at point 2, then bring it up one stitch length ahead at point 3.
- Go back down into the exact hole where your previous stitch ended at point 1.
- Repeat along your drawn lines to create a solid, continuous outline.
Satin Stitch
- Bring the needle up at one edge of your shape and go down straight across to the opposite edge.
- Come back up right next to your starting hole and cross over again, keeping the threads parallel and packed closely together.
- Do not pull the thread too tight, or the fabric will pucker.
French Knot
- Bring the needle up through the fabric where you want the knot.
- Wrap the thread around the needle two times close to the fabric surface.
- Insert the needle back down very close to your starting hole while holding the tail of the thread taut with your non-dominant hand, then pull the needle through to the back.
Lazy Daisy
- Bring the needle up at the base of the petal and make a loop with the thread on the front of the fabric.
- Insert the needle back down right next to where it came up, leaving the loop loose.
- Bring the needle up a short distance away at the tip of the petal, catching the loop, and pull gently. Anchor the loop with a tiny stitch over the top.
Transferring the Design
Center your 10 in x 10 in (25 cm x 25 cm) linen fabric over the design. The house sits in the middle, measuring 3 1/2 in (9 cm) wide and 2 1/2 in (6.5 cm) high including the roof. The stone wall runs across the bottom, spanning 4 in (10 cm) wide and sitting 1 in (2.5 cm) up from the bottom edge of the finished circle. The tall hollyhock stem on the left reaches 4 1/2 in (11.5 cm) high, starting near the bottom stone wall and stretching toward the top left. Trace the house outlines, windows, door, stone wall, and flower stems onto the linen using your water-soluble transfer pen.
💡 Designer Tip: Hold your linen and the design up against a bright sunny window to trace the lines clearly without straining your eyes.
Stitching Instructions
1. The Cottage Walls and Windows
- Stitch the main walls of the house using White (DMC Blanc) with 2 strands in straight rows of back stitch, filling the wall area so the linen texture shows through softly.
- Outline the windows and crossbars using Charcoal Black (DMC 3799) with 2 strands in back stitch. Fill the window glass panes with solid satin stitch in the same Charcoal Black.
2. The Roof and Chimney
- Stitch the terracotta roof using Terracotta Red (DMC 3830) with 3 strands. Work horizontal rows of small overlapping satin stitches to mimic clay roof tiles.
- Add the chimney on the right side of the roof using Terracotta Red in satin stitch, with a narrow white cap in White (DMC Blanc).
3. The Front Door
- Stitch the central front door using Dusty Blue (DMC 931) with 2 strands in vertical satin stitch. Add a tiny dot in Charcoal Black (DMC 3799) for the door handle.
4. The Stone Wall
- Stitch the stones at the base of the house using Slate Grey (DMC 642) and Light Grey (DMC 644) with 2 strands. Use small padded satin stitches and straight stitches for individual stones, outlining them with Charcoal Black (DMC 3799) back stitch to give them dimension.
5. Hollyhocks and Garden Flowers
- Stitch the tall stems and leaves using Olive Green (DMC 3011) and Light Sage (DMC 3012) with 2 strands in stem stitch and lazy daisy for the leaves.
- Form the hollyhock flower petals using Rose Pink (DMC 3350) and Soft Pink (DMC 3354) with 2 strands in lazy daisy loops, clustering them thickly along the upper stems.
- Add French knot centers to each flower using Deep Burgundy (DMC 814) with 2 strands.
✅ Checkpoint: Step back and check your flower clusters. The left hollyhock should stretch tall past the roofline, while the right side balances it with shorter flower spikes and small white blossoms.
6. Lavender Bushes
- Stitch the lavender bushes flanking the path using Lavender Purple (DMC 3743) with 2 strands, using vertical French knots grouped closely together on short Olive Green stems.
- Add tiny white filler flowers along the stone wall using White (DMC Blanc) in French knots.
Finishing the Hoop
- Once all your stitching is complete, dab the fabric with a damp cloth to dissolve any leftover blue transfer ink. Let it dry completely.
- Press the embroidered linen face down on a soft towel with a warm iron so the stitches keep their loft.
- Mount the fabric back into the 6 in (15 cm) wooden hoop, pulling the edges evenly until the fabric is drum-tight.
- Trim the excess fabric around the back, leaving a 1 in (2.5 cm) margin, and run a gathering stitch through the raw edge, pulling it tight to secure the back.
Tips and Variations
If you want a different look, try stitching the cottage walls in a soft yellow linen with pale grey slate roofing. You can also stitch this design onto the pocket of a plain canvas tote bag by omitting the hoop steps and securing the fabric in a smaller square hoop while you work.
FAQ
Can I use embroidery floss straight from the skein without separating it?
Always separate your floss into individual strands before stitching. Using all six strands at once makes the thread too thick and bulky for detailed work like window frames and flower petals.
What is the best way to keep my fabric from puckering in the hoop?
Make sure your linen is stretched drum-tight in the hoop before you start stitching, and avoid pulling your working thread too tight when making satin stitches.
Can I wash the finished embroidery?
Yes, you can wash your finished piece by hand in cool water with a mild soap if it gets dirty, but avoid scrubbing the stitches. Roll it in a towel to remove excess water and press dry from the back.
Happy Stitching!
I hope this little cottage brings a touch of calm to your stitching corner. Save this pin on Pinterest so you can find it easily when you are ready to start. If you make one, I would love to see it: send me a photo through the contact page.