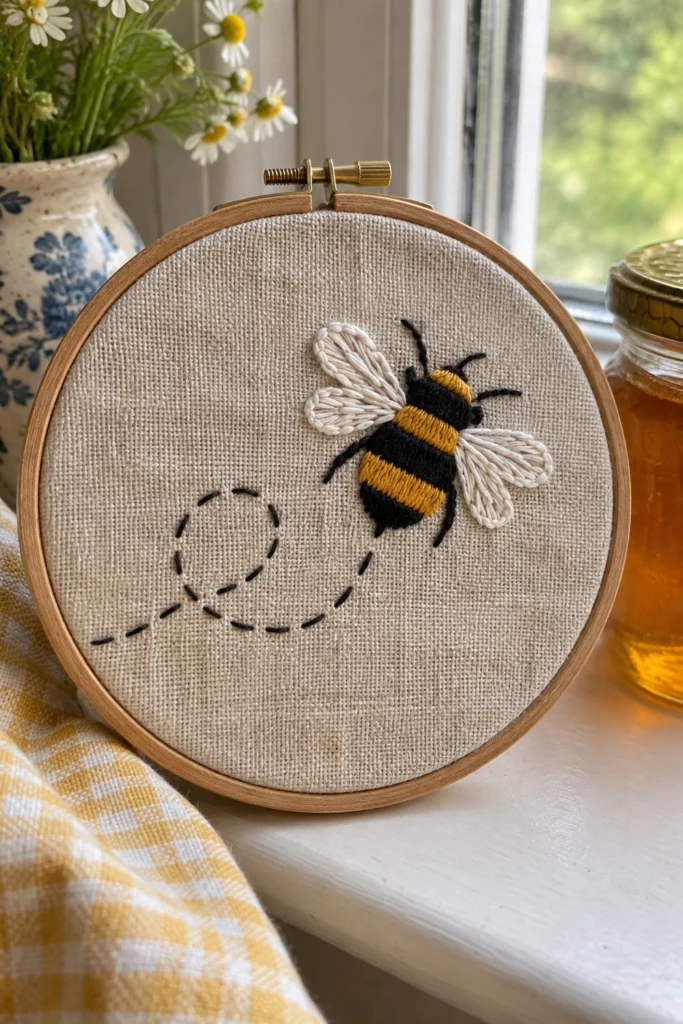
Here is how I stitch this little fat bee in my sewing room. It is a quick, happy project for a sunny afternoon, worked in simple satin stitch and lazy daisy loops on plain linen.
Quick Facts
Skill level: Beginner
Finished size: 3 in by 2 in (7.5 cm by 5 cm) design on 5 in (12.5 cm) hoop
Hoop: 5 in (12.5 cm) wooden embroidery hoop
Fabric: Natural linen, cut 9 in by 9 in (23 cm by 23 cm)
Stitches used: Satin stitch, lazy daisy stitch, running stitch
Time to make: 2 to 3 hours
What Makes This Hoop Art Special
I love this pattern because you get to practice solid satin stitch without committing to a giant piece. The bee is plump and friendly, with textured lazy daisy wings that catch the light, and a stitched flight path that loops across the fabric like a handwritten signature. It sits right in the middle of your hoop, leaving plenty of natural linen showing around the edges for a clean, modern look.
Finished Size
The finished embroidery design measures 3 in wide by 2 in high (7.5 cm by 5 cm) and fits comfortably inside a 5 in (12.5 cm) wooden embroidery hoop with a 1 in (2.5 cm) margin of plain linen all the way around.
Materials You Will Need
- Natural linen fabric, cut 9 in by 9 in (23 cm by 23 cm)
- 5 in (12.5 cm) wooden embroidery hoop
- Embroidery needle size 5 or 7
- Small embroidery scissors
- Water-soluble transfer pen or pencil
| Colour name |
DMC number |
strands |
used for |
skeins |
| Golden Yellow |
DMC 3820 |
3 strands |
Bee body stripes |
2 |
| Black |
DMC 310 |
3 strands |
Bee body stripes, head, legs, antenna, flight path |
2 |
| White |
DMC White |
3 strands |
Wings |
2 |
Stitches Used
Satin Stitch
- Bring your needle up at one edge of the shape and down at the opposite edge to lay a single straight stitch across the width.
- Come back up right next to your starting point, keeping the threads parallel and touching.
- Repeat this back-and-forth motion until the entire shape is filled with a smooth, solid block of thread.
Lazy Daisy Stitch
- Bring your needle up through the fabric at the base of the petal loop, then go back down in the exact same spot or one thread away, leaving a small loop of thread on top.
- Bring the needle up a short distance away along the length of the loop, catching the loop under the needle point.
- Pull the thread gently down to form a rounded petal shape, then anchor the tip with a tiny tacking stitch over the thread.
Running Stitch
- Bring your needle up from the back, then push it back down a short distance away to make a single straight stitch on the front.
- Leave an equal space on the back before bringing the needle up again for the next stitch.
- Keep your stitch length and spacing even all along the line.
Transferring the Design
Center your 9 in by 9 in (23 cm by 23 cm) piece of natural linen on a sunny window or light pad, place the inside ring of your 5 in (12.5 cm) hoop over it to frame the workspace, and draw the design directly onto the fabric with your water-soluble pen.
Draw the bee body starting 1 1/2 in (3.8 cm) in from the right edge and 1 3/4 in (4.5 cm) down from the top. The body is an oval measuring 1 1/2 in long by 3/4 in wide (3.8 cm by 1.9 cm), angled diagonally. Add the four curved wing loops overlapping the top and right sides of the body. Sketch the dotted flight path curving down and to the left in a loose loop, starting from the lower left side of the bee and ending 1 1/2 in (3.8 cm) from the left frame edge.
Stitching Instructions
1. Flight Path
Using 3 strands of Black (DMC 310), work a neat running stitch along the curved dotted line from left to right. Keep your stitches about 1/8 in (0.3 cm) long with matching gaps between them.
✅ Checkpoint: Your flight path should form a smooth, looping trail that leads right up to the bottom-left corner of where the bee will sit.
2. Bee Body Stripes
Thread your needle with 3 strands of Golden Yellow (DMC 3820) and fill the two yellow stripe sections on the lower-middle part of the oval body using satin stitch. Next, switch to 3 strands of Black (DMC 310) and fill the top stripe, the bottom tail tip, and the rounded head section with satin stitches running in the same parallel direction.
✅ Checkpoint: The black and yellow satin stitches should lie flat and smooth right next to each other without any fabric showing through between the stripes.
3. Bee Details: Legs, Antennae, and Head Outline
Using 3 strands of Black (DMC 310), add short straight stitches for the two front legs extending down from the body, two antennae poking up from the head, and tiny wing anchor lines where the wings meet the body.
4. Wings
Using 3 strands of White (DMC White), stitch the four wings using lazy daisy loops. Work two larger loops on the top left and two slightly smaller loops on the right side, anchoring each petal tip securely with a tiny straight stitch at the edge.
✅ Checkpoint: All four wings should radiate outward from the central black-and-yellow body, looking light and full.
Finishing the Hoop
Daub your fabric with a damp cloth to dissolve any leftover blue transfer lines, then let it dry completely. Lay the piece face down on a clean towel and press it gently with a warm iron on the back. Place the inner wooden hoop on a flat surface, center your stitched linen over it, press the outer hoop down over the fabric, and tighten the brass screw at the top while pulling the linen edges taut so the fabric is drum-tight. Trim the excess linen on the back to a 1/2 in (1.3 cm) margin, fold the raw edges inward, and run a gathering stitch around the perimeter to pull it flat against the back of the hoop.
Tips and Variations
If you want to make a matching set, try stitching a second bee flying in the opposite direction on another 5 in (12.5 cm) hoop. You can also work this exact pattern on the corner of a plain linen tea towel or the pocket of a denim jacket by skipping the hoop entirely during stitching and framing it in a hoop only when you are done.
FAQ
Can I use embroidery floss straight from the skein without separating the strands?
No, always pull three individual strands from the six-strand floss skein. Using all six strands at once makes the stitches too thick and bulky to lie flat on the linen.
How do I keep my satin stitches from looking loose or messy?
Make sure your fabric is pulled drum-tight in the hoop before you start stitching, and avoid pulling your working thread too hard, which puckers the linen. Just pull it snugly until the thread lies flat against the fabric surface.
What is the best way to secure my thread ends on the back?
Run your needle under 3 or 4 existing stitches on the back of the work to anchor the thread securely without making bulky knots that might show through the woven linen from the front.
Happy Stitching!
I hope your little bee turns out bright and sweet. Save this pin on Pinterest so you can find it later. If you make one, I would love to see it: send me a photo through the contact page.