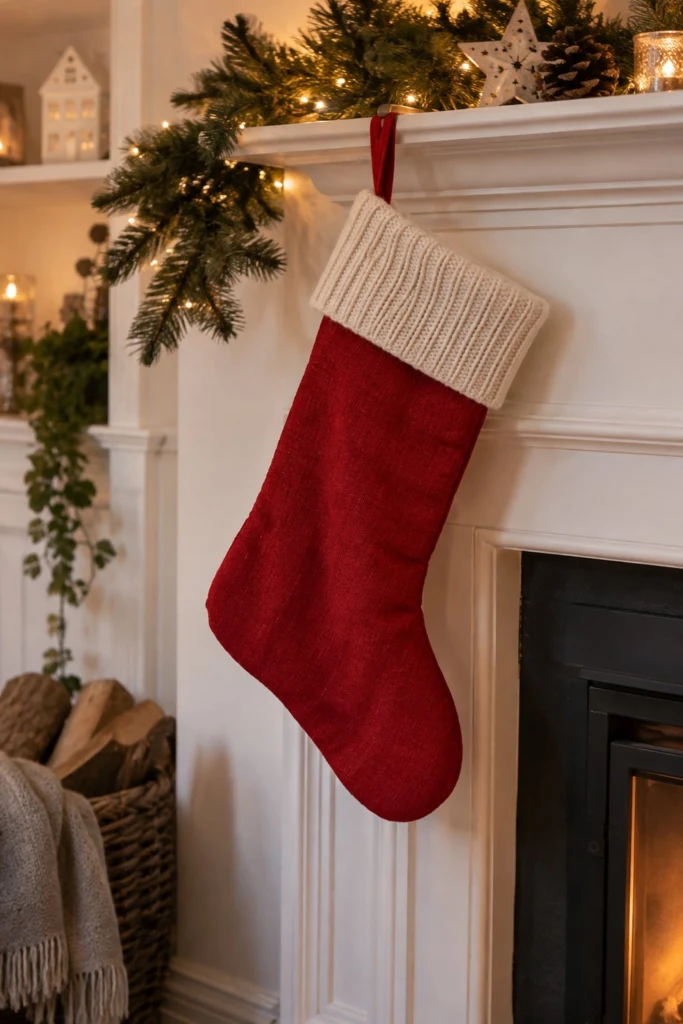
There is something deeply satisfying about hanging a handmade stocking by the chimney on Christmas Eve. This lined stocking features a rich red body, a wide cream ribbed cuff, and a sturdy hanging loop that holds up year after year without stretching out.
Quick Facts
- Skill level: Confident beginner
- Finished size: 12 1/4 in (31 cm) wide at the foot, 16 1/4 in (41 cm) tall from cuff top to heel
- Fabric: Heavyweight red cotton-linen blend for the outer, natural cream ribbed knit for the cuff, and neutral cotton muslin for the lining
- Seam allowance: 3/8 in (1 cm) throughout
- Time to make: 2 hours
- Machine needed: Standard sewing machine with a universal needle
What Makes This Stocking Special
The deep cream cuff folds neatly over the red body to hide the top raw edge, giving it a clean, store-bought finish that still feels entirely homemade. Drafting the curved heel and toe directly from a simple grid means you never have to print, tape, or scale a PDF template.
Finished Size
| Dimension |
Inches |
Centimetres |
| Height (cuff to heel) |
16 1/4 in |
41 cm |
| Width at top opening |
8 in |
20.5 cm |
| Width at foot (toe to heel) |
12 1/4 in |
31 cm |
Materials You Will Need
| Material / Notion |
Amount (Imperial) |
Amount (Metric) |
Notes |
| Red outer fabric |
3/4 yd |
70 cm |
Medium-to-heavyweight woven fabric |
| Cream ribbed knit fabric |
1/2 yd |
45 cm |
Has good stretch across the width |
| Lining fabric |
3/4 yd |
70 cm |
Lightweight cotton or muslin |
| Matching thread |
1 spool |
1 spool |
All-purpose polyester |
| Scissors, pins, and iron |
Standard |
Standard |
Essential sewing tools |
Cutting List
Seam allowance is 3/8 in (1 cm) and is included in all cut sizes.
| Piece |
Fabric |
Cut Size W x H |
How Many |
| Outer Stocking |
Red outer |
13 in x 18 in (33 cm x 45.5 cm) |
2 mirrored |
| Lining Stocking |
Lining |
13 in x 18 in (33 cm x 45.5 cm) |
2 mirrored |
| Cuff |
Cream knit |
9 in x 16 in (23 cm x 40.5 cm) |
1 |
| Hanging Loop |
Red outer |
2 in x 6 in (5 cm x 15 cm) |
1 |
Before You Start
Pre-wash and dry your fabrics so your stocking does not warp the first time it gets washed. Press both fabrics flat with a hot iron.
To draft the stocking shape without a template, take one outer rectangle and fold it in half lengthwise. Measure down 8 in (20.5 cm) from the top right corner for the opening, slope out gently to 13 in (33 cm) wide at the heel, and curve the toe upward toward the left. Cut through both layers at once so you get two identical mirrored pieces. Repeat this exact process for the lining pieces.
Step-by-Step Instructions
Step 1: Making the Hanging Loop
Fold the red loop strip in half lengthwise with wrong sides together, press, and open it back up. Fold both raw outer edges inward to meet the center crease line, press again, and fold the whole strip in half to enclose the raw edges. Stitch down the open long edge 1/8 in (3 mm) from the fold. Cut the finished strip in half to make two 3 in (7.5 cm) tabs, and set one aside.
✅ Checkpoint: Your hanging loop strip should measure 1/2 in (1.3 cm) wide after folding and stitching.
Step 2: Assembling the Outer Stocking
Place your two outer stocking pieces with right sides together. Slip the raw ends of your hanging loop inside the top right seam, positioning it about 1 in (2.5 cm) down from the top raw edge with the loop facing inward toward the toe. Pin all around the outer edge, leaving the top straight opening unstitched. Sew at 3/8 in (1 cm), pivoting carefully around the heel and toe curves. Clip small triangular notches into the seam allowance around the curves so the fabric lies flat when turned.
⚠️ Note: Do not sew the top opening shut; you need that open to turn the stocking right side out.
Step 3: Assembling the Lining
Place your two lining pieces right sides together. Pin around the curved edges, leaving the top opening free and also leaving a 4 in (10 cm) turning gap open along the straight back edge of the leg. Sew at 3/8 in (1 cm), and clip the curves just like you did for the outer stocking. Leave the lining inside out.
Step 4: Preparing the Cuff
Fold the cream knit cuff piece in half widthwise with right sides together, matching the 9 in (23 cm) short edges. Stitch down the short edge at 3/8 in (1 cm) to form a continuous loop. Fold the cuff in half lengthwise, wrong sides together, so the seam is hidden inside and the fold sits at the top. Press the folded edge flat with your iron.
Step 5: Joining Cuff to Outer Stocking
Keep your outer stocking turned wrong side out. Slip the cream cuff over the top opening of the outer stocking, matching the raw edge of the cuff to the raw top edge of the stocking. Align the cuff seam with the back heel side of the stocking. Pin all three layers together (front and back cuff layers plus the outer stocking top edge). Sew around the top circle at 3/8 in (1 cm).
Step 6: Final Assembly
Slip the outer stocking (with the cuff attached) inside the lining stocking, keeping right sides together. The right side of the outer stocking now faces the right side of the lining. Align the top raw edges and the side seams. Pin all the way around the top circle opening. Sew around the entire top circle at 3/8 in (1 cm).
Step 7: Turning and Closing
Reach through the 4 in (10 cm) turning gap you left in the lining seam. Gently pull the entire outer stocking and cuff through the gap until everything is right side out. Push the lining down inside the outer stocking. Tuck the raw edges of the lining turning gap inward so they match the rest of the seam, and topstitch the gap closed 1/8 in (3 mm) from the edge. Push the lining down into the foot. Fold the cream cuff down over the red body of the stocking. Give the whole thing a final press with your iron.
Finishing
Your stocking is ready to hang by the fireplace. Shake out the toe and heel so they hold their shape cleanly, and smooth the cuff down evenly all the way around.
Size and Fabric Variations
If you want a wider stocking to hold bulkier gifts, add 2 in (5 cm) to the width of the initial cutting rectangles, keeping the height the same. For a rustic look, swap the red cotton-linen for plaid flannel and use a faux fur cuff instead of the knit ribbing.
Care Instructions
Spot clean your stocking with a damp cloth and mild soap when needed. If it needs a full wash, turn it inside out, place it in a mesh laundry bag, wash on a gentle cycle in cold water, and lay it flat to dry.
FAQ
Can I sew this without a sewing machine?
Yes, you can hand sew this stocking using a strong backstitch throughout, though a sewing machine makes quick work of the long curved seams.
What if my knit cuff is too loose?
Cut the cuff width 1 in (2.5 cm) shorter than instructed if your knit fabric has a very high spandex content and stretches out easily.
Do I need to finish the raw seams inside?
The seams remain safely hidden between the outer stocking and the lining, so raw edges will not fray or show.
Happy Sewing!
I hope this stocking brings a touch of handmade warmth to your holiday decorating this year. Save this pin on Pinterest so you can find it easily when December rolls around. If you make one, I would love to see it: send me a photo through the contact page.