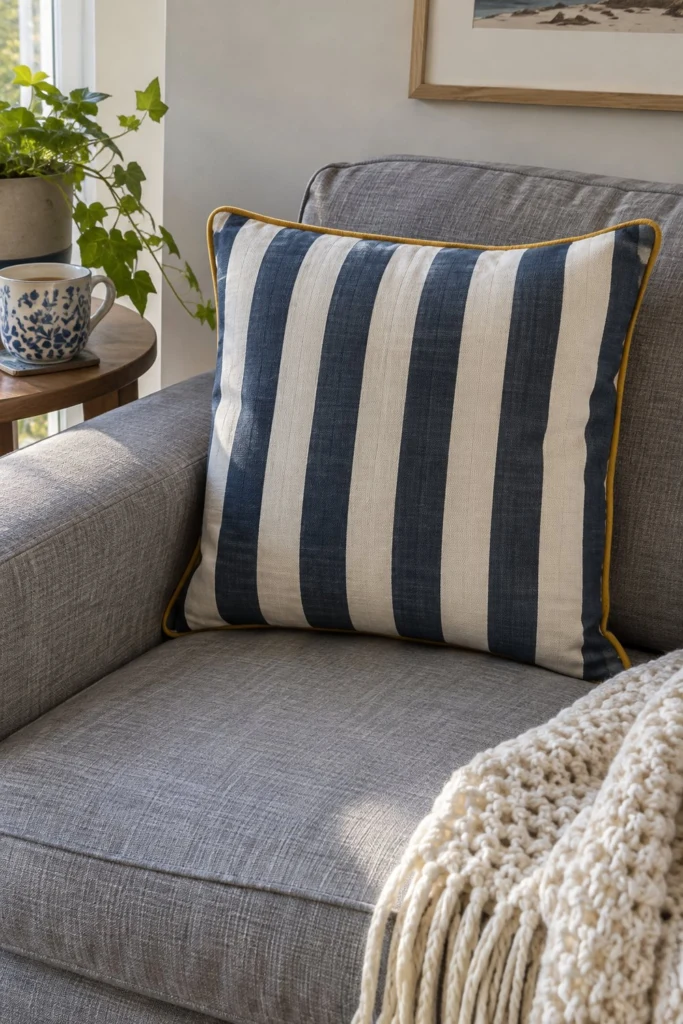
There is nothing quite like a crisp navy and cream stripe to refresh a tired sofa in twenty minutes. This envelope pillow cover uses three simple rectangles and a neat four-inch back overlap to hold the cushion firmly in place without a single zip or button in sight.
Quick Facts
- Skill level: Beginner
- Finished size: 16 in x 16 in (40.5 cm x 40.5 cm), 18 in x 18 in (45.5 cm x 45.5 cm), or 20 in x 20 in (51 cm x 51 cm)
- Fabric: Medium-weight cotton canvas or linen-cotton blend
- Seam allowance: 1/2 in (1.3 cm)
- Time to make: 30 minutes
- Machine needed: Standard sewing machine
What Makes This Pillow Cover Special
The bold blue and cream vertical stripes bring instant structure to a room, while the mustard yellow contrast piping adds a sharp, tailored edge that catches the eye. Because there are no zippers to wrestle with, the back flap makes washing the insert as simple as pulling out the cushion.
Finished Size
| Cushion Size |
Finished Width |
Finished Height |
| Small |
16 in (40.5 cm) |
16 in (40.5 cm) |
| Medium |
18 in (45.5 cm) |
18 in (45.5 cm) |
| Large |
20 in (51 cm) |
20 in (51 cm) |
Materials You Will Need
| Material / Notion |
Amount (18 in size) |
Notes |
| Main striped fabric |
3/4 yd (0.7 m) |
Medium weight, cotton or linen blend |
| Contrast piping cord |
2 yd (1.8 m) |
1/8 in diameter with fabric flange |
| Matching thread |
1 spool |
Polyester or cotton-poly blend |
| Cushion insert |
1 |
Match your chosen size |
- Tools: Sewing machine, fabric scissors, pins or sewing clips, iron and ironing board, soft tape measure, safety pin or bodkin.
Cutting List
Seam allowance is 1/2 in (1.3 cm) unless noted otherwise.
| Piece |
Fabric |
Cut Size W x H (18 in size) |
How Many |
| Front Panel |
Striped canvas |
19 in x 19 in (48.5 cm x 48.5 cm) |
1 |
| Back Upper Panel |
Striped canvas |
19 in x 13 1/2 in (48.5 cm x 34.5 cm) |
1 |
| Back Lower Panel |
Striped canvas |
19 in x 13 1/2 in (48.5 cm x 34.5 cm) |
1 |
Note for 16 in covers, cut front 17 in x 17 in (43 cm x 43 cm) and backs 17 in x 12 1/2 in (43 cm x 32 cm). For 20 in covers, cut front 21 in x 21 in (53.5 cm x 53.5 cm) and backs 21 in x 14 1/2 in (53.5 cm x 37 cm).
Before You Start
Wash and dry your fabric before cutting so any shrinkage happens before your cover is sewn. Press the fabric flat with a hot iron, paying attention to the straight grain of the stripes so your vertical lines stay straight.
Step-by-Step Instructions
Step 1: Baste the Piping to the Front Panel
Lay your front panel right side up on your work table. Place the mustard piping along the raw edge of the front panel, with the flange raw edges matching the raw edges of the fabric. Clip or pin the piping in place all the way around the four sides, clipping the fabric flange slightly at the corners so it turns a sharp corner without puckering. Baste the piping in place using a zipper foot, stitching just inside the edge of the piping cord.
✅ Checkpoint: The piping should sit evenly around all four sides of the front panel with the corners sharp and squared off.
Step 2: Prepare the Back Panels
Take your two back panels. On one long 19 in (48.5 cm) edge of the upper back panel, press the edge under 1/2 in (1.3 cm) toward the wrong side, then fold it under another 1/2 in (1.3 cm) to enclose the raw edge. Press flat with your iron. Stitch down the fold close to the inner edge. Repeat this exact double-fold hem on one long 19 in (48.5 cm) edge of the lower back panel.
Step 3: Layer the Cover Pieces
Lay the front panel right side up with the mustard piping facing up. Take the hemmed upper back panel and place it face down on top of the front panel, aligning the raw top, left, and right edges, with the hemmed edge running horizontally across the middle. Take the hemmed lower back panel and place it face down, aligning the raw bottom, left, and right edges. The two hemmed edges will overlap by 4 in (10 cm) across the center of the pillow.
Step 4: Pin and Sew the Outer Seams
Pin all three layers securely around the four outer edges, making sure to stitch right over your previous basting line where the piping is attached. Sew around all four sides using a 1/2 in (1.3 cm) seam allowance, switching to a zipper foot so you can ride right alongside the raised piping cord. Pivot carefully at each of the four corners with your needle down in the fabric.
⚠️ Note: Take it slow as you pass over the thick center overlap where the back pieces cross over each other.
Step 5: Trim and Turn
Trim the fabric corners diagonally across the tips to reduce bulk, being careful not to snip your stitches. Turn the cover right side out through the center envelope opening. Push out the four corners gently using a blunt point like a knitting needle or chopstick. Press the finished edges flat with your iron so the mustard piping frames the front cleanly.
✅ Checkpoint: The cover should measure 18 in x 18 in (45.5 cm x 45.5 cm) square from seam to seam.
Finishing
Insert your 18 in (45.5 cm) cushion form through the back envelope opening, tucking the corners of the insert neatly into the corners of the cover. Give the pillow a good karate chop in the center to create a nice soft lounge look.
Size and Fabric Variations
- Linen blend option: If you use a lighter linen, add a lightweight fusible interfacing to the wrong side of the front panel to give the stripes more stability.
- Flanged edge: Leave a 1 in (2.5 cm) flange around the outer perimeter by stitching 1 in outside the cushion size instead of using piping.
Care Instructions
Remove the cover from the insert and machine wash on a gentle cycle in cold water with similar colors. Line dry or tumble dry on low heat. Warm iron on the reverse side if needed, avoiding direct heat on the plastic piping cord.
FAQ
Can I make this without piping?
Yes, you can skip the piping entirely. Just sew the front and back pieces right sides together using a standard 1/2 in (1.3 cm) seam allowance.
Why do the back panels overlap?
The 4 in (10 cm) overlap ensures the cushion insert stays completely hidden inside the cover and never pops out when you lean against it on the sofa.
How do I stop my stripes from looking crooked?
Line up your fabric grain carefully when cutting, and pin the stripes every few inches before sewing so they do not shift under the presser foot.
Happy Sewing!
I would love to see how your striped cushion turns out on your sofa. Save this pin on Pinterest to keep the instructions handy. If you make one, I would love to see it: send me a photo through the contact page.