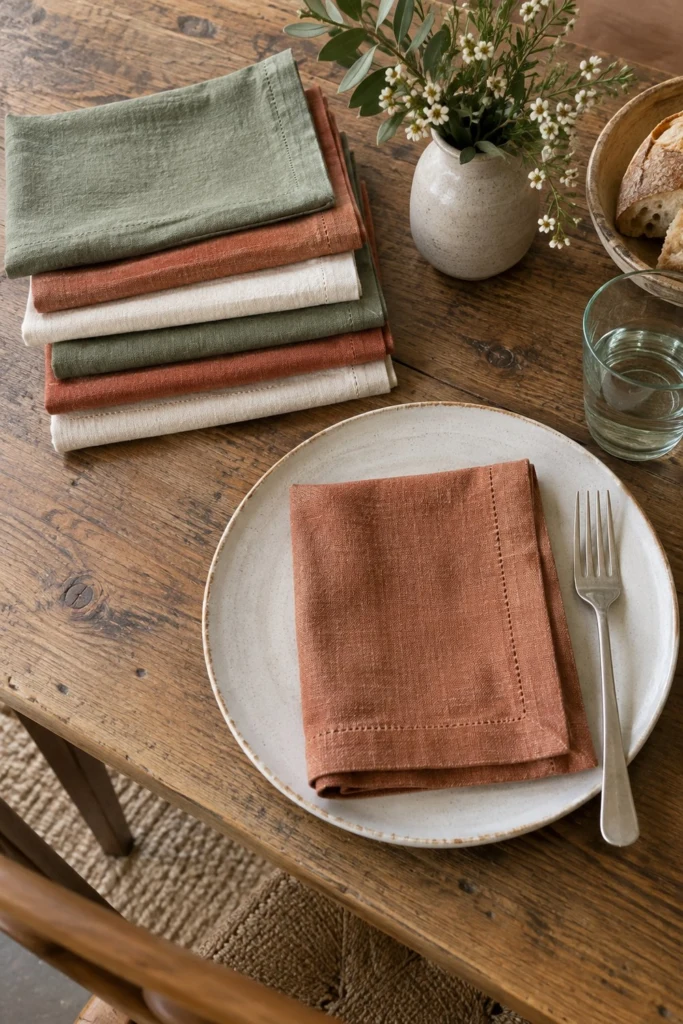
Linen napkins with proper mitred corners give a dinner table that crisp, tailored look you usually only see in restaurants. Making them yourself is straightforward once you know how to fold the corners cleanly without any bulky bunching.
Quick Facts
- Skill level: Beginner
- Finished size: 17 in x 17 in (43 cm x 43 cm)
- Fabric: Linen or linen-blend
- Seam allowance: 1/2 in (1.3 cm) double-fold hem
- Time to make: 2 hours for a set of six
- Machine needed: Standard sewing machine
What Makes This Home Sewing Project Special
The secret to these napkins is the mitred corner technique. Instead of folding raw edges under twice and creating a heavy, bulky corner, you fold the corner diagonally first. This removes the excess fabric so your napkins lie completely flat and square on the table, just like the ones shown in the rustic table setting.
Finished Size
| Dimension |
Inches |
Centimetres |
| Finished napkin width |
17 in |
43 cm |
| Finished napkin height |
17 in |
43 cm |
Materials You Will Need
| Material / Notion |
Amount |
Notes |
| Linen fabric |
3 1/4 yd (3.0 m) |
54 in (137 cm) wide |
| Matching all-purpose thread |
1 spool |
Cotton or polyester |
- Tools: Sewing machine, iron and ironing board, fabric shears, long straight pins, clear quilting ruler, fabric marking pen.
Cutting List
Seam allowance: Double-fold 1/2 in (1.3 cm) hem on all four sides.
| Piece |
Fabric |
Cut Size W x H |
How Many |
| Napkin Square |
Linen |
19 in x 19 in (48.5 cm x 48.5 cm) |
6 |
Before You Start
Linen shrinks during its first wash, so always pre-wash and dry your fabric before cutting. Press it flat with a hot steam iron to remove any creases. When cutting your 19 in x 19 in (48.5 cm x 48.5 cm) squares, use a rotary cutter and a large square quilting ruler if you have one to keep the grain completely straight.
Step-by-Step Instructions
Step 1: Pressing the First Fold
Lay one napkin square wrong side up on your ironing board. Fold each of the four raw edges over by 1/2 in (1.3 cm) toward the wrong side and press firmly all the way around.
✅ Checkpoint: Measure from the folded crease to the raw edge. It should be exactly 1/2 in (1.3 cm) on all four sides.
Step 2: Pressing the Second Fold
Fold each pressed edge over by another 1/2 in (1.3 cm) to enclose the raw edge entirely, pressing as you go. Open out only the second fold on all four corners so you can see the crease lines clearly.
Step 3: Mitring the Corners
Fold one corner diagonally so the point meets the intersection of your pressed fold lines. Press the diagonal crease. Open the corner back up. Using your fabric shears, snip across the diagonal fold about 1/4 in (0.6 cm) outside the inner corner crease.
Step 4: Refolding the Mitre
Fold the corner back in along your pressed diagonal line, matching the raw edges inside the folds. Fold your 1/2 in (1.3 cm) hems back down along the iron creases. The mitred corner should now tuck neatly inside itself without overlapping bulk. Pin the folded edges in place. Repeat this for all four corners of the napkin.
💡 Designer Tip: Take your time pinning the mitres so the corner points stay sharp and square before you take them to the machine.
Step 5: Edgestitching
Take your napkin to the sewing machine. Starting along any straight edge, topstitch close to the inner folded edge at about 1/8 in (0.3 cm). Pivot at each corner with your needle down, continuing all the way around the napkin. Backstitch securely at the start and end, and trim your thread tails. Repeat for all six napkins.
✅ Checkpoint: Your finished napkin should measure 17 in x 17 in (43 cm x 43 cm) square across the middle.
Finishing
Give all six finished napkins a final press with a hot steam iron. Mist them with a little water or starch if you like an extra crisp finish for your table.
Size and Fabric Variations
- Dinner size: For a larger 20 in x 20 in (51 cm x 51 cm) dinner napkin, cut your squares 22 in x 22 in (56 cm x 56 cm) instead.
- Fabric choice: Medium-weight cotton or cotton-linen blends work just as well as pure linen and hold up wonderfully to everyday washing.
Care Instructions
Machine wash on a gentle cycle with similar colors. Line dry while still slightly damp to minimize wrinkles, or tumble dry on low and press with a hot iron while warm.
FAQ
Why do I need to cut the corner when making mitred corners?
Snipping the corner removes the excess bulk where the folds overlap, allowing the corner to lie completely flat instead of forming a thick lump.
Can I make these napkins without a sewing machine?
You can hem them by hand using a blind hem stitch, though machine edgestitching is much faster and holds up better to frequent laundering.
Do I need to use an iron for every step?
Yes. Pressing is the secret to getting crisp, straight edges and sharp corners on linen projects.
Happy Sewing!
I love how a stack of handmade linen napkins instantly makes sitting down for a meal feel special. Save this pin on Pinterest so you can find it later. If you make one, I would love to see it: send me a photo through the contact page.