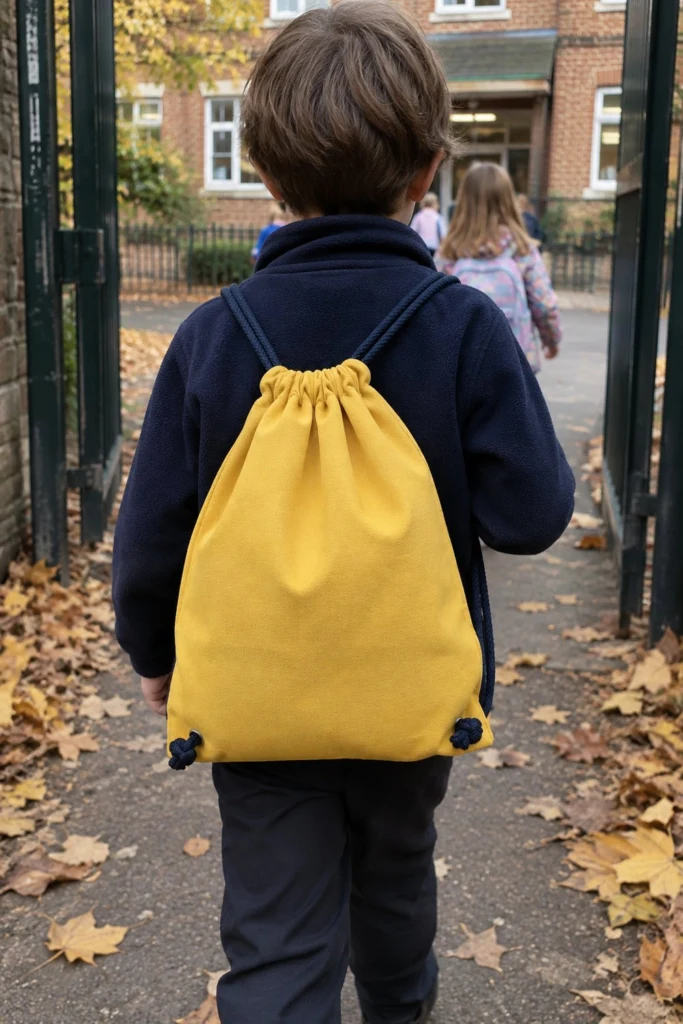
This bright yellow drawstring backpack is a light and practical companion for school PE kits, swimming gear, or library books. The navy blue cords double as shoulder straps, and the reinforced corners at the bottom keep the heavy wear and tear from ripping the fabric out.
Quick Facts
- Skill level: Beginner
- Finished size: 12 1/4 in wide x 15 in high (31 cm x 38 cm)
- Fabric: Medium-weight cotton canvas or twill
- Seam allowance: 3/8 in (1 cm)
- Time to make: 1 hour
- Machine needed: Standard sewing machine
What Makes This Kids Drawstring Backpack Special
- The drawstring cords pull closed at the top and thread through the bottom corners, turning the bag into a simple backpack your child can wear on both shoulders.
- Small reinforcement tabs at the lower corners take the strain where the cords pull tight.
- Fully enclosed seams inside mean the bag holds up to rough playground use and washing without fraying.
Finished Size
| Dimension |
Inches |
Centimetres |
| Finished Width |
12 1/4 in |
31 cm |
| Finished Height |
15 in |
38 cm |
| Casing Height |
1 1/4 in |
3.2 cm |
Materials You Will Need
| Material |
Amount |
Notes |
| Yellow cotton canvas |
1 1/4 yd (1.2 m) |
Main body, casing, and corner tabs |
| Navy blue cotton cord |
3 yds (2.7 m) |
1/4 in (6 mm) thick |
| Matching thread |
1 spool |
All-purpose polyester |
Tools:
– Sewing machine with standard needle
– Fabric shears or rotary cutter and mat
– Pins or sewing clips
– Safety pin or bodkin for threading cords
– Iron and ironing board
Cutting List
Seam allowance: 3/8 in (1 cm) unless noted.
| Piece |
Fabric |
Cut Size W x H |
How Many |
| Main Body |
Yellow canvas |
13 in x 16 3/4 in (33 cm x 42.5 cm) |
2 |
| Casing Strip |
Yellow canvas |
13 in x 3 1/2 in (33 cm x 9 cm) |
2 |
| Corner Tab |
Yellow canvas |
2 in x 2 in (5 cm x 5 cm) |
2 |
Before You Start
Pre-wash and dry your yellow canvas so the bag doesn’t shrink the first time it goes through the laundry. Press the fabric flat with your iron. Cut out all your pieces carefully using the cutting list above.
Step-by-Step Instructions
Step 1: Prep the Corner Tabs
Take the two 2 in x 2 in (5 cm x 5 cm) corner tabs. Fold all four raw edges in toward the wrong side by 3/8 in (1 cm) and press. Fold the square in half right sides out so it forms a small 1 in x 1 in (2.5 cm x 2.5 cm) square, enclosing the raw edges. Press and set aside.
Step 2: Prepare the Casings
Take one casing strip. Fold the short vertical ends under by 1/4 in (0.6 cm) toward the wrong side, press, and stitch down close to the fold. Repeat for the second casing strip.
Next, fold each casing strip in half lengthwise, wrong sides together, matching the long raw edges, and press with your iron to set a sharp crease.
Step 3: Attach the Corner Tabs to the Front Panel
Take the front main body panel and lay it right side up. Fold the bottom corners diagonally by 1/2 in (1.3 cm) and press. Slide one prepared corner tab over the bottom-left raw corner, sandwiching the corner inside the folded tab. Pin securely. Repeat for the bottom-right corner. Edge-stitch around three sides of each tab to secure it to the canvas.
✅ Checkpoint: The front panel should now have a neat square tab stitched securely onto each bottom corner, with the raw edges fully enclosed inside the fold.
Step 4: Add the Casings
Take one main body panel (front or back). Place it right side up. Measure 1 1/2 in (3.8 cm) down from the top raw edge and make a small mark. Place the folded raw edge of one casing strip along this mark, aligning the raw edges of the casing with the side raw edges of the main panel. Pin in place. Repeat for the second main panel.
Stitch across the casing strip close to the raw edge with a 1/4 in (0.6 cm) seam to tack it down.
Step 5: Sew the Main Bag
Place the front and back main panels right sides together, matching all outer edges. The casings and corner tabs should line up at the sides. Pin around the sides and bottom, leaving the top open.
Stitch down the left side, across the bottom, and up the right side using a 3/8 in (1 cm) seam allowance. Pivot neatly at the bottom corners, sewing right across the corner tabs to anchor them firmly into the seam.
✅ Checkpoint: The bag body is now stitched into a pouch, with the top open and the casing strips trapped into the side seams.
Step 6: Finish the Seams
Trim the bottom corner excess fabric diagonally to reduce bulk. Finish the raw side seams using a zigzag stitch or an overlocker to prevent fraying over time.
Step 7: Form the Casing Channel
Fold the top raw edge of the main panel down by 3/8 in (1 cm) toward the inside, then fold it down again by 1 in (2.5 cm) so it encloses the raw edge of the casing strip you attached earlier. Press well and pin.
Stitch close to the lower folded edge all the way around the bag, creating a clean tunnel for the cord. Make sure you don’t catch the back of the tunnel in your stitching. Repeat for the other side of the bag.
✅ Checkpoint: You should have two open channels at the top of the bag, each about 3/4 in (1.9 cm) wide.
Step 8: Thread the Cords
Cut your 3 yds (2.7 m) of navy blue cord in half so you have two pieces, each 1 1/2 yds (1.4 m) long.
Attach a safety pin to one end of the first cord. Thread it into the right-hand casing, travel all the way around the top, and come back out the same side. Feed the same cord down through the outside of the bag and through the loop on the bottom-right corner tab. Tie a secure double knot at the end of the cord.
Take the second cord and start on the left side. Thread it through the left-hand casing, around the top, and out the left side. Feed it down through the outside of the bag and through the loop on the bottom-left corner tab. Tie a secure double knot at the end.
Finishing
Trim any stray threads with your embroidery scissors. Give the finished backpack a final press with your iron to crisp up the folds. Pull the cords gently to test that the bag cinches closed smoothly.
Size and Fabric Variations
- Lined version: If you want a lined bag, cut two lining pieces from a lighter cotton print to the exact same size as the main body panels. Sew the lining with a 3 in (7.6 cm) turning gap at the bottom, then slip it inside the main bag right sides together at the top casing step before turning.
- Larger size: To make the bag 2 in (5 cm) wider, add 2 in (5 cm) to the width of the main body panels and casing strips when cutting.
Care Instructions
Wash your drawstring backpack on a gentle cool cycle with similar colors. Line dry it in the shade to keep the yellow canvas bright, and touch it up with a warm iron if needed.
FAQ
Can I use ribbon instead of cord for the straps?
Ribbon tends to twist and dig into shoulders under weight, so round cotton cord or nylon paracord works much better for a backpack that actually gets worn.
How do I stop the cord ends from fraying?
If you are using a synthetic cord, you can carefully melt the cut ends with a lighter flame. For cotton cord like the navy one used here, tie a tight knot close to the tip or dip the very end in a dab of fabric glue.
Is this bag strong enough for heavy books?
It works wonderfully for PE kits, swimming gear, or a couple of library books, but canvas and drawstring cords aren’t meant for heavy textbooks or laptops.
Happy Sewing!
If you make one, I would love to see it: send me a photo through the contact page. Save this pin on Pinterest so you can find the tutorial later when you are ready to sew!