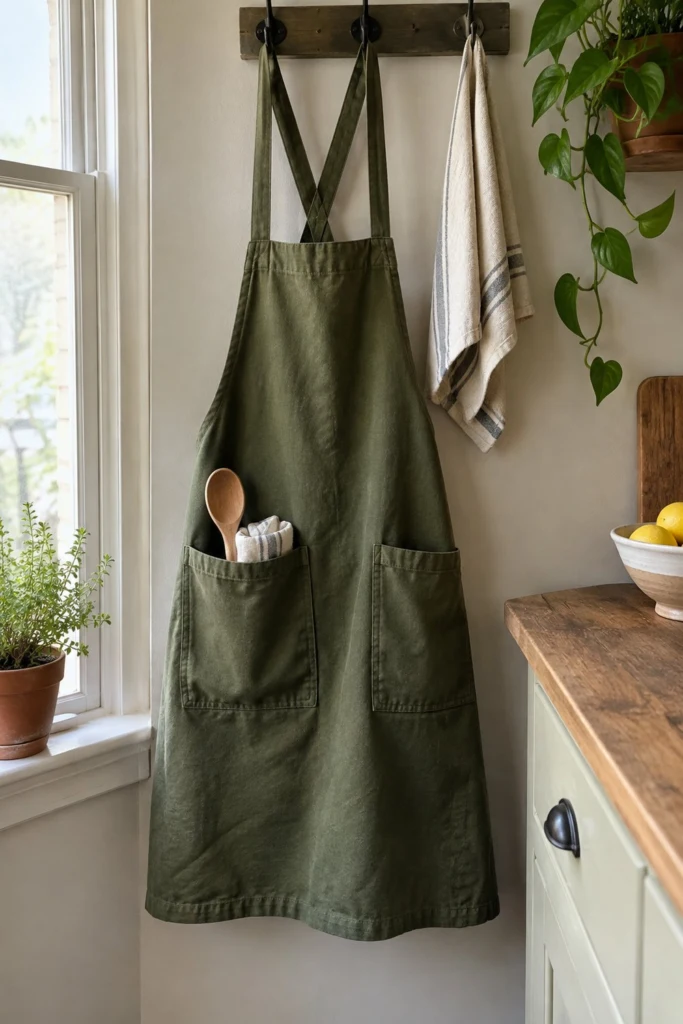
This cross-back apron hangs from the wall with a simple elegance that always makes me smile. It slips over your head with zero ties to fuss with, and the straps cross securely in the back so the weight rests evenly on your shoulders instead of pulling on your neck. Two roomy patch pockets hold your phone, scissors, or a wooden spoon while you work in the kitchen or the garden.
Quick Facts
- Skill level: Confident beginner
- Finished size: 28 in (71 cm) long by 26 in (66 cm) wide at the lower body
- Fabric: Medium-weight olive green cotton canvas
- Seam allowance: 1/2 in (1.3 cm) unless noted otherwise
- Time to make: 2 to 3 hours
- Machine needed: Standard sewing machine with a heavy-duty needle
What Makes This Apron Special
The beauty of this design lies in its simplicity. The body is cut as one large single piece with gently curved upper sides that flow smoothly into the chest panel. The two long straps cross over each other at the back, sliding freely through top loops so you simply step into it. The patch pockets feature double-stitched top edges to withstand daily use, and every raw edge is neatly enclosed with a clean double-folded hem.
Finished Size
| Dimension |
Inches |
Centimetres |
| Length (top bib to hem) |
28 in |
71 cm |
| Lower width |
26 in |
66 cm |
| Upper chest width |
10 in |
25.5 cm |
Materials You Will Need
| Material / Notion |
Amount |
Notes |
| Olive green cotton canvas |
3 1/8 yd (2.9 m) |
Medium-weight (about 8 to 10 oz) for durability |
| Matching polyester thread |
1 spool |
Heavy-duty or all-purpose |
Tools: Sewing machine, fabric shears, pins or sewing clips, soft tape measure, iron and ironing board, large piece of paper or newspaper for the paper template, safety pin or loop turner.
Cutting List
Note: A 1/2 in (1.3 cm) seam allowance is included in all cutting dimensions unless stated otherwise.
| Piece |
Fabric |
Cut Size W x H |
How Many |
| Apron Body |
Olive green canvas |
27 in x 29 in (68.5 cm x 73.5 cm) block, trimmed to template shape |
1 |
| Straps |
Olive green canvas |
4 in x 32 in (10 cm x 81.5 cm) |
2 |
| Patch Pockets |
Olive green canvas |
7 1/2 in x 8 in (19 cm x 20.5 cm) |
2 |
Before You Start
Wash and dry your canvas fabric before cutting to prevent any post-sewing shrinkage. Press out any deep creasing with a hot iron.
To draft the apron body template, take your large paper and draw a rectangle 27 in (68.5 cm) wide by 29 in (73.5 cm) high. At the top edge, mark the center point, then measure outward 5 in (12.5 cm) in each direction to create a 10 in (25.5 cm) chest width. From those top corners, draw a smooth curved line down to the side edges about 10 in (25.5 cm) below the top. Cut along these lines to create your symmetrical half-pattern or full-pattern template.
Step-by-Step Instructions
Step 1: Prepare the Straps
Take one strap strip and fold it in half lengthwise, right sides together. Press with your iron. Open the strip up, then fold both long raw edges inward to meet the center crease line you just pressed. Press again. Fold the strip in half lengthwise once more along the original center crease, enclosing all raw edges inside. Pin the long open edge closed. Repeat for the second strap.
Step 2: Stitch the Straps
Take both prepared straps to your sewing machine. Edgestitch down the open long side of each strap about 1/8 in (0.3 cm) from the fold, and sew a matching line of topstitching along the folded side to keep everything looking balanced and crisp. Set the finished straps aside.
✅ Checkpoint: Each finished strap should measure 1 in (2.5 cm) wide by 32 in (81.5 cm) long.
Step 3: Hem the Upper Bib and Sides
Take the apron body piece. Turn the top bib edge under by 1/4 in (0.6 cm) and press, then turn it under again by 1/2 in (1.3 cm) to enclose the raw edge completely. Pin in place. Stitch along the folded edge to secure the top hem. Repeat this exact double-fold hem process (1/4 in then 1/2 in) along the two upper diagonal curved sides of the bib.
💡 Designer Tip: Clip into the curved seam allowance curves ever so slightly before pressing if the canvas feels too bulky, but make sure not to cut through your fold line!
Step 4: Hem the Side and Lower Edges
Turn the left and right straight side edges of the apron body under by 1/2 in (1.3 cm), press, then turn under another 1/2 in to create a clean double-fold side hem. Pin and stitch down both sides. Repeat this same double-fold hem (1/2 in then 1/2 in) along the bottom horizontal edge of the apron. Press all your newly stitched hems flat.
✅ Checkpoint: The main apron body should now have all four outer edges neatly hemmed, with clean finished borders.
Step 5: Prepare and Hem the Pockets
Take the two pocket pieces. Press the top edge of each pocket down toward the wrong side by 1/4 in (0.6 cm), then fold it down again by 3/4 in (2 cm) to create a sturdy upper hem. Pin and topstitch across the top folded edge of each pocket about 1/2 in (1.3 cm) down from the rim.
Step 6: Attach the Pockets to the Apron Body
Take the two hemmed pockets and fold them in half vertically just for a moment to crease the center line, giving yourself a placement guide. Lay the apron flat right side up. Position the left pocket about 5 in (12.5 cm) up from the bottom hem and 4 in (10 cm) in from the left side edge. Pin securely. Position the right pocket symmetrically on the right side. Edge-stitch around the sides and bottom of each pocket at 1/8 in (0.3 cm), pivoting at the bottom corners, and sew a second line of stitching 1/4 in (0.6 cm) inside the first for extra strength. Backstitch securely at the upper pocket corners.
Step 7: Attach the Straps
Take your two finished straps. Slide one end of the first strap through the top corner of the left side, tucking the raw end neatly behind the folded edge by 1/2 in (1.3 cm). Pin it securely. Take the opposite end of that same strap, cross it diagonally behind to the top corner of the right side, tuck the raw end behind the hem by 1/2 in, and pin. Repeat this same crossing process with the second strap, forming a clean “X” shape across the upper back area of the apron.
Step 8: Secure the Strap Ends
Stitch firmly across each strap attachment point on the front apron bib and upper corners, sewing a small square with an “X” through the middle to ensure the straps will never pull loose under everyday strain. Trim away any loose thread tails.
✅ Checkpoint: Pull gently on the crossed straps to make sure they are secure and oriented correctly without any twists in the crossover.
Finishing
Give your completed apron a final press with a hot iron, smoothing the pockets and straps. Clip away any remaining stray threads. Your new cross-back apron is ready to wear!
Size and Fabric Variations
- For a longer apron: Add 3 in (7.5 cm) to the bottom of the apron body cut height, making your cut height 32 in (81.5 cm) instead of 29 in (73.5 cm).
- For a lighter summer feel: Substitute the cotton canvas with a sturdy linen or heavy cotton-linen blend of a similar weight.
Care Instructions
Machine wash on a gentle cycle in cold water with similar colors. Tumble dry on low heat or hang to air dry while still slightly damp to minimize wrinkling. Press with a hot iron while slightly damp if you prefer a crisp, tailored look.
FAQ
Can I make this apron without drafting a paper template?
Yes, you can measure and mark the curves directly onto your canvas fabric using a chalk pencil, using a large plate or a flexible ruler to draw the gentle slope from the chest down to the sides.
Do I need to interface the straps?
Not with medium-weight cotton canvas. The canvas is sturdy enough on its own once folded into four layers, keeping the straps strong and comfortable without feeling stiff.
How do I adjust the strap length if it feels too loose?
Before stitching the final ends down in Step 8, slip the apron on over your head and adjust the overlap at the top corners until it hangs at your preferred height, then pin and sew.
Happy Sewing!
I would love to see how your apron turns out. Save this pin on Pinterest to find it easily later. If you make one, I would love to see it: send me a photo through the contact page.