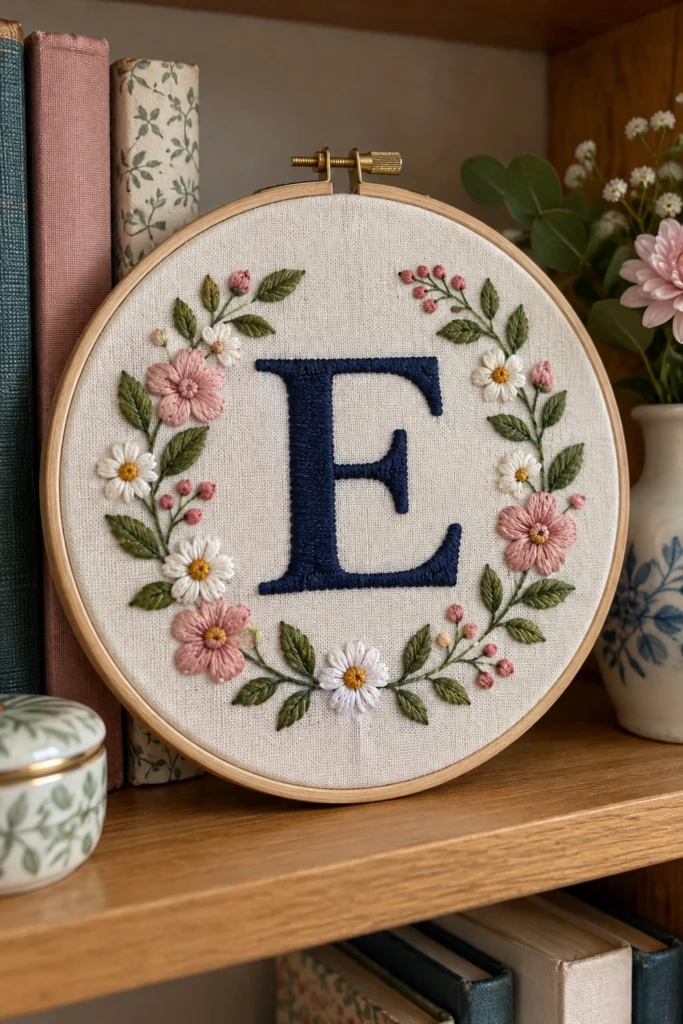
I love working on monograms because they make a gift feel deeply personal without needing hours of complex planning. This project pairs a bold, midnight navy initial with a delicate garden wreath of pink and white flowers, stitched neatly inside a wooden hoop and ready to hang on a wall or prop on a shelf.
Quick Facts
- Skill level: Confident beginner
- Finished size: 6 in (15 cm) design inside a 6 in (15 cm) hoop
- Hoop: 6 in (15 cm) wooden embroidery hoop
- Fabric: Natural linen, cut to 10 in x 10 in (25 cm x 25 cm)
- Stitches used: Split stitch, satin stitch, long and short stitch, lazy daisy, French knot
- Time to make: 8 to 10 hours
What Makes This Hoop Art Special
The contrast between the heavy, padded navy letter and the airy pastel wreath makes this design pop right off the fabric. The leaves use simple lazy daisy loops to create texture, and the French knot flower centers give the blossoms a lovely 3D finish.
Finished Size
The embroidered wreath measures 5 in (13 cm) across, framing a 3 in (7.5 cm) tall initial inside a 6 in (15 cm) wooden embroidery hoop.
Materials You Will Need
- Natural linen fabric: 1 piece cut to 10 in x 10 in (25 cm x 25 cm)
- Wooden embroidery hoop: 6 in (15 cm)
- Embroidery needles: Crewel needles size 5 and 7
- Embroidery scissors
- Water-soluble transfer pen
| Colour name |
DMC number |
Strands |
Used for |
Skeins |
| Midnight Navy |
3799 |
3 |
Initial E fill and outline |
1 |
| Dusty Rose |
3716 |
3 |
Pink flower petals |
1 |
| Soft Blush |
760 |
3 |
Small pink buds and accents |
1 |
| Bright White |
BLANC |
3 |
White daisy petals |
1 |
| Moss Green |
3011 |
3 |
Leaves and stems |
1 |
| Golden Yellow |
725 |
2 |
Flower centers |
1 |
Stitches Used
Split Stitch
- Bring your needle up through the fabric on the line, then take a small stitch forward.
- Bring the needle back up right through the middle of the stitch you just made, splitting the two strands.
- Pull gently and repeat along your marked line to create a strong chain-like foundation.
Satin Stitch
- Bring your needle up on one side of the shape and go down directly across on the opposite side.
- Come back up right next to your starting point, keeping your threads parallel and snug.
- Fill the shape completely without overlapping the threads so the surface stays flat and smooth.
Lazy Daisy
- Bring your needle up at the base of the petal and go back down right beside that same hole, leaving a small loop on top of the fabric.
- Bring the needle up a short distance away inside the loop, catching the thread.
- Pull gently to form the petal shape, then anchor the loop with a tiny stitch over the top edge.
French Knot
- Bring your needle up through the fabric where you want the knot.
- Wrap the floss around the needle two times near the tip, holding the tail taut with your non-dominant hand.
- Insert the needle back down very close to the entry hole, pull slowly until the knot forms, and secure.
Transferring the Design
Center the 6 in (15 cm) embroidery hoop over your 10 in x 10 in (25 cm x 25 cm) linen and trace the inner circle with your water-soluble pen so you know where your border sits. Sketch the capital letter E right in the middle, standing 3 in (7.5 cm) tall and 2 in (5 cm) wide. Draw a wreath of small daisies and pink flowers framing the letter, leaving a 1/2 in (1.3 cm) clear margin between the flowers and your circle line.
To transfer, tape your drawing to a sunny window, place your linen over it, and trace the lines with your water-soluble pen.
Stitching Instructions
The Initial E
- Outline the entire letter E using Midnight Navy (DMC 3799) in 3 strands of split stitch.
- Fill the space inside the split stitch outline using Midnight Navy (DMC 3799) in 3 strands of satin stitch, working horizontally across the stems to build a padded, raised effect.
✅ Checkpoint: Your letter E should be completely solid and smooth, with sharp corners and no fabric showing through the navy floss.
Stems and Leaves
- Stitch all the curving wreath stems using Moss Green (DMC 3011) in 3 strands of stem stitch.
- Add the leaves along the stems using Moss Green (DMC 3011) in 3 strands of lazy daisy or straight stitch, pointing outward away from the wreath.
✅ Checkpoint: Your greenery should form a complete circular frame with leaves branching out evenly on both sides of the letter E.
Flowers and Buds
- Stitch the large pink flowers using Dusty Rose (DMC 3716) in 3 strands of lazy daisy arranged in a circle for each blossom.
- Add French knot centers to the pink flowers and white daisies using Golden Yellow (DMC 725) in 2 strands.
- Stitch the small flower buds at the top and bottom of the wreath using Soft Blush (DMC 760) in 3 strands of French knots and tiny straight stitches.
✅ Checkpoint: All flower petals should be secure, and the French knots should sit neatly on top of the fabric without pulling through to the back.
Finishing the Hoop
- Dab the fabric with a damp cloth to dissolve any leftover blue pen marks, then let it dry completely.
- Place your finished embroidery face down on a soft towel and press the back gently with a warm iron.
- Mount the fabric back into the wooden hoop, pull the linen edges taut so the grain stays straight, and tighten the brass screw.
- Trim the excess fabric on the back down to a 1/2 in (1.3 cm) margin, gather the edge with a running stitch, and pull it tight to finish the back neatly.
Tips and Variations
If you want to stitch this design on a linen tote bag or the hem of a tea towel instead of hoop art, skip the wooden hoop and mount your fabric in a larger hoop just for stitching. You can also swap the navy letter for charcoal grey or forest green to match your home decor.
FAQ
Can I use embroidery floss straight from the skein without separating it?
Always separate your floss into individual strands before stitching. This design calls for 3 strands of six-strand cotton embroidery floss for most stitches to give you smooth coverage without making the stitches too bulky.
What is the best way to keep my satin stitch neat?
Take your time and keep your stitches parallel. If your satin stitch starts to look crooked, pull the thread out and redo that section. Padding the letter first with split stitch makes achieving a smooth finish much easier.
How do I stop my fabric from puckering in the hoop?
Tighten the screw on your hoop while gently pulling the edges of the linen. The fabric should sound like a drum when you tap it lightly with your finger before you start stitching.
Happy Stitching!
I hope you enjoy stitching this sweet floral initial as much as I did. If you make one, please save this pin on Pinterest to share with other makers. If you make one, I would love to see it: send me a photo through the contact page.