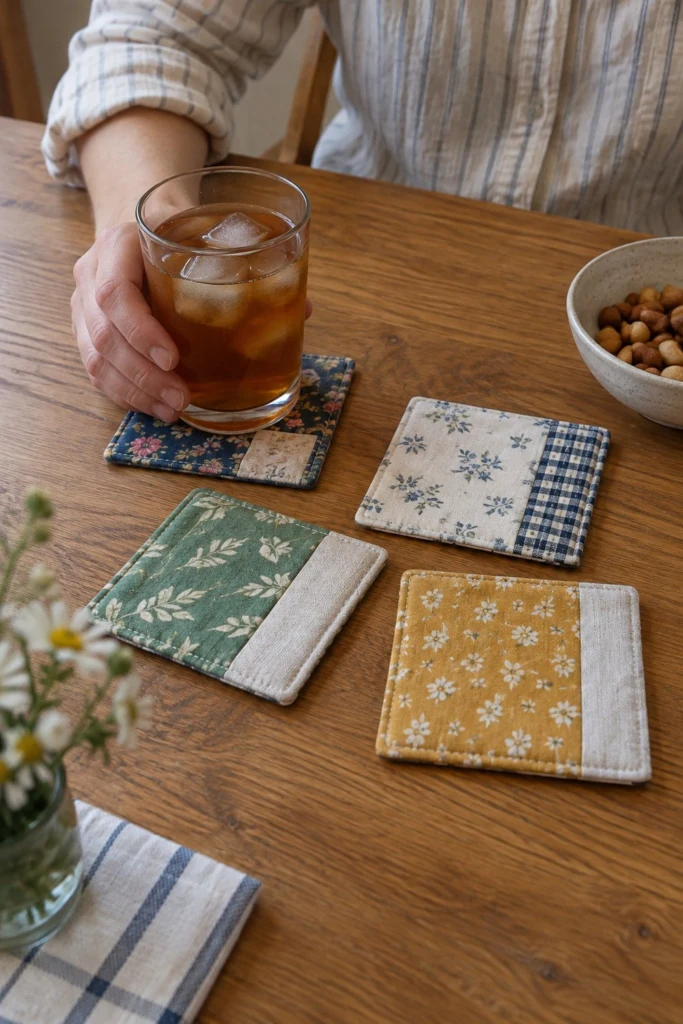
These four little scrap fabric coasters are the best way I know to practice sewing a straight seam, turning a crisp corner, and topstitching close to the edge. They combine cheerful floral linen with contrasting neutral linen and a square of fusible fleece inside so they actually protect your wood table from a cold glass of iced tea. You can whip up a whole set in an afternoon with bits and pieces from your scrap basket.
Quick Facts
- Skill level: Absolute Beginner
- Finished size: 4 1/2 in x 4 1/2 in (11.5 cm x 11.5 cm)
- Fabric: Quilting cotton or linen scraps, plus fusible fleece
- Seam allowance: 1/4 in (6 mm)
- Time to make: 1 hour for a set of four
- Machine needed: Basic sewing machine (straight stitch)
What Makes This Fabric Coasters Free Sewing Pattern Special
Each coaster pairs a main floral print with a contrasting solid or check band on the right side, giving you a custom patchwork look without complicated piecing. The fusible fleece gives each square a nice padded weight so it feels substantial in your hand, not flimsy like a single layer of fabric. I love making these to match the season, using dark blues for autumn and crisp greens for spring.
Finished Size
| Coaster Part |
Width |
Height |
| Finished Coaster |
4 1/2 in (11.5 cm) |
4 1/2 in (11.5 cm) |
Materials You Will Need
| Material / Notion |
Amount |
Notes |
| Floral linen scraps (green, yellow, blue, and navy mix) |
1/2 yd (0.5 m) total |
For the main front panels |
| Contrasting linen and check scraps (natural canvas, navy check) |
1 yd (1.0 m) total |
For the side accent bands and backs |
| Fusible fleece (Pellon 987F or similar) |
3/4 yd (0.7 m) |
Cut into four 5 in squares |
| Matching all-purpose polyester thread |
1 spool |
To match your fabrics |
Tools:
– Rotary cutter, acrylic ruler, and self-healing cutting mat
– Sewing machine with a standard foot
– Iron and ironing board
– Sharp fabric scissors
– Pins or wonder clips
Cutting List
Note: All pieces include a 1/4 in (6 mm) seam allowance.
| Piece |
Fabric |
Cut Size W x H |
How Many |
| Main Front Left (Floral) |
Floral linen |
3 1/2 in x 5 in (9 cm x 13 cm) |
4 (one of each print: green, yellow, blue, navy) |
| Main Front Right (Solid/Check) |
Neutral canvas or check |
2 in x 5 in (5 cm x 13 cm) |
4 |
| Backing Square |
Neutral canvas or check |
5 in x 5 in (13 cm x 13 cm) |
4 |
| Fusible Fleece Interfacing |
Fusible fleece |
5 in x 5 in (13 cm x 13 cm) |
4 |
Before You Start
Give your fabric scraps a quick press with a hot iron to smooth out any wrinkles before you cut. This ensures your pieced sections line up evenly. Fuse the rough, bumpy side of each 5 in fusible fleece square to the wrong side of your four backing squares following the manufacturer’s heat instructions.
Step-by-Step Instructions
Step 1: Piece the Front Panels
Take one Main Front Left floral place and place it right sides together with one Main Front Right solid or check piece along their 5 in vertical edges. Pin in place.
Step 2: Stitch the Pieced Seam
Sew the two front pieces together down the vertical edge using a 1/4 in (6 mm) seam allowance. Backstitch at the start and end to secure your threads.
✅ Checkpoint: When pressed flat with your iron, your pieced front panel should measure 5 in x 5 in (13 cm x 13 cm). Repeat for all four coasters.
Step 3: Layer Front and Back
Place your newly pieced front panel face up on your work table. Place your backing square (with the fusible fleece already fused to its wrong side) directly on top, face down, so the pretty sides of the fabric are facing each other.
Step 4: Pin and Mark the Turning Gap
Align all four raw outer edges carefully and pin through all layers. Along the bottom edge, mark a 2 in (5 cm) opening with two pins to remind yourself where to leave a gap for turning.
Step 5: Stitch Around the Perimeter
Start sewing at the first turning gap marker, backstitching securely, and sew all the way around the 5 in square using a 1/4 in (6 mm) seam allowance. Pivot sharply at each of the four corners with your needle down in the fabric. Stop at the second turning gap marker and backstitch.
💡 Designer Tip: To keep your straight seams even, line up the raw edge of your fabric with the 1/4 in line on your machine’s throat plate rather than watching the needle.
Step 6: Trim the Corners
Snip across all four outer corners diagonally, cutting close to your stitching line without clipping through the thread. This removes bulky excess fabric so your corners pop out sharp and square.
Step 7: Turn Right Side Out
Reach through the 2 in (5 cm) opening at the bottom and gently turn the coaster right side out. Use a blunt tool like a turning stick or a closed pair of scissors to gently push out all four corners until they are crisp.
Step 8: Press the Coaster
Press the whole coaster flat with your iron, making sure the raw edges of the 2 in turning gap are tucked neatly inside so they match the rest of the seam line.
Finishing
Take your pressed coasters to the sewing machine. Topstitch all the way around the outer perimeter of each coaster about 1/8 in (3 mm) from the edge. This topstitching creates a neat, polished frame and permanently closes your turning gap in one smooth line of stitching. Give them a final press.
Size and Fabric Variations
If you want larger coasters for mugs or small bowls, cut your front and back squares 6 in x 6 in (15 cm x 15 cm) instead of 5 in, keeping the 1/4 in seam allowance. You can also experiment with quilting lines across the finished square to practice free-motion or straight-line grid quilting.
Care Instructions
Drop these coasters into the washing machine on a gentle cold cycle whenever they get a coffee ring or crumb stain. Lay them flat on a towel to air dry, then touch them up with a hot iron.
FAQ
Can I make these without fusible fleece?
Yes, you can use a layer of lightweight flannel or cotton batting from your scrap bin instead, though the fleece gives the best stability for heavy glasses.
Why do my corners look rounded after turning?
You likely didn’t clip close enough to the corner seam, or you left too much bulk inside the point. Trim closer to the stitches next time before turning.
Can I sew these by hand?
You can, but machine sewing is much faster and gives you the even, sturdy tension needed for topstitching.
Happy Sewing!
I hope these little fabric scrap squares bring a bit of charm to your coffee table and help you practice your straight stitching. Save this pin on Pinterest so you can find it later when your scrap basket overflows. If you make one, I would love to see it: send me a photo through the contact page.