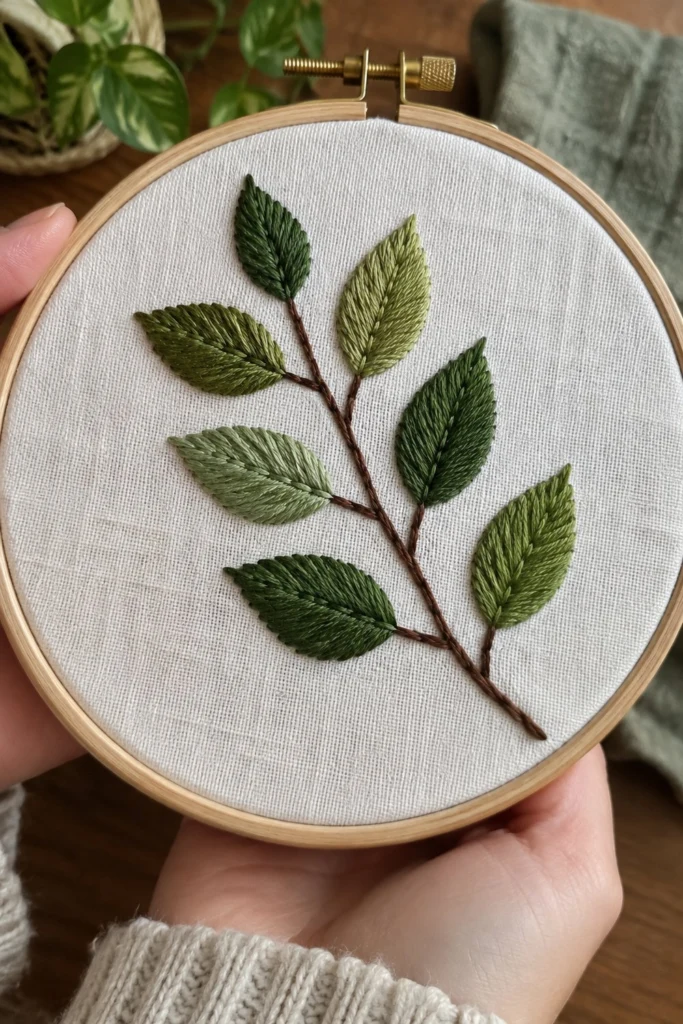
If you want to get better at satin stitch so it actually looks smooth and flat instead of bulky and messy, this little leaf study is just the thing. The secret lies in a split stitch outline, which gives your satin stitches a sharp, raised edge to butt up against. I stitched nine leaves in olive and moss greens on plain white cotton, and it sits right in a wooden hoop ready to hang on the wall or sit on your shelf.
Quick Facts
Skill level: Intermediate
Finished size: 5 in (13 cm) across the design area in a 5 in (13 cm) hoop
Hoop: 5 in (13 cm) wooden embroidery hoop
Fabric: White plain-weave cotton or linen, cut to 9 in x 9 in (23 cm x 23 cm)
Stitches used: Split stitch, satin stitch
Time to make: 3 to 4 hours
What Makes This Hoop Special
Every leaf on this branch is a lesson in tension and angle. The split stitch border holds your satin stitches in place so they do not slip past the edge of the leaf. Working the satin stitch at a gentle forty-five degree angle makes the light catch the floss just right, giving you a shiny finish that looks like a real leaf.
Finished Size
The embroidered design spans about 4 in (10 cm) wide by 4 1/2 in (11 cm) high. It is centered inside a 5 in (13 cm) wooden embroidery hoop.
Materials You Will Need
- White cotton fabric: one piece cut to 9 in x 9 in (23 cm x 23 cm)
- 5 in (13 cm) wooden embroidery hoop
- Embroidery needle: size 5 or 7 sharps
- Small embroidery scissors
- Water-soluble transfer pen or pencil
| Colour Name |
DMC Number |
Strands |
Used For |
Skeins |
| Dark Olive Green |
DMC 3011 |
2 strands |
Outlines, stem, leaf fills |
2 |
| Medium Moss Green |
DMC 3012 |
2 strands |
Leaf fills |
2 |
| Light Sage Green |
DMC 3013 |
2 strands |
Leaf fills |
2 |
Stitches Used
Split Stitch
- Bring your needle up through the fabric on the line, then take a short stitch forward.
- Bring the needle back up right through the middle of that first stitch, splitting the two strands of floss.
- Pull the thread through, then take another short stitch forward, splitting the previous stitch again.
- Keep the stitches even in length to form a solid, slightly raised line.
Satin Stitch
- Bring your needle up on one side of your shape, then take it down directly across on the opposite side.
- Come back up right next to your starting point, leaving no fabric visible between the threads.
- Lay each stitch parallel to the last, making sure not to pull the thread so tight that the fabric puckers.
- Cover the entire shape until the fill is smooth and solid.
Transferring the Design
To draw the branch freehand, center your 9 in x 9 in (23 cm x 23 cm) fabric in the hoop and tighten the screw. Lightly sketch a central stem running from about 1 in (2.5 cm) above the bottom edge up to 1 in (2.5 cm) below the top edge. Draw nine small leaf shapes branching off from the main stem, each about 1 in (2.5 cm) long and 1/2 in (1.3 cm) wide. Four leaves sit on the left side, four on the right, and one sits right at the very top tip.
You can also tape your fabric to a sunny window with the design printed or drawn on paper underneath, then trace the lines using your water-soluble pen.
Stitching Instructions
1. The Main Stem and Side Stems
Using Dark Olive Green (DMC 3011) threaded with 2 strands, work the main branch and all small connecting stems using split stitch. Keep your stitches short so the curves stay smooth.
✅ Checkpoint: The branch should form a continuous, crisp line with no fabric showing through between stitches.
2. Leaf Outlines
Using Dark Olive Green (DMC 3011) with 2 strands, outline every single leaf with a single row of split stitch just inside the drawn edge.
💡 Designer Tip: Do not skip this outline step. It acts as a little fence that keeps your satin stitch edges straight and neat.
3. Leaf Fills (Satin Stitch)
Fill the nine leaves with satin stitch at a forty-five degree angle, using 2 strands of floss. Match your thread colours to the photo: use Dark Olive Green (DMC 3011) for the top leaf, bottom leaf, and middle-right leaf; Medium Moss Green (DMC 3012) for the top-right and middle-left leaves; and Light Sage Green (DMC 3013) for the top-left and lower-left-center leaves. Pierce your needle just outside the split stitch outline so the satin stitches hug the border tightly.
✅ Checkpoint: Run your finger gently over the finished leaves; they should feel smooth, flat, and firm without any loose threads sagging in the middle.
Finishing the Hoop
Take your fabric out of the hoop and dab away any remaining blue ink with a damp cloth, then let it dry completely. Press the embroidery face down on a soft towel with your iron set to a medium cotton heat so you do not crush the stitches. Place the fabric back into the hoop, pull the edges taut all the way around, and tighten the screw firmly. Trim the excess fabric in the back to about 1/2 in (1.3 cm), and run a running stitch around the raw edge to gather it tight against the back of the hoop.
Tips and Variations
If you want to make this design on clothing instead of a practice hoop, trace just three leaves onto the pocket of a canvas tote bag or the collar of a plain linen shirt. You can swap the greens for autumn rusts and golds if you want an autumn branch instead of summer leaves.
FAQ
Why are my satin stitches loose in the middle?
Your stitches are likely too long across a wide span. Satin stitch works best on shapes under 1 in (2.5 cm) wide. If your leaf is wider, try splitting the fill into two sections or switch to a long and short stitch.
Can I use all six strands of embroidery floss straight from the skein?
Six strands will make your leaves very bulky and hard to pierce cleanly. Sticking to two strands gives you the control needed for smooth edges and a flat finish.
How do I keep my fabric from slipping in the hoop?
Wrap a thin strip of cotton bias tape or scrap fabric around the inner ring of your wooden hoop before you mount your embroidery fabric. This gives the cotton extra grip so it stays drum-tight.
Happy Stitching!
I hope stitching these leaves brings you a quiet, enjoyable afternoon at your sewing table. Save this pattern on Pinterest for your next embroidery session. If you make one, I would love to see it: send me a photo through the contact page.
– Vera