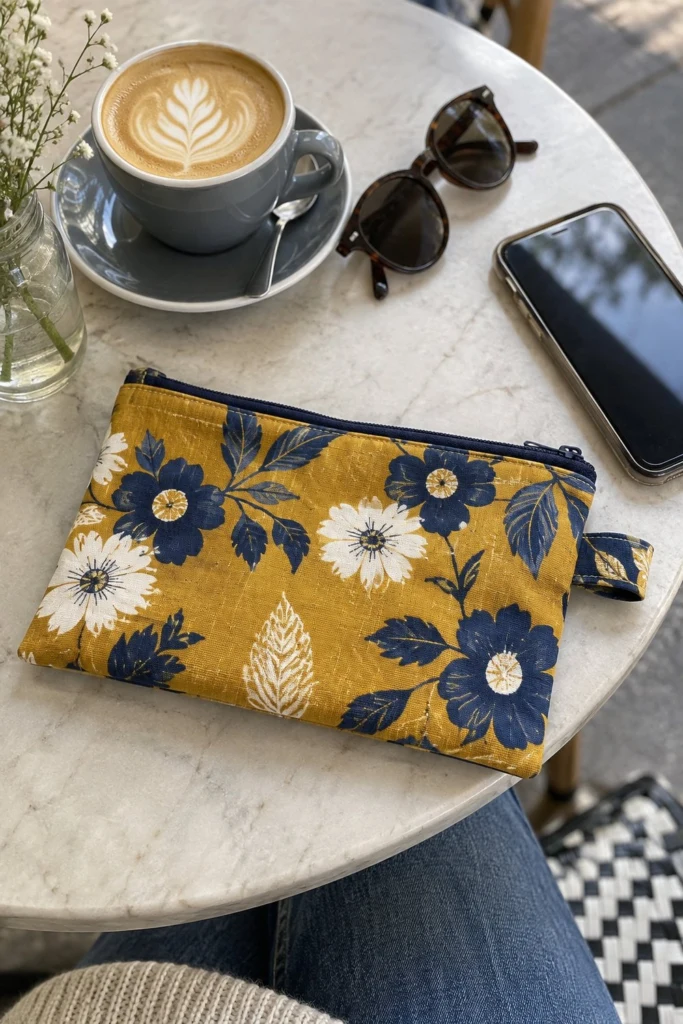
This mustard floral zipper pouch is the project I reach for when I want a quick win at the sewing machine. The mustard background makes the navy and white floral print pop, and the navy zipper and side tab finish the edges so neatly. It is just the right size for a phone, a couple of cards, and a lip balm when you are running out the door.
Quick Facts
Skill level: Beginner
Finished size: 9 in wide by 6 in high (23 cm wide by 15 cm high)
Fabric: Cotton-linen blend with mustard and navy floral print, matching solid navy lining
Seam allowance: 3/8 in (1 cm)
Time to make: 45 minutes
Machine needed: Standard sewing machine with a zipper foot
What Makes This Pouch Special
The design is simple, but two details give it a professional finish. First, the fabric zipper tab on the right end hides the raw edges of the zipper tape and gives you something to hold onto when you pull the zip. Second, the full lining means there are no raw seams on the inside to fray over time.
Finished Size
| Dimension |
Inches |
Centimetres |
| Width |
9 in |
23 cm |
| Height |
6 in |
15 cm |
| Depth |
2 in |
5 cm |
Materials You Will Need
| Material / Notion |
Amount |
Notes |
| Mustard floral fabric |
5/8 yd (0.6 m) |
Outer body and zipper tab |
| Navy lining fabric |
5/8 yd (0.6 m) |
Interior lining |
| Fusible interfacing |
5/8 yd (0.6 m) |
Lightweight woven or tricot |
| Zipper |
10 in (25.5 cm) |
Closed-end metal or nylon coil zip |
| Matching thread |
1 spool |
All-purpose polyester |
Tools: Sewing machine, zipper foot, fabric shears, pins or wonder clips, iron and ironing board, safety pin or bodkin.
Cutting List
Seam Allowance: 3/8 in (1 cm) throughout, unless noted otherwise.
| Piece |
Fabric |
Cut Size (Width x Height) |
Qty |
| Outer Body |
Mustard Floral |
9 3/4 in x 6 3/4 in (25 cm x 17 cm) |
2 |
| Lining |
Navy |
9 3/4 in x 6 3/4 in (25 cm x 17 cm) |
2 |
| Interfacing |
Fusible Interfacing |
9 3/4 in x 6 3/4 in (25 cm x 17 cm) |
2 |
| Zipper Tab |
Mustard Floral |
2 in x 2 1/2 in (5 cm x 6.5 cm) |
1 |
Before You Start
Pre-press your fabrics with a hot iron to remove any creases. Fuse the woven interfacing to the wrong side of both outer body panels following the manufacturer’s heat instructions. This gives the pouch enough body to stand up on its own without feeling stiff.
Step-by-Step Instructions
Step 1: Prep the Zipper Tab
Take the small mustard floral zipper tab piece and press the long raw edges in toward the centre by 1/4 in (0.6 cm). Fold the piece in half lengthwise, right sides out, enclosing the raw edges, and press again. Slide this folded tab over one cut end of your zipper tape, pin it in place, and stitch across it close to the folded edge to secure it. Trim any excess zipper tape so the total zipper length matches the 9 3/4 in (25 cm) width of your pouch panels.
Step 2: Attach the Outer Panel and Lining to the Zipper
Lay one outer body panel face up on your table. Place your zipper face down along the top raw edge of the outer panel, aligning the raw edges together. Place one navy lining panel face down right on top of the zipper and outer panel, sandwiching the zipper tape between the two fabrics. Pin all three layers together along the top edge.
Step 3: Sew the First Zipper Sandwich
Attach your zipper foot to your sewing machine. Sew along the top edge using a 3/8 in (1 cm) seam allowance, keeping your stitches running just alongside the zipper teeth.
💡 Designer Tip: When your sewing foot gets close to the metal zipper pull, stop with the needle down in the fabric, lift the presser foot, and slide the zipper pull back out of the way before continuing down the seam.
Step 4: Press and Topstitch
Flip the outer panel and the lining away from the zipper so both wrong sides are facing each other, and press the seam flat. Switch back to a standard presser foot and topstitch along the folded edge of the fabric about 1/8 in (0.3 cm) away from the zipper teeth on both the outer and lining sides. This keeps the lining from getting caught in the teeth later.
Step 5: Add the Second Side
Lay your second navy lining panel face up on the table. Place your assembled outer-and-zipper piece face down on top of it, aligning the remaining long edge of the zipper with the top edge of the lining. Finally, place your second outer mustard floral panel face down on top of that, creating the second sandwich. Pin through all layers along the top edge and sew with a 3/8 in (1 cm) seam allowance. Press both fabrics away from the zipper and topstitch through the fabric layers just like you did in Step 4.
Step 6: Open the Zipper
⚠️ Note: Do not skip this step! Unzip your zipper about halfway right now. If you leave the zip closed, you will not be able to turn your pouch right side out after sewing the final seams.
Step 7: Sew Around the Pouch
Pull the two outer panels together with right sides facing, and pull the two lining panels together with right sides facing, pushing the zipper teeth toward the lining side. Pin all the way around the outer rectangle and the lining rectangle, leaving a 3 in (7.5 cm) opening along the bottom edge of the lining for turning.
✅ Checkpoint: Make sure the zipper tape ends are pointing toward the lining side so they get caught neatly in the side seams.
Step 8: Stitch the Perimeter
Sew all the way around the outer edge of the pouch using a 3/8 in (1 cm) seam allowance, pivoting carefully at all four corners. Backstitch at the start and stop points near the lining opening.
Finishing
Trim the excess corners of the fabric at a diagonal angle close to your stitching, taking care not to cut through your threads. Reach through the opening in the lining and gently pull the entire pouch right side out through the open zipper and the lining gap. Push the corners out fully with a blunt turning tool. Tuck the raw edges of the lining opening under so they match the rest of the seam, press it flat with your iron, and topstitch the lining opening closed close to the edge. Push the lining down inside the outer pouch and give the whole bag a final press.
Size and Fabric Variations
- For a larger phone pouch: Cut your outer panels, linings, and interfacing to 11 in wide by 7 1/2 in high (28 cm x 19 cm), and use a 12 in (30.5 cm) zipper.
- For a quilted version: Quilt your outer fabric to a layer of thin cotton batting before cutting out your panel shapes.
Care Instructions
Spot clean with a damp cloth and mild soap when needed. If the pouch gets heavily creased, iron it on a medium cotton setting, avoiding direct contact with the plastic or metal zipper teeth.
FAQ
Can I use a metal zipper instead of a nylon coil one?
Yes, metal zippers look lovely on this project. Just make sure to stop sewing well before your needle hits any metal teeth so you do not break a needle.
What if my zipper is longer than the pattern calls for?
Zippers are easy to shorten. Simply measure the required length from the closed stop, mark it, and sew a few tight zigzag stitches across the teeth at that mark before cutting off the excess tape.
Do I really need to use interfacing?
Interfacing gives this pouch its structured shape. Without it, the cotton-linen blend will feel too floppy, and the pouch will slouch when you set it down.
Happy Sewing!
I hope you enjoy making this quick zipper pouch as much as I do. Save this pin on Pinterest so you can find it easily the next time you need a fast gift idea. If you make one, I would love to see it: send me a photo through the contact page.