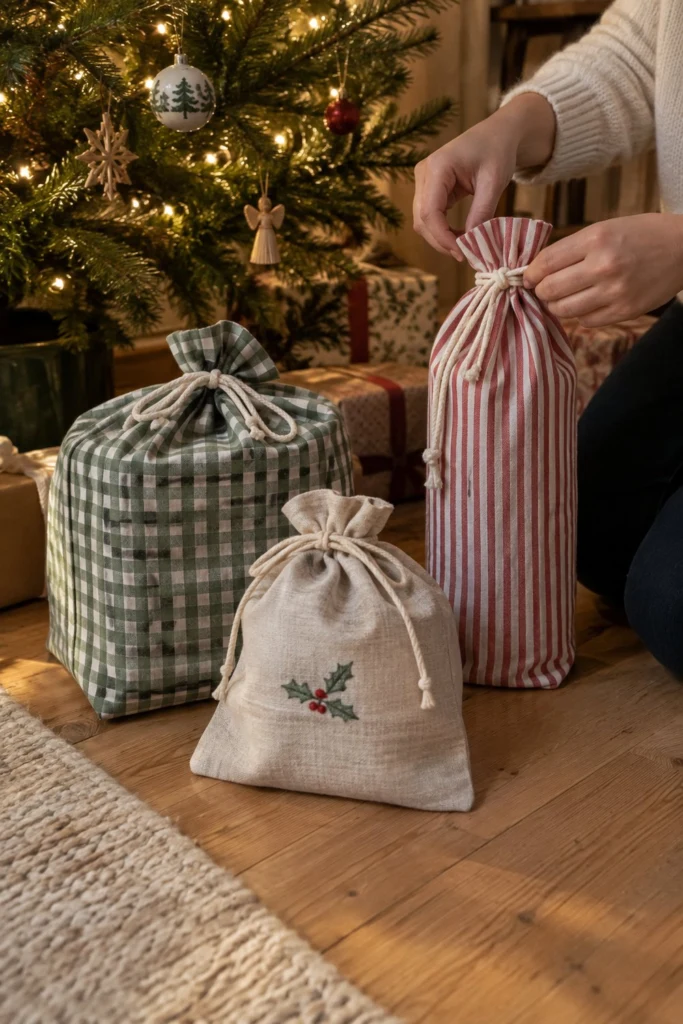
These reusable fabric gift bags look tidy inside and out thanks to French seams that hide all raw edges. Make a stack in green gingham, natural linen with holly embroidery, and red ticking stripe, thread them with cotton cord, and you will never need to buy wrapping paper again.
Quick Facts
- Skill level: Beginner
- Finished size: Small (8 x 9 1/4 in), Medium (12 x 15 1/4 in), Bottle (6 x 13 1/4 in)
- Fabric: Light-to-medium weight cotton, linen, or canvas
- Seam allowance: 1/2 in (1.3 cm) unless noted
- Time to make: 45 minutes per bag
- Machine needed: Standard sewing machine (hand sewing works too)
What Makes This Drawstring Gift Bag Special
These bags use French seams so the inside looks just as neat as the outside, with no fraying edges. The casing is built right into the top edge by folding and stitching, and threading two cords from opposite sides makes opening and closing smooth and even.
Finished Size
| Bag Type |
Finished Width |
Finished Height |
| Small |
8 in (20.5 cm) |
9 1/4 in (23.5 cm) |
| Medium |
12 in (30.5 cm) |
15 1/4 in (39 cm) |
| Bottle |
6 in (15 cm) |
13 1/4 in (33.5 cm) |
Materials You Will Need
| Material / Notion |
Amount (Yd / M) |
Notes |
| Fabric for Small Bag |
2/3 yd (0.6 m) |
Natural linen or cotton |
| Fabric for Medium Bag |
1 yd (0.9 m) |
Green gingham cotton |
| Fabric for Bottle Bag |
7/8 yd (0.8 m) |
Red ticking stripe cotton |
| Cotton Cord or Twine |
1 1/4 yds (1.2 m) |
1/8 in to 1/4 in wide |
- Tools: Rotary cutter, acrylic ruler, cutting mat, sewing machine, matching thread, safety pin or bodkin for threading cord, iron.
Cutting List
Seam allowance is 1/2 in (1.3 cm) throughout.
| Piece |
Fabric |
Cut Size W x H (Inches) |
Cut Size W x H (Metric) |
How Many |
| Small Bag Panel |
Natural linen |
9 x 22 1/2 in |
23 x 57 cm |
1 on fold or 2 separate |
| Medium Bag Panel |
Green gingham |
13 x 34 1/2 in |
33 x 88 cm |
1 on fold or 2 separate |
| Bottle Bag Panel |
Red stripe |
7 x 30 1/2 in |
18 x 77.5 cm |
1 on fold or 2 separate |
| Cord (per bag) |
Cotton cord |
2 pieces at 20 in |
2 pieces at 51 cm |
2 |
💡 Designer Tip: If you are cutting multiple sizes, label your pieces with small scraps of paper pinned to them so you do not mix up the medium and bottle bag heights.
Before You Start
Wash and press your fabric before cutting to prevent any shrinkage later. Cut your panels carefully using a rotary cutter and ruler so your side edges match up evenly when folded.
Step-by-Step Instructions
Step 1: Fold the Panel
Place your fabric panel face down on your ironing board. Fold the top raw edge down by 1/2 in (1.3 cm) toward the wrong side and press it flat.
Step 2: Form the Casing
Fold the pressed edge down again by 1 1/2 in (3.8 cm) toward the wrong side to create the casing channel. Press it firmly and pin it in place.
Step 3: Stitch the Casing
Sew close to the lower folded edge of the casing, stitching all the way across the width of the panel. Backstitch at both ends to secure your threads.
✅ Checkpoint: The casing channel should be smooth and even, measuring about 1 in (2.5 cm) wide from the top fold to your stitching line.
Step 4: First Seam (Wrong Sides Together)
Fold your bag panel in half with wrong sides together, matching the side edges and the bottom fold. Pin the two side edges. Sew down both side seams using a 1/4 in (0.6 cm) seam allowance, stopping just below the casing stitching line. Do not sew into the casing.
Step 5: Trim and Press
Trim the side seam allowances down to 1/8 in (0.3 cm) to remove any loose threads. Turn the bag inside out so the wrong side is facing out again, poking out the bottom corners neatly with a point turner. Press the side seams flat.
Step 6: Second Seam (Right Sides Together)
Pin the side edges again. Sew down both side seams using a 3/8 in (1 cm) seam allowance, enclosing the raw edges completely inside the French seam. Stop right below the casing opening and backstitch.
✅ Checkpoint: Turn the bag right side out. The inside side seams should look like clean enclosed folds with no raw threads showing.
Step 7: Thread the Cords
Attach a safety pin to one end of your first cord. Feed it into one side of the casing, travel all the way around, and pull it out the same side it went in. Take your second cord, enter from the opposite side of the casing, go all the way around, and pull it out. Tie the ends of each cord in a knot.
Finishing
Trim any stray threads from the casing and side seams. Give the finished bag a final press with your iron to make the folds crisp.
Size and Fabric Variations
If you want to make an extra-large gift bag to hold bulky items, cut your panel 17 x 42 1/2 in (43 x 108 cm) and follow the exact same construction steps. You can also use lightweight quilting cotton, canvas, or festive flannel depending on how structured you want the bag to be.
Care Instructions
Machine wash in cold water on a gentle cycle. Tumble dry on low heat or line dry, and warm iron if needed to crisp up the fabric.
FAQ
Can I make these bags without a sewing machine?
Yes, you can hand sew all the seams using a strong backstitch, though a sewing machine will make the project go much faster.
Why do I need to sew French seams?
French seams enclose all raw edges inside the seam, which keeps the inside of the gift bag neat and prevents fraying when the bag is pulled open and closed repeatedly.
How do I adjust the cord length?
If you are making a wider bag, cut your two cords an extra 4 in (10 cm) longer so you have plenty of room to pull and tie them comfortably.
Happy Sewing!
I hope you enjoy making these reusable gift bags for the holidays. Save this pin on Pinterest so you can find it easily later. If you make one, I would love to see it: send me a photo through the contact page.