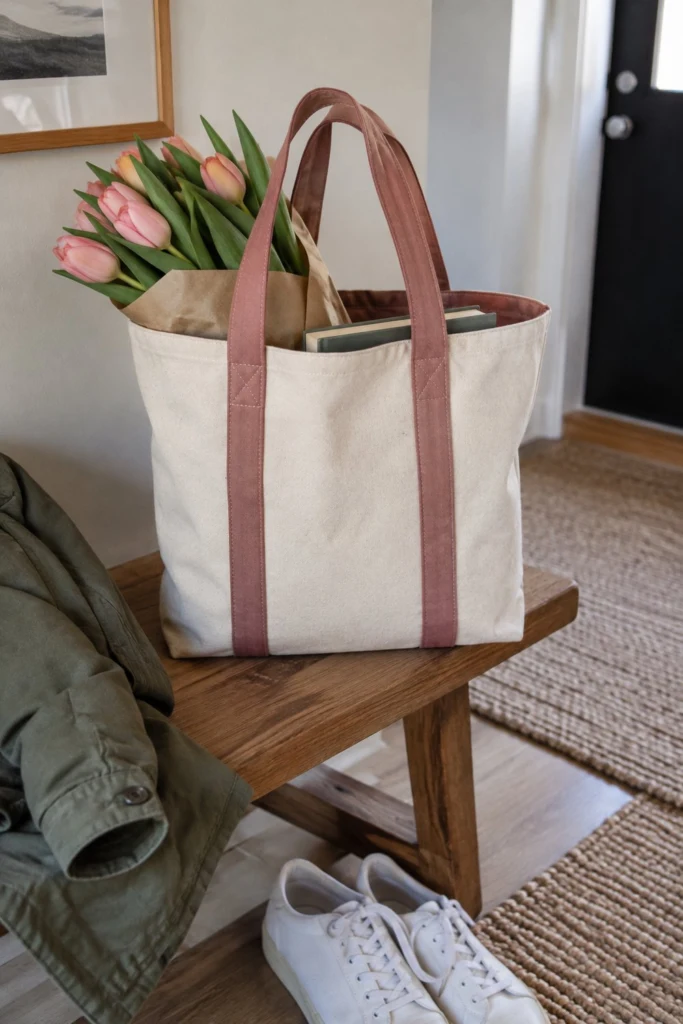
This canvas tote bag has sturdy boxed corners, a clean lining, and dusty rose straps that fit comfortably over your shoulder. It is the kind of bag you grab for the farmers’ market, library runs, or everyday errands when you need something reliable that holds its shape.
Quick Facts
Skill level: Confident beginner
Finished size: 14 in wide x 13 in high x 3 in deep (35.5 cm x 33 cm x 7.5 cm)
Fabric: Medium-weight cream cotton canvas and dusty rose cotton
Seam allowance: 1/2 in (1.3 cm)
Time to make: 2 hours
Machine needed: Standard sewing machine
What Makes This Lined Tote Bag Special
This design skips the fiddly bits and focuses on clean construction. The heavy cream canvas outer gives the bag enough structure to stand up on its own while you load it, and the contrasting dusty rose strap fabric adds a crisp two-tone look. Boxed corners create a flat bottom so books, binders, and bunches of tulips sit properly instead of rolling around.
Finished Size
| Dimension |
Inches |
Centimetres |
| Width |
14 in |
35.5 cm |
| Height |
13 in |
33 cm |
| Depth |
3 in |
7.5 cm |
| Strap Drop |
11 in |
28 cm |
Materials You Will Need
| Material / Notion |
Amount (Imperial) |
Amount (Metric) |
Notes |
| Cream Canvas |
1 yd |
90 cm |
For the outer bag body |
| Dusty Rose Cotton |
3/4 yd |
70 cm |
For the lining and straps |
| Coordinating Thread |
1 spool |
1 spool |
All-purpose polyester |
Tools:
– Sewing machine and standard needles (size 90/14 for canvas)
– Fabric shears and rotary cutter with cutting mat
– Iron and ironing board
– Pins or wonder clips
– Safety pin or bodkin for turning straps
Cutting List
Seam allowance: 1/2 in (1.3 cm) unless noted otherwise.
| Piece |
Fabric |
Cut Size (W x H) |
Qty |
| Outer Body |
Cream Canvas |
15 in x 15 1/2 in (38 cm x 39.5 cm) |
2 |
| Lining Body |
Dusty Rose Cotton |
15 in x 15 1/2 in (38 cm x 39.5 cm) |
2 |
| Straps |
Dusty Rose Cotton |
4 in x 28 in (10 cm x 71 cm) |
2 |
Before You Start
Pre-wash and dry your canvas and cotton fabrics on the settings you plan to use later, as canvas tends to shrink slightly on the first wash. Press your fabrics flat with a hot iron before cutting out your rectangles.
💡 Designer Tip: When cutting heavy canvas, a rotary cutter and a heavy-duty acrylic ruler will give you much straighter edges than scissors alone.
Step-by-Step Instructions
Step 1: Prep the Straps
Take one dusty rose strap strip and fold it in half lengthwise, wrong sides together, press with your iron to crease the center line. Open it up, then fold the long raw outer edges inward to meet that center crease. Press again. Fold the whole strap in half lengthwise along the original crease, enclosing all raw edges inside. Press firmly and pin along the open edge. Repeat for the second strap.
Step 2: Topstitch the Straps
Take your pressed dusty rose straps to the sewing machine. Edgestitch down the open folded side, staying about 1/16 in from the edge. Sew a second row of topstitching along the opposite folded edge to match. Set your straps aside.
Step 3: Attach Straps to Outer Panels
Take one cream canvas Outer Body panel and lay it flat with the right side facing up. Measure 3 1/2 in (9 cm) in from the left raw edge and place one end of a dusty rose strap raw edge flush with the top raw edge of the panel. Pin the strap down vertically, making sure it is not twisted. Measure 3 1/2 in (9 cm) from the right raw edge and pin the other end of the same strap in the same way. Repeat for the second Outer Body panel with the second strap.
Stitch across each strap end in a small square with an ‘X’ inside it, about 1/4 in from the top raw edge, to secure the straps firmly in place.
✅ Checkpoint: Both cream outer panels should now have a dusty rose strap securely stitched to their right sides, looped downward toward the bottom edge.
Step 4: Sew the Outer Bag Sides
Place the two cream Outer Body panels right sides together, matching the side and bottom edges. Pin around the two sides and the bottom edge. Stitch with a 1/2 in (1.3 cm) seam allowance down the left side, across the bottom, and up the right side. Leave the top edge open. Backstitch at the start and finish.
Step 5: Box the Outer Corners
At the bottom corners of your stitched cream outer bag, open out the side seam and bottom seam so they match up center-to-center, creating a flat triangular wedge. Measure 1 1/2 in (3.8 cm) from the point of the corner inward, draw a line perpendicular to the seam, and stitch across it. Repeat for the other bottom corner. Trim the excess corner fabric away, leaving a 1/4 in seam allowance.
✅ Checkpoint: Turn the outer bag right side out and check your bottom corners. They should sit flat with sharp points.
Step 6: Assemble the Lining
Take the two dusty rose Lining Body panels and place them right sides together. Pin the two sides and bottom edge, but leave a 5 in (12.5 cm) turning gap open along the bottom edge. Stitch around the sides and bottom using a 1/2 in (1.3 cm) seam allowance, remembering to start and stop at your turning gap markers. Box the bottom corners of the lining the exact same way you did for the outer bag (1 1/2 in / 3.8 cm square cut-outs), but leave the lining inside out.
Step 7: Join Outer and Lining
Leave your cream outer bag right side out with the straps tucked safely down inside the bag body. Slip the outer bag down inside the inside-out dusty rose lining bag, so the right sides of the outer and lining fabrics are facing each other. Match the side seams up precisely and align the top raw edges all the way around. Pin every few inches.
Step 8: Stitch the Top Edge
Sew all the way around the top opening in a circle using a 1/2 in (1.3 cm) seam allowance. Take your time around the thick strap areas, turning your hand wheel if your machine struggles with the multiple layers of canvas.
Step 9: Turn the Bag
Reach through the 5 in (12.5 cm) turning gap you left in the bottom of the lining. Grab the outer bag and gently pull the entire bag through the gap. Work your fingers into the corners to push them out fully.
Finishing
Push the lining down inside the cream canvas outer bag. Press the top edge flat with your iron so the lining rolls slightly toward the inside, keeping the stitching line hidden. Topstitch all the way around the top opening of the bag at 1/4 in from the edge to give it a crisp, professional finish. Finally, tuck the raw edges of the lining opening inside by 1/2 in, press, and topstitch the gap closed close to the fold.
Size and Fabric Variations
- Deeper Bag: If you want a 2 in deeper bag, cut your Outer Body and Lining Body panels 2 in taller (17 1/2 in high instead of 15 1/2 in), and increase your boxed corner cut-out to 2 in instead of 1 1/2 in.
- All-Canvas Version: You can use canvas for the lining too if you want an extra-heavyweight utility bag that has zero flop.
Care Instructions
Spot clean cream canvas marks with a damp cloth and mild soap when possible. If the whole bag needs a wash, turn it inside out and machine wash on a gentle cold cycle. Line dry in the shade to prevent shrinkage and press with a hot iron while slightly damp.
FAQ
Can I sew this bag on a basic sewing machine?
Yes, absolutely. Just make sure you use a denim or canvas needle (size 90/14 or 100/16) and go slowly when crossing over the thick strap attachment areas.
Do I need to interface the canvas?
No. Quality cotton canvas has enough natural body and weight to hold its shape on its own without iron-on interfacing.
Can I make the straps longer to wear cross-body?
Yes. Just cut your dusty rose strap strips to 4 in x 42 in (10 cm x 106 cm) instead of 28 in to get a comfortable cross-body drop.
Happy Sewing!
I hope this sturdy canvas tote serves you well on all your daily runs. If you make one, save the pin to your Pinterest boards. If you make one, I would love to see it: send me a photo through the contact page.