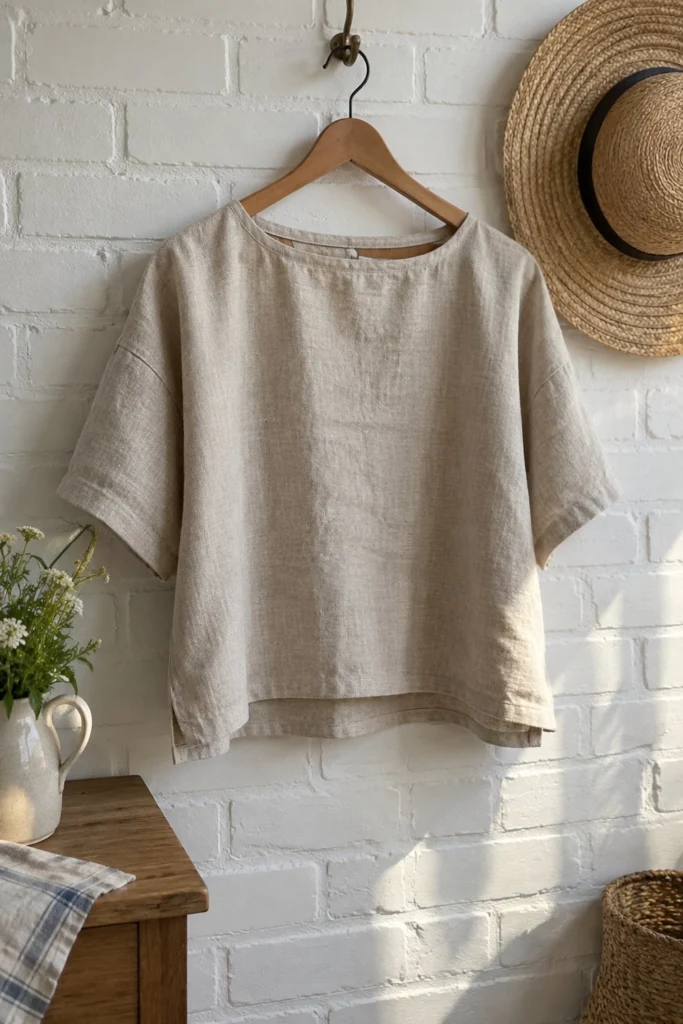
This simple, natural linen boxy top is the easiest garment you can sew for warm weather. It hangs in soft, relaxed folds against the brick wall without needing any darts, zippers, or complicated fitting.
Quick Facts
- Skill level: Beginner
- Finished size: Sizes XS to 3XL (see Finished Size table)
- Fabric: Medium-weight natural linen in oatmeal
- Seam allowance: 3/8 in (1 cm)
- Time to make: 3 to 4 hours
- Machine needed: Standard sewing machine
What Makes This Linen Top Special
The beauty of this boxy top comes from its clean lines and wide, comfortable cut. The shoulder seams drop slightly onto the arm, and the short sleeves are cut straight into the side panels so there are no awkward sleeve caps to ease in. I added neat side slits at the hem so the linen moves freely when you walk.
Finished Size
| Size |
Bust (in / cm) |
Length (in / cm) |
Sleeve Length (in / cm) |
| XS |
20 1/4 / 51.5 |
21 1/4 / 54 |
9 / 23 |
| S |
22 1/4 / 56.5 |
21 3/4 / 55 |
9 1/2 / 24 |
| M |
24 1/4 / 61.5 |
22 1/4 / 56.5 |
10 / 25.5 |
| L |
26 1/4 / 66.5 |
22 3/4 / 58 |
10 1/2 / 26.5 |
| XL |
28 1/4 / 72 |
23 1/4 / 59 |
11 / 28 |
| 2XL |
30 1/4 / 77 |
23 3/4 / 60 |
11 1/2 / 29 |
| 3XL |
32 1/4 / 82 |
24 1/4 / 61.5 |
12 / 30.5 |
Materials You Will Need
| Material / Notion |
Amount (yd and m) |
Notes |
| Oatmeal linen fabric |
1 3/4 yd (1.6 m) |
54 in (140 cm) wide, medium weight |
| Matching polyester thread |
1 spool |
To match the oatmeal linen |
| Bias tape (single fold, 1/2 in / 1.3 cm wide) |
1 yd (0.9 m) |
For finishing the back neckline facing |
Tools: Sewing machine, fabric shears, tape measure, pins or clips, iron, ironing board, tailor’s chalk.
Cutting List
Seam allowance is 3/8 in (1 cm) throughout, except for the hem and side slit fold-backs which are 3/4 in (2 cm). Cut these pieces from your oatmeal linen:
| Piece |
Fabric |
Cut Size W x H in (cm) |
How Many |
| Front Panel |
Oatmeal Linen |
XS: 21 x 22 (53.5 x 56)
S: 23 x 22 1/2 (58.5 x 57)
M: 25 x 23 (63.5 x 58.5)
L: 27 x 23 1/2 (68.5 x 60)
XL: 29 x 24 (73.5 x 61)
2XL: 31 x 24 1/2 (78.5 x 62)
3XL: 33 x 25 (84 x 63.5) |
1 on fold |
| Back Panel |
Oatmeal Linen |
Same width and height as Front Panel |
1 on fold |
| Sleeve Extenders |
Oatmeal Linen |
XS: 12 x 9 (30.5 x 23)
S: 12 x 9 1/2 (30.5 x 24)
M: 13 x 10 (33 x 25.5)
L: 13 x 10 1/2 (33 x 26.5)
XL: 14 x 11 (35.5 x 28)
2XL: 14 x 11 1/2 (35.5 x 29)
3XL: 15 x 12 (38 x 30.5) |
2 |
Before You Start
Wash and dry your linen before cutting, as linen always shrinks a little on its first trip through the laundry. Press the fabric flat with a hot iron. Fold your linen in half lengthwise, matching the selvages, and lay it on a flat table before marking your cutting lines with tailor’s chalk.
Step-by-Step Instructions
Step 1: Shape the Necklines
Fold the Front Panel in half vertically to find the center. Measure down 3 in (7.5 cm) from the top raw edge along the center fold and mark with chalk. Draw a gentle scoop curve from shoulder edge to shoulder edge. Cut along your chalk line. Repeat for the Back Panel, but measure down only 1 in (2.5 cm) for a shallower scoop.
Step 2: Join the Shoulder Seams
Place the Front Panel and Back Panel right sides together. Pin the shoulder edges on both sides. Sew across each shoulder using a 3/8 in (1 cm) seam allowance. Finish the raw edges with a zigzag stitch or a serger, then press the seams toward the back.
Step 3: Attach the Sleeves
Open out your flat top with the right side facing up. Take one Sleeve Extender piece, find its long edge, and align it along the armhole opening of the top, right sides together. Pin in place. Sew with a 3/8 in (1 cm) seam allowance. Repeat for the other side. Press the seams open.
Step 4: Sew the Side Seams and Slits
Fold the top back over at the shoulders, matching the front and back pieces right sides together along the sides and under the sleeves. Pin from the wrist edge, down the sleeve underarm, and down the side of the body. Stop pinning 2 1/2 in (6.5 cm) above the bottom hem edge to leave room for the side slits.
Sew the seam from the sleeve edge down to your stopping mark. Backstitch securely at the stopping mark. Press the side seams open, including the unstitched slit allowance at the bottom.
Step 5: Finish the Neckline
Take your length of single-fold bias tape and pin it around the raw edge of the neckline, right sides together. Stitch in the fold crease all the way around the neck opening. Trim the excess tape, fold the tape over to the inside of the top so no bias tape shows from the front, and press. Topstitch close to the inner folded edge to secure the facing.
💡 Designer Tip: Pin your bias tape with lots of tiny pins around the curves so the linen neckline doesn’t stretch out of shape while you sew.
Step 6: Hem the Sleeves and Bottom
Fold the raw edge of each sleeve cuff under by 3/8 in (1 cm), press, then fold under another 3/8 in (1 cm) to enclose the raw edge. Pin and topstitch close to the inner fold. For the bottom hem, fold the front and back lower edges under by 3/8 in (1 cm), press, fold under another 3/8 in (1 cm), pin, and topstitch all the way around, pivoting neatly at the side slits.
✅ Checkpoint: Your finished side slits should measure 2 in (5 cm) tall from the bottom hem to the top of the side seam stitching.
Finishing
Trim any loose thread tails with small snips. Give your finished linen top a final press with a hot iron, steaming out any wrinkles from handling.
Size and Fabric Variations
If you want a longer tunic length, simply add 2 in (5 cm) to the height of both the Front and Back panels when cutting. If you prefer a cotton gauze or lightweight cotton poplin instead of linen, cut using the exact same measurements.
Care Instructions
Wash your linen top in cold water on a gentle machine cycle using mild detergent. Hang it up to air dry while still slightly damp, or tumble dry on low heat. Warm iron on the reverse side while the fabric is slightly damp for a crisp look, or leave unpressed for that casual, lived-in linen texture.
FAQ
Can I sew this top without a serger?
Yes, absolutely. A standard sewing machine zigzag stitch or a faux-overlock stitch along the raw edges works wonderfully to keep the linen from fraying in the wash.
Why do I need to pre-wash linen?
Linen fibers shrink during their first wash. Pre-washing your fabric ensures your finished top won’t become too small or warp after you wear and wash it for the first time.
How do I keep the neckline from stretching out?
Take care not to pull or stretch the neckline fabric while cutting or pinning. Staystitching just inside the seam allowance around the neck curve before attaching the bias tape will keep everything crisp and stable.
Happy Sewing!
I hope you enjoy making and wearing this relaxed linen top as much as I do. Save this pin on Pinterest to keep the instructions handy. If you make one, I would love to see it: send me a photo through the contact page.