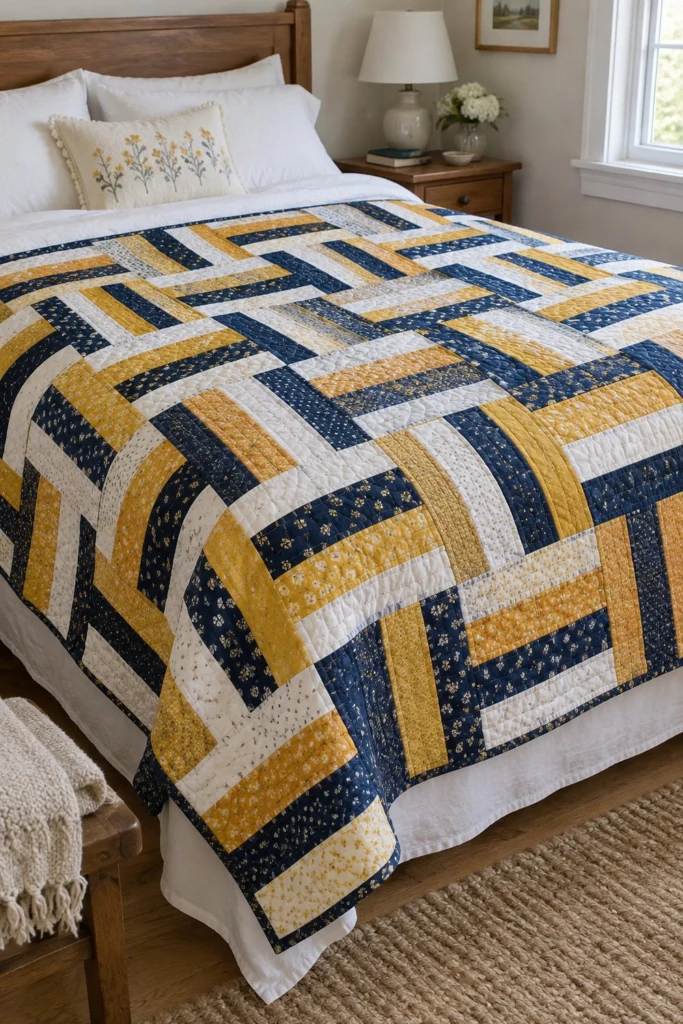
This rail fence quilt looks like woven ribbons, but it goes together much faster than you would expect. By sewing three strips into a set and cutting across them, you get blocks that fit together in a striking checkerboard design without complicated seams.
Quick Facts
- Skill level: Confident beginner
- Finished size: 48 in x 60 in (122 cm x 152.5 cm)
- Block size: 6 in (15 cm) finished
- Fabric: Cotton prints and solids
- Seam allowance: 1/4 in (6 mm)
- Time to make: A weekend
What Makes This Rail Fence Quilt Special
The classic Rail Fence block uses three parallel rectangles. When you rotate alternate blocks in the quilt top, the straight bars suddenly turn corners and create an optical weave. The navy blue prints give the design weight, the mustard yellow adds warmth, and the cream speckle print separates them so the blocks pop against each other.
Finished Size
| Size |
Block Size |
Blocks (Across x Down) |
Finished Dimensions |
| Throw |
6 in (15 cm) |
8 x 10 |
48 in x 60 in (122 cm x 152.5 cm) |
Fabric Requirements
| Fabric |
Used For |
Yards |
Metres |
| Navy Floral Print |
Rail 1 |
22 1/4 |
20.4 |
| Mustard Yellow Print |
Rail 2 |
22 1/4 |
20.4 |
| Cream Speckle Print |
Rail 3 |
22 1/4 |
20.4 |
| Cotton Batting |
Filling |
56 in x 68 in |
142 cm x 173 cm |
| Quilt Backing |
Backing |
3 1/2 |
3.2 |
| Binding Fabric |
Binding |
6 1/4 |
5.8 |
Cutting Instructions
From the Navy Floral Print, cut:
– 48 strips 2 1/2 in x WOF (6.4 cm x WOF); subcut into 320 rectangles 2 1/2 in x 6 1/2 in (6.4 cm x 16.5 cm)
From the Mustard Yellow Print, cut:
– 48 strips 2 1/2 in x WOF (6.4 cm x WOF); subcut into 320 rectangles 2 1/2 in x 6 1/2 in (6.4 cm x 16.5 cm)
From the Cream Speckle Print, cut:
– 48 strips 2 1/2 in x WOF (6.4 cm x WOF); subcut into 320 rectangles 2 1/2 in x 6 1/2 in (6.4 cm x 16.5 cm)
From the Binding Fabric, cut:
– 6 strips 2 1/2 in x WOF (6.4 cm x WOF) for the binding
Assembly
Block Assembly
- Lay out one Navy rectangle, one Mustard rectangle, and one Cream rectangle in a row side by side.
- Place the Navy rectangle right sides together with the Mustard rectangle, aligning the long raw edges. Stitch down the long side using a 1/4 in (6 mm) seam allowance.
- Press the seam allowance toward the darker fabric.
- Add the Cream rectangle to the other side of the Mustard rectangle, right sides together, and stitch. Press the seam toward the Cream fabric.
- You now have a strip set containing all three fabrics. Subcut the strip set crosswise every 2 1/2 in (6.4 cm) to make individual square blocks. You need 80 blocks total for the quilt top.
✅ Checkpoint: Each unfinished block measures 7 in x 7 in (18 cm x 18 cm) square, including the seam allowances.
Quilt Top Assembly
- Arrange your 80 finished blocks on a large table or the floor in 10 rows of 8 blocks each. Rotate alternating blocks by 90 degrees to create the woven zigzag ladder effect shown in the photo.
- Sew the blocks in each row together, pressing the seam allowances in alternating directions for each adjacent row so the seams nest neatly.
- Sew the 10 rows together in order from top to bottom. Pin at the intersecting seams to keep your rails lined up straight.
- Press the final horizontal row seams open or to one side.
Quilting and Binding
- Layer your quilt backing face down, batting in the middle, and the finished quilt top face up. Smooth out any wrinkles and baste the layers together with safety pins or basting spray.
- Quilt as desired. An overall diagonal grid or simple straight-line quilting following the rails works wonderfully and keeps the focus on the piecing. Trim away the excess batting and backing even with the quilt top edge.
- Sew your 6 binding strips together end-to-end with diagonal seams. Fold the strip in half lengthwise with wrong sides together and press.
- Attach the binding to the front of the quilt using a 1/4 in (6 mm) seam, miter the corners, fold it over to the back, and hand-stitch or machine-stitch it down securely.
Size Variations
- Baby Quilt: Make a 4 x 5 block layout for a finished size of 24 in x 30 in (61 cm x 76 cm).
- Twin Quilt: Make a 6 x 12 block layout for a finished size of 36 in x 72 in (91.5 cm x 183 cm).
Care Instructions
Machine wash in cold water on a gentle cycle with mild detergent. Tumble dry on low heat or lay flat to dry. The cotton fabrics will soften up beautifully with every wash.
FAQ
Can I use fat quarters instead of yardage for this quilt?
Yes, fat quarters work well since the strips only need to be 2 1/2 in wide. Just make sure your fat quarters are at least 21 in wide so you can get multiple rectangles out of each strip.
Why do I need to press my seams in alternating directions?
Pressing your vertical row seams one way and the next row the opposite way lets the seams lock together when you sew the rows to each other. This keeps your block corners matching up neatly without bulky lumps.
How do I keep my strip sets from bowing or stretching?
Set your stitch length slightly shorter than standard (around 2.0 or 2.5), do not pull or push the fabric as it feeds through the sewing machine, and press with an iron rather than ironing back and forth.
Happy Quilting!
I hope you enjoy piecing these woven rails as much as I do. Save this pin on Pinterest so you can find it easily later. If you make one, I would love to see it: send me a photo through the contact page.